Easy Apple Pie Cinnamon Roll Bake for a Quick Breakfast
Transform store-bought cinnamon rolls and apple pie filling into a golden, gooey breakfast bake. This simple one-dish recipe is perfect for busy mornings.
Published 7 min read
- Total time
- Prep
- Cook
- Rest
- Serves
- 8
- Makes one 9x13 inch baking dish
- Cuisine
- American
- Calories
- 420
- per serving, estimated

On this page15 sections
Transform your morning routine with this incredibly simple and satisfying apple pie cinnamon roll bake. By combining pre-made cinnamon rolls with classic apple pie filling, you create a decadent breakfast that tastes like a labor of love without the hours of preparation. It is the perfect solution for lazy weekends or when you need to serve a crowd quickly and easily with minimal effort and cleanup.
This dish brings together the warm, spiced notes of apple pie and the soft, sweet dough of cinnamon rolls in one convenient baking dish. The addition of heavy cream ensures that the rolls stay tender and moist, creating a rich sauce that bubbles up around the apples during baking. It is a comforting, crowd-pleasing breakfast that is consistently delicious, whether you are hosting guests or simply looking for a special treat to brighten up a slow Sunday morning at home.
The appeal
Why you’ll love it
The combination of heavy cream and apple filling creates a self-basting environment for the cinnamon rolls. As the dish bakes, the cream and the juices from the apples combine to create a luxurious, syrupy sauce that keeps the dough soft and prevents the bottom from drying out. This method ensures that the rolls absorb the spiced flavors of the filling while maintaining their structure.
Using a ceramic baking dish provides even heat distribution, which is essential for baking dough-based dishes. The ceramic retains heat well, ensuring the edges of the cinnamon rolls crisp slightly while the center remains tender and infused with the apple filling. This approach yields a consistent texture throughout the entire dish, resulting in a perfectly baked breakfast that is easy to portion and serve directly from the oven.
What you need
Ingredients
Makes one 9x13 inch baking dish.
Main
Sauce
Topping
Contains:
- Gluten
- Milk
Tools
Equipment
- 9x13 inch ceramic baking dish
- Spatula
- Measuring cup
- Small ramekin
Swaps
Substitutions
Instead ofHeavy cream
UseHalf-and-half or whole milk can be used for a slightly lighter sauce
Instead ofCinnamon sugar
UseA mixture of 1 tablespoon ground cinnamon and 1 tablespoon granulated sugar
Good to know
Notes
For the best results, use refrigerated cinnamon rolls that are standard in size. If using larger, bakery-style rolls, you may need to adjust the baking time slightly to ensure they cook through. Ensure the apple pie filling is spread in a relatively even layer before adding the rolls to prevent any areas from becoming overly saturated or undercooked during the baking process.
A standard 9x13 inch ceramic baking dish is ideal for this recipe. If you only have a glass dish, reduce the oven temperature by 25°F (15°C) and increase the baking time by about 5 minutes, as glass conducts heat differently. Always ensure the cinnamon rolls are arranged in a single layer to promote uniform cooking and prevent the dough from becoming gummy in the center.
Prep
Before you start
Before starting, ensure your oven is preheated to the correct temperature. Gather all your ingredients and have your 9x13 inch baking dish ready on a stable surface. If you are using refrigerated cinnamon roll cans, keep them chilled until the moment you are ready to cut and assemble the dish, as the dough is much easier to work with when it is cold and firm.
Step by step
Method
Phase 1
Assembly of the Bake
Step 1: Prepare the Base
Preheat the oven to 350°F (175°C). In a large rectangular ceramic baking dish, spread the apple pie filling evenly across the bottom. Take the raw cinnamon roll pieces and nestle them into the apple filling, ensuring they are distributed across the dish in a single layer.
You’ll need: cinnamon rolls · apple pie filling
Look for: The rolls should be evenly spaced among the apples.
Tip: Cutting the rolls into quarters helps them cook faster and more evenly.
Checkpoint
At the end of this phase, the apple filling should be spread evenly across the bottom of the dish, and the cinnamon roll quarters should be arranged in a single, neat layer. The dish should look organized, with the apple filling visible between the pieces of dough, ready for the liquid and sugar toppings.
Phase 2
Adding Moisture and Flavor
Step 2: Add Cream and Sugar
Pour the heavy cream evenly over the arranged cinnamon rolls and apple filling. Finally, sprinkle the cinnamon sugar over the entire dish to ensure a golden, caramelized top once baked.
You’ll need: heavy cream · cinnamon sugar
Look for: The cream should lightly coat the rolls and apple mixture.
Tip: Pour the cream slowly to ensure it reaches the bottom of the dish.
Checkpoint
After pouring the cream and dusting with cinnamon sugar, the dish will look slightly more liquid. The cream should have settled into the gaps between the rolls. Check that the cinnamon sugar is evenly distributed over the top of the rolls, as this will create the signature golden, caramelized crust during the baking process.
Phase 3
Baking to Perfection
Step 3: Bake and Serve
Place the dish in the preheated oven and bake for 25 to 30 minutes, or until the cinnamon rolls are puffed and golden brown. Remove from the oven and let it rest for 5 minutes before serving to allow the sauce to thicken slightly.
Look for: The rolls are golden brown and the filling is bubbly.
Tip: Check the center rolls to ensure they are fully cooked through.
Checkpoint
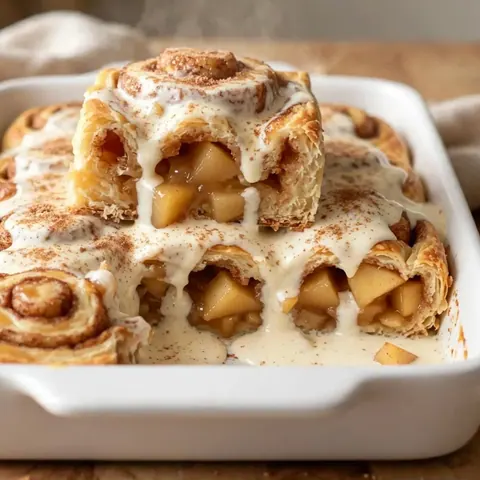
When the dish comes out of the oven, the cinnamon rolls will be puffed up and deep golden brown. The sauce should be bubbling vigorously, and the kitchen should smell intensely of cinnamon and cooked apples. Check that the rolls have achieved a uniform color and that the sauce has reduced slightly before you begin serving.
Doneness
How to tell it’s done
The bake is done when the cinnamon rolls have risen and are golden brown on top. You can gently press the center of one of the rolls; it should feel firm and spring back, indicating that the dough is fully cooked. The apple filling should be bubbling around the edges, and the sauce should have thickened into a rich, syrupy consistency.
Avoid these
Common mistakes
A common mistake is overcrowding the baking dish, which can prevent the rolls from rising properly and leave the center pieces undercooked. Ensure there is enough space between the rolls for the heat to circulate. Another error is failing to let the dish rest after baking; allowing it to sit for 5 minutes helps the sauce set, making it much easier to lift out clean portions.
Better results
Tips
Tip 1
For an extra layer of texture, consider adding a handful of chopped pecans or walnuts over the top before baking. The nuts will toast beautifully in the oven and provide a nice crunch that contrasts with the soft rolls and apples. If you choose to add nuts, sprinkle them on at the same time as the cinnamon sugar to ensure they adhere to the sauce.
Tip 2
If you find that the tops of the cinnamon rolls are browning too quickly before the center is cooked, you can loosely tent the dish with aluminum foil for the final 10 minutes of baking. This protects the sugar topping from burning while allowing the heat to continue cooking the dough through to the center. Remove the foil for the last few minutes to ensure the top stays crisp.
Make it yours
Variations
Caramel Apple Twist
Drizzle a quarter cup of store-bought caramel sauce over the top of the dish immediately after pulling it out of the oven for an extra indulgent, sticky caramel apple flavor.
Spiced Nut Topping
Add a half cup of chopped walnuts or pecans over the cinnamon rolls before baking. The nuts toast during the process, adding a satisfying crunch to every bite.
On the table
Serving suggestions
Serve this bake warm, ideally straight from the oven. It pairs wonderfully with a cup of hot coffee or cold milk, which helps balance the sweetness of the apple and cinnamon. You can use a spatula to lift out individual portions, ensuring each serving includes a generous amount of the caramelized apple filling and the syrupy cream sauce from the bottom of the dish.
If you want to dress up the dish for a special brunch, consider serving each portion with a small scoop of vanilla bean ice cream or a dollop of unsweetened whipped cream. The cool, creamy element contrasts beautifully with the warm, spiced rolls and apples. For a more rustic presentation, serve the dish directly in the baking container and allow guests to scoop their own portions.
Leftovers
Storage & make-ahead
- Fridge
- Keep refrigerated for up to 3 days in an airtight container.
- Freezer
- Freeze for up to 1 month in a freezer-safe container; thaw in the refrigerator overnight before reheating.
- Reheat
- Reheat portions in the microwave for 30-60 seconds or in a 300°F (150°C) oven until warmed through.
Store any leftovers in an airtight container in the refrigerator for up to 3 days. To maintain the best texture, try to keep the rolls in a single layer if possible, though stacking them is acceptable if you are short on space. Always allow the dish to cool completely to room temperature before covering and moving it to the refrigerator to prevent excess condensation.
Make ahead
You can assemble the dish up to 4 hours in advance and keep it covered in the refrigerator. However, do not add the cream or cinnamon sugar until you are ready to bake, as the raw dough may absorb too much liquid if left for too long. If assembling ahead, simply pour the cream and add the sugar topping just before putting the dish into the oven.
Questions
Frequently asked questions
Can this dish be made ahead of time?
Yes, you can assemble the base with the apples and rolls earlier in the day. Keep it refrigerated and add the cream and cinnamon sugar just before baking to ensure the best texture and avoid the dough becoming too soft.
What is the best way to reheat leftovers?
Individual portions can be reheated in the microwave for about 45 seconds. For a crispier texture, place the leftovers in a baking dish and reheat in a 300°F (150°C) oven for about 10-15 minutes until warmed through.
Can a different type of fruit be used instead of apples?
Yes, you can substitute the apple pie filling with other canned fruit pie fillings, such as cherry or peach. The baking time will remain largely the same, though the consistency of the final sauce may vary slightly depending on the fruit.
Everything in one place: the recipe card below gathers the ingredients, steps and estimated nutrition, ready to print.
Recipe card
Easy Apple Pie Cinnamon Roll Bake for a Quick Breakfast
Transform store-bought cinnamon rolls and apple pie filling into a golden, gooey breakfast bake. This simple one-dish recipe is perfect for busy mornings.
- Prep
- Cook
- Rest
- Total
- Servings
- one 9x13 inch baking dish
Ingredients
Main
- 2 cans refrigerated cinnamon rolls, cut into quarters
- 2 cans apple pie filling
Sauce
- 1/2 cup heavy cream
Topping
- 2 tbsp cinnamon sugar
Instructions
Prepare the Base. Preheat the oven to 350°F (175°C). In a large rectangular ceramic baking dish, spread the apple pie filling evenly across the bottom. Take the raw cinnamon roll pieces and nestle them into the apple filling, ensuring they are distributed across the dish in a single layer.
Add Cream and Sugar. Pour the heavy cream evenly over the arranged cinnamon rolls and apple filling. Finally, sprinkle the cinnamon sugar over the entire dish to ensure a golden, caramelized top once baked.
Bake and Serve. Place the dish in the preheated oven and bake for 25 to 30 minutes, or until the cinnamon rolls are puffed and golden brown. Remove from the oven and let it rest for 5 minutes before serving to allow the sauce to thicken slightly.
Allergens: Gluten, Milk
Nutrition (estimated, per serving)
- Calories
- 420 kcal
- Protein
- 5 g
- Carbs
- 62 g
- Fat
- 18 g
- Fiber
- 2 g
- Sugar
- 35 g
- Sodium
- 580 mg
Estimates only: values vary with brands, substitutions and portion sizes.
Recipe by EasyCooks Kitchen · easycooksrecipes.com
Share this recipe
Send it to someone who’d love it, or save it for later.
Spotted a mistake in this recipe? Let us know.
Keep cooking


