Deep-Dish Cheesy Meat Pie for a Hearty Dinner
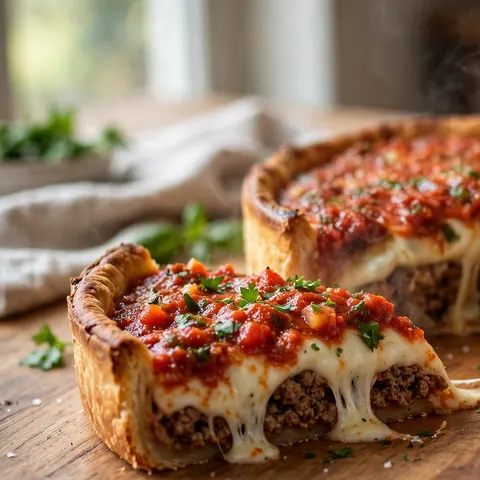
Experience the ultimate comfort food with this deep-dish meat pie, featuring a golden, buttery crust filled with seasoned ground beef and an incredible, stretchy cheese pull.
Published 7 min read
- Total time
- Prep
- Cook
- Rest
- Serves
- 8
- Makes one 9-inch deep-dish pie
- Cuisine
- American
- Calories
- 520
- per serving, estimated

On this page16 sections
Transform humble pantry staples into a show-stopping meal that brings comfort to any table. This deep-dish meat pie is designed for those who appreciate a hearty, satisfying dinner without the need for overly complicated techniques or exotic ingredients.
This recipe focuses on the balance of a flaky, buttery crust and a dense, savory center. By using a deep-dish approach, the pie accommodates a generous amount of seasoned beef and a substantial layer of cheese, creating the signature pull that everyone loves. It is a straightforward, reliable dish that relies on quality ingredients and proper oven management to achieve a golden, crisp exterior and a warm, gooey interior. Whether for a weekend family gathering or a simple midweek dinner, this pie delivers consistent results every time.
The appeal
Why you’ll love it
The deep-dish method works by creating a contained environment where the flavors of the seasoned beef and the melted cheese can meld together without drying out. The bottom crust absorbs the savory juices from the beef, while the top crust stays crisp and protects the filling, resulting in a perfect texture contrast.
Browning the meat thoroughly before assembly is critical because it develops the Maillard reaction, which adds a deep, savory profile that permeates the entire pie. By layering the cheese directly against the hot meat, the filling reaches the ideal melting point quickly, ensuring the characteristic elastic pull throughout the dish.
What you need
Ingredients
Makes one 9-inch deep-dish pie.
Crust
Filling
Topping
Contains:
- Gluten
- Milk
Tools
Equipment
- 9-inch pie dish
- Large skillet
- Spatula
- Pie server
- Cutting board
Swaps
Substitutions
Instead ofGround beef
UseGround turkey or a mixture of ground pork and beef for added flavor depth
Instead ofMozzarella cheese
UseProvolone or fontina for a similar melt and stretch
Good to know
Notes
For the best results, use a high-quality, store-bought refrigerated pie crust that is designed for deep-dish baking. If the crust seems too thin, you can double up or choose a brand that specifically states it is extra-flaky, as this will hold the weight of the dense meat and cheese filling without becoming soggy.
The choice of cheese is vital for the signature pull. Mozzarella is recommended because of its high moisture content and excellent elasticity when melted. If you prefer a more complex flavor, you can mix in a small amount of sharp cheddar or provolone, but keep the mozzarella as the primary component to ensure the texture remains consistent.
Prep
Before you start
Before beginning, ensure all ingredients are at the correct temperature. Take the pie crust out of the refrigerator about 10 minutes before you plan to roll it out to prevent cracking. Have your 9-inch deep-dish pie pan ready on a stable surface. Ensure the oven is fully preheated to 375°F (190°C) before the pie goes in, as a hot oven is necessary to get the crust crisp before the filling gets too hot.
Step by step
Method
Phase 1
Browning the beef
Step 1: Prepare the meat filling
Heat a large skillet over medium-high heat. Add the ground beef and cook, breaking it apart with a spatula, until it is fully browned and no pink remains. The internal temperature must reach 160°F (71°C) to ensure it is safe to eat. Drain any excess grease from the pan.
You’ll need: ground beef
Internal temperature 160°F (71°C)
Look for: The beef should be deeply browned and crumbled into small, uniform pieces.
Tip: Season the meat generously with salt and pepper while it browns to build a strong flavor base.
Checkpoint
The ground beef should be cooked until it is no longer pink and has achieved a deep, caramelized brown color. The fat should be mostly rendered out, leaving the meat moist but not swimming in liquid, which ensures the pie crust stays crisp during the baking phase.
Phase 2
Assembling the layers
Step 2: Assemble the pie
Preheat your oven to 375°F (190°C). Line a 9-inch pie dish with one sheet of the pie crust. Layer the cooked ground beef evenly into the crust, followed by a thick, generous layer of the shredded mozzarella cheese. Cover the pie with the second sheet of crust, crimping the edges to seal it tightly. Cut a few small slits in the top to allow steam to escape during the baking process.
You’ll need: pie crust · ground beef · mozzarella cheese
Look for: The cheese should be packed densely to ensure a consistent, stretchy pull throughout the filling.
Tip: Ensure the edges are well-sealed so the cheese does not leak out while the pie bakes.
Checkpoint
The bottom crust should be pressed firmly into the corners of the pie dish. The beef should be spread in an even layer, and the cheese should be distributed uniformly to the edges. Ensure the top crust covers the filling completely and the edges are crimped tightly to create a sealed unit.
Phase 3
Baking until golden
Step 3: Bake and finish
Place the pie in the preheated oven and bake for 30 to 35 minutes, or until the crust is golden brown and flaky. Remove the pie from the oven and let it rest for 10 minutes. Top the warm pie with the marinara sauce and fresh herbs before serving.
You’ll need: marinara sauce · fresh herbs
Look for: The crust should be deep golden brown and the filling should be bubbling slightly around the edges.
Tip: The resting period is essential to allow the cheese filling to set slightly, which makes serving much cleaner.
Checkpoint
The pie should look puffed and golden brown on top. The edges of the crust should be firm to the touch. If the crust starts to brown too quickly, you can loosely cover the edges with a thin strip of foil to prevent burning while the center continues to cook.
Doneness
How to tell it’s done
The pie is considered done when the crust is a deep, uniform golden brown color. You can test the center by inserting a small knife; it should pass through the filling with slight resistance, indicating the cheese is fully melted and the beef is heated through. The internal temperature of the beef layer should be at least 160°F (71°C).
Avoid these
Common mistakes
Avoid over-crowding the pie dish with too much sauce, as this can make the bottom crust soggy and prevent it from crisping properly. Another common mistake is failing to let the pie rest after baking. Cutting into the pie immediately will cause the molten cheese to spill out, destroying the structure of the slice and making it difficult to serve.
Cook safely
Food safety
Safe internal temperatures
Cook to at least these temperatures, measured with an instant-read thermometer in the thickest part.
| Food | Minimum internal temperature |
|---|---|
| Ground meat | 160°F (71°C) |
Better results
Tips
Tip 1
To achieve a beautiful, glossy finish on the top crust, brush it lightly with a beaten egg wash before baking. This simple step creates a professional-looking sheen and helps the crust develop a richer, deeper color that enhances the overall presentation of the pie when served.
Tip 2
If you find the pie is browning unevenly, rotate the dish halfway through the baking time. This is especially important in ovens that have hot spots or uneven heating elements. Using a pie shield or a ring of aluminum foil can also protect the delicate edges from over-browning while the center reaches the perfect temperature.
Make it yours
Variations
Spicy Meat Pie
Add a teaspoon of red pepper flakes or finely diced jalapeños into the ground beef while it browns to give the pie a subtle, warming heat that pairs perfectly with the marinara sauce.
Vegetable-Packed Pie
Sauté finely chopped onions, bell peppers, and mushrooms with the beef to add extra texture and flavor. Ensure you cook the vegetables until they are soft and the moisture has evaporated.
On the table
Serving suggestions
Serve the pie while it is still warm, ideally about 10 minutes after it comes out of the oven. This ensures the cheese is perfectly melted and stretchy, providing that iconic pull. Use a sharp, serrated knife to cut through the crust cleanly, and use a wide pie server to lift the slices onto individual plates.
Pair the pie with a crisp, acidic side salad to balance the richness of the beef and cheese. A simple vinaigrette dressing cuts through the savory fat and adds a refreshing note to the meal. You can also offer extra marinara sauce on the side for those who prefer an even more intense tomato flavor with every bite.
Leftovers
Storage & make-ahead
- Fridge
- Store in an airtight container for up to 3 days.
- Freezer
- Wrap tightly in foil and store for up to 1 month.
- Reheat
- Reheat in a 350°F oven until the center is hot and the crust is crisp.
Ensure any leftovers are cooled to room temperature within 2 hours, then promptly transfer them to an airtight container and store in the refrigerator. This rapid cooling process is essential for food safety and maintaining the quality of the crust and cheese filling for subsequent meals.
Make ahead
You can prepare the meat filling up to 24 hours in advance and store it in the refrigerator. Assemble the pie right before you are ready to bake it. If you assemble the entire pie ahead of time, keep it in the refrigerator and add about 5 to 10 minutes to the total baking time to account for the colder starting temperature of the filling.
Questions
Frequently asked questions
Can this pie be made ahead of time?
Yes, the meat filling can be cooked and cooled in advance. For the best texture, assemble the pie with the crust and cheese right before you are ready to bake it. This prevents the crust from becoming soggy while sitting in the refrigerator.
What is the best way to get a perfect cheese pull?
The key is using a good quality, low-moisture shredded mozzarella. Avoid pre-shredded cheese with anti-caking agents if possible, as these can affect the melting quality. Let the pie rest for at least 10 minutes after baking so the cheese sets enough to hold together when sliced.
Can other types of cheese be used?
While mozzarella provides the best stretch, you can blend it with other cheeses like provolone, mild fontina, or even a little bit of Monterey Jack. Avoid using very aged cheeses, as they do not melt as smoothly and may result in a oily texture.
Everything in one place: the recipe card below gathers the ingredients, steps and estimated nutrition, ready to print.
Recipe card
Deep-Dish Cheesy Meat Pie for a Hearty Dinner
Experience the ultimate comfort food with this deep-dish meat pie, featuring a golden, buttery crust filled with seasoned ground beef and an incredible, stretchy cheese pull.
- Prep
- Cook
- Rest
- Total
- Servings
- one 9-inch deep-dish pie
Ingredients
Crust
- 2 sheets pie crust, store-bought or made ahead
Filling
- 1.5 lb ground beef
- 2 cups shredded mozzarella cheese
Topping
- 1 cup marinara sauce
- 1 tbsp fresh herbs, chopped
Instructions
Prepare the meat filling. Heat a large skillet over medium-high heat. Add the ground beef and cook, breaking it apart with a spatula, until it is fully browned and no pink remains. The internal temperature must reach 160°F (71°C) to ensure it is safe to eat. Drain any excess grease from the pan.
Assemble the pie. Preheat your oven to 375°F (190°C). Line a 9-inch pie dish with one sheet of the pie crust. Layer the cooked ground beef evenly into the crust, followed by a thick, generous layer of the shredded mozzarella cheese. Cover the pie with the second sheet of crust, crimping the edges to seal it tightly. Cut a few small slits in the top to allow steam to escape during the baking process.
Bake and finish. Place the pie in the preheated oven and bake for 30 to 35 minutes, or until the crust is golden brown and flaky. Remove the pie from the oven and let it rest for 10 minutes. Top the warm pie with the marinara sauce and fresh herbs before serving.
Allergens: Gluten, Milk
Nutrition (estimated, per serving)
- Calories
- 520 kcal
- Protein
- 28.5 g
- Carbs
- 32 g
- Fat
- 31 g
- Fiber
- 2 g
- Sugar
- 3.5 g
- Sodium
- 780 mg
Estimates only: values vary with brands, substitutions and portion sizes.
Recipe by EasyCooks Kitchen · easycooksrecipes.com
Share this recipe
Send it to someone who’d love it, or save it for later.
Spotted a mistake in this recipe? Let us know.
Keep cooking


