Crispy Cheesy Chili Tortilla Cups for a Quick Snack
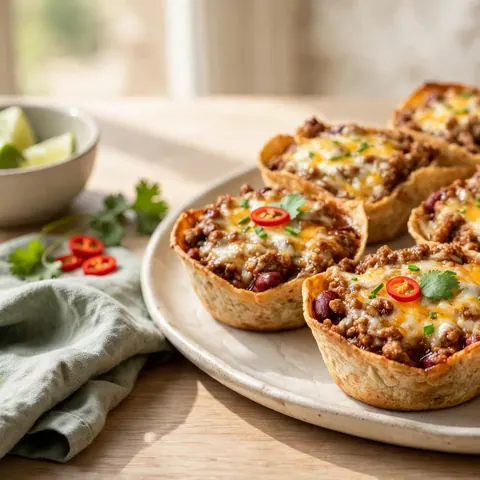
These crispy tortilla cups are filled with hearty beef chili and melted cheddar cheese. They provide a satisfying crunch and a delicious, savory flavor in every bite.
Published 9 min read
- Total time
- Prep
- Cook
- Serves
- 4
- Makes 8 tortilla cups
- Cuisine
- Mexican-American
- Calories
- 280
- per serving, estimated

On this page16 sections
Discover how to transform simple tortillas into crunchy, cheesy snack cups that are packed with savory beef chili. This recipe is an ideal solution for quick gatherings or an easy weeknight treat that everyone will enjoy. With a few basic ingredients and minimal effort, you can create a restaurant-quality appetizer right in your own home kitchen. The combination of crispy textures and melted cheese makes these cups an absolute favorite for any occasion requiring a delicious, handheld snack that packs a serious flavor punch.
These cheesy chili tortilla cups are the ultimate crowd-pleasing snack. By using flour tortillas as a base, you achieve a light, crispy shell that perfectly holds a hearty mixture of seasoned ground beef and gooey melted cheddar. The addition of fresh red chilies provides a subtle kick that balances the richness of the meat and cheese. Whether you are hosting a game night or simply looking for a satisfying afternoon bite, these cups are straightforward to assemble, quick to bake, and incredibly fun to eat. Follow these steps to master the art of the perfect crispy tortilla cup.
The appeal
Why you’ll love it
The method of pre-baking the tortilla shells before adding the filling is essential for achieving the perfect crunch. By shaping the tortillas into muffin cups and baking them first, you ensure that the crust remains crispy even after the moist beef chili is added. This technique prevents the tortillas from becoming soggy, which is a common issue when filling soft shells. The result is a structure that is sturdy enough to hold the weight of the ingredients while providing a satisfying texture in every bite.
Using a muffin tin is the secret to uniform, perfectly shaped cups. The tin provides consistent heat distribution, allowing the tortillas to crisp up evenly on all sides. This also makes the assembly process much faster, as you can prepare multiple servings simultaneously. By baking in batches, you can keep the process organized and efficient. The uniform size also ensures that each cup cooks at the same rate, resulting in a consistent level of doneness for the cheese topping across all servings.
What you need
Ingredients
Makes 8 tortilla cups.
Shells
Filling
Topping
Contains:
- Gluten
- Milk
Tools
Equipment
- Muffin tin
- Skillet
- Spatula
- Baking dish
Swaps
Substitutions
Instead ofFlour tortillas
UseCorn tortillas work well for a slightly different texture and flavor profile.
Instead ofCheddar cheese
UseMonterey jack or pepper jack cheese can be used for extra creaminess or heat.
Good to know
Notes
For the best results, use standard flour tortillas as they crisp up beautifully in the oven. If you prefer a different texture, corn tortillas can be used, though they may require a slightly longer baking time to reach the desired level of crispness. Ensure the ground beef is well-drained after cooking to prevent excess moisture from compromising the structural integrity of the tortilla cups. You can also experiment with different types of cheese, such as a sharp cheddar or a Mexican blend, to customize the flavor profile to your liking.
The equipment used in this recipe is minimal, requiring only a standard muffin tin and a skillet. The muffin tin is crucial for maintaining the shape of the cups during the baking process. If you do not have a muffin tin, you can use individual ramekins, though you will need to adjust the number of cups accordingly. The skillet used for the beef should be large enough to allow for even browning. Keep a spatula handy for breaking up the meat and a spoon for filling the cups efficiently.
Prep
Before you start
Before beginning, ensure that your workspace is clean and that you have all your ingredients measured and ready. Preheat your oven to the specified temperature to ensure it is fully heated when you are ready to bake. If you are using fresh chilies, wash them thoroughly and slice them into thin rounds before you start cooking the beef. Having your ingredients prepped in advance will make the assembly process smooth and efficient, allowing you to focus on achieving the perfect crispy texture for your tortilla cups.
Step by step
Method
Phase 1
Baking the Tortilla Shells
Step 1: Prepare the Tortilla Cups
Preheat your oven to 375°F (190°C). Gently press each flour tortilla into the cups of a muffin tin to create a bowl shape. Place the muffin tin in the oven and bake for about 5 to 7 minutes until the edges are light golden brown and hold their shape firmly.
You’ll need: flour tortillas
Look for: The tortillas should feel crisp and hold their shape when removed from the oven.
Tip: Ensure the tortillas are pressed firmly into the bottom of the muffin cups to create a deep enough well for the filling.
Checkpoint
At the end of this phase, the tortillas should be light golden brown and hold a firm, bowl-like shape in the muffin tin. They should feel dry and crispy when touched lightly. If they appear soft or pale, bake them for an additional minute or two until they reach the correct color and texture, as this foundation is critical for the final result.
Phase 2
Cooking the Beef Filling
Step 2: Cook the Beef Chili
While the tortillas are baking, heat a large skillet over medium-high heat. Add the ground beef and cook, breaking it apart with a spatula, until it is browned and cooked through to an internal temperature of 160°F (71°C). Drain any excess fat from the skillet before proceeding to the assembly phase.
You’ll need: ground beef
Internal temperature 160°F (71°C)
Look for: The beef should be browned throughout with no visible pink remaining.
Tip: Season the beef with your favorite chili spices while cooking to enhance the overall flavor of the filling.
Checkpoint
The ground beef should be fully browned with no visible pink areas remaining. The texture should be uniform, with no large clumps of meat. After draining the fat, the mixture should smell savory and aromatic. Ensure the beef is cooked through to the correct internal temperature before you begin the assembly step, which will combine the filling with the crispy shells.
Phase 3
Final Baking with Cheese
Step 3: Assemble and Bake
Spoon the cooked beef chili into the prepared tortilla cups. Top each cup generously with shredded cheddar cheese and a few slices of red chili. Return the muffin tin to the oven and bake for another 5 to 8 minutes, or until the cheese is completely melted and bubbly.
You’ll need: shredded cheddar cheese · red chilies
Look for: The cheese should be fully melted and slightly browned at the edges for a perfect finish.
Tip: Do not overfill the cups to ensure the cheese melts evenly without spilling over the sides of the tortilla.
Checkpoint
At the end of this phase, the cheese should be fully melted, smooth, and bubbling throughout the cups. The red chilies should be slightly softened by the heat. The entire dish should look cohesive and appetizing, with the golden edges of the tortilla cups providing a beautiful contrast to the savory beef and melted cheese. Carefully remove the tin from the oven and let it cool slightly.
Doneness
How to tell it’s done
The beef chili is done when it reaches an internal temperature of 160°F (71°C) to ensure it is cooked safely. You can verify this with a meat thermometer inserted into the thickest part of the beef mixture. The tortilla cups are done when they are golden brown and crisp to the touch. The cheese should be completely melted and bubbly, indicating that the final baking stage is complete and the appetizer is ready to be served hot from the oven.
Avoid these
Common mistakes
A common mistake is failing to drain the ground beef adequately, which can lead to soggy tortilla shells. Always drain the excess fat after browning the meat. Another error is overfilling the cups, which can cause the cheese to spill over and make it difficult to remove the cups from the tin. Finally, ensure you do not skip the pre-baking step for the tortillas, as this is critical for achieving that signature crunch. If the tortillas are not pre-baked, they will not hold their shape or texture.
Cook safely
Food safety
Safe internal temperatures
Cook to at least these temperatures, measured with an instant-read thermometer in the thickest part.
| Food | Minimum internal temperature |
|---|---|
| Ground meat | 160°F (71°C) |
Better results
Tips
Tip 1
To add extra flavor to your beef filling, consider adding a dash of cumin or chili powder while browning the meat. These spices complement the cheddar cheese perfectly and elevate the overall taste of the dish. You can also experiment with adding finely diced onions or bell peppers to the beef mixture during the cooking phase for added texture and complexity. Always adjust the seasoning to your preference, but remember to keep the flavor profile balanced so it does not overpower the crispy tortilla shell.
Tip 2
For a more polished presentation, garnish the finished cups with a dollop of sour cream or a sprinkle of fresh cilantro before serving. These additions provide a cool, creamy contrast to the warm, savory filling and add a pop of color to the dish. If you are serving these as an appetizer, consider placing them on a decorative platter to make them more inviting for your guests. The combination of textures and temperatures is what makes these tortilla cups a memorable and delicious snack.
Make it yours
Variations
Spicy Jalapeño Cups
Add finely diced fresh jalapeños to the beef mixture during the cooking phase for a significantly spicier kick. Top with extra cheese to balance the heat.
Vegetarian Bean Cups
Substitute the ground beef with a mixture of black beans and corn. Season with cumin and chili powder for a savory, plant-based version of this appetizer.
On the table
Serving suggestions
Serve these cheesy chili tortilla cups immediately after they come out of the oven to enjoy the best texture and flavor. They are best when the cheese is still warm and melted, and the tortilla shell is at its crispest. Arrange them on a serving tray and provide small napkins for guests, as these are intended to be handheld snacks. The contrast between the crispy shell and the savory filling makes them a perfect addition to any casual gathering or party spread.
For a more substantial meal, you can serve these cups alongside a fresh side salad or a bowl of vegetable soup. The lightness of the salad balances the richness of the beef and cheese, creating a well-rounded dining experience. If you are serving them as a main dish, consider offering a variety of toppings like salsa, guacamole, or pickled jalapeños on the side, allowing your guests to customize their cups to their own personal taste preferences and heat levels.
Leftovers
Storage & make-ahead
- Fridge
- Store in an airtight container in the refrigerator for up to 3 days. Ensure leftovers cool at room temperature for no more than 2 hours before refrigerating.
- Reheat
- Reheat in a 350°F (175°C) oven for 5 to 10 minutes until warmed through and the cheese is melted. Avoid using the microwave as it will make the tortillas soggy.
If you have leftovers, allow them to cool completely at room temperature for no more than 2 hours before transferring them to an airtight container. Store them in the refrigerator, where they will remain fresh for up to three days. Keep in mind that the tortilla shells may lose some of their crispness when stored, so it is best to consume them as soon as possible after cooking for the best texture and flavor experience.
Make ahead
You can prepare the beef filling up to 24 hours in advance and store it in the refrigerator until you are ready to assemble. The tortilla cups can also be pre-baked a few hours before serving and stored in an airtight container at room temperature. When you are ready to eat, simply fill the cups with the pre-cooked beef, top with cheese and chilies, and bake according to the instructions. This approach saves time and ensures a fresh, hot appetizer for your guests.
Questions
Frequently asked questions
Can these be made ahead of time?
Yes, you can prepare the beef filling and pre-bake the tortilla shells in advance. Store them separately and assemble with the cheese and chilies just before the final baking step.
What is the best way to keep the shells crispy?
The key is to pre-bake the empty tortilla shells in the muffin tin until they are golden and firm. Avoid adding the beef filling until just before the final bake to prevent sogginess.
Can a different type of meat be used?
Yes, ground turkey or ground chicken can be substituted for the ground beef. Ensure that whichever protein you use is fully cooked to its required safe internal temperature before assembly.
Everything in one place: the recipe card below gathers the ingredients, steps and estimated nutrition, ready to print.
Recipe card
Crispy Cheesy Chili Tortilla Cups for a Quick Snack
These crispy tortilla cups are filled with hearty beef chili and melted cheddar cheese. They provide a satisfying crunch and a delicious, savory flavor in every bite.
- Prep
- Cook
- Total
- Servings
- 8 tortilla cups
Ingredients
Shells
- 8 small flour tortillas
Filling
- 1 lb ground beef
- 1 cup shredded cheddar cheese
Topping
- 2 sliced red chilies
Instructions
Prepare the Tortilla Cups. Preheat your oven to 375°F (190°C). Gently press each flour tortilla into the cups of a muffin tin to create a bowl shape. Place the muffin tin in the oven and bake for about 5 to 7 minutes until the edges are light golden brown and hold their shape firmly.
Cook the Beef Chili. While the tortillas are baking, heat a large skillet over medium-high heat. Add the ground beef and cook, breaking it apart with a spatula, until it is browned and cooked through to an internal temperature of 160°F (71°C). Drain any excess fat from the skillet before proceeding to the assembly phase.
Assemble and Bake. Spoon the cooked beef chili into the prepared tortilla cups. Top each cup generously with shredded cheddar cheese and a few slices of red chili. Return the muffin tin to the oven and bake for another 5 to 8 minutes, or until the cheese is completely melted and bubbly.
Allergens: Gluten, Milk
Nutrition (estimated, per serving)
- Calories
- 280 kcal
- Protein
- 14 g
- Carbs
- 18 g
- Fat
- 16 g
- Fiber
- 2 g
- Sugar
- 1 g
- Sodium
- 450 mg
Estimates only: values vary with brands, substitutions and portion sizes.
Recipe by EasyCooks Kitchen · easycooksrecipes.com
Share this recipe
Send it to someone who’d love it, or save it for later.
Spotted a mistake in this recipe? Let us know.
Keep cooking


