Crispy Parmesan Potato Roses for Elegant Dinners
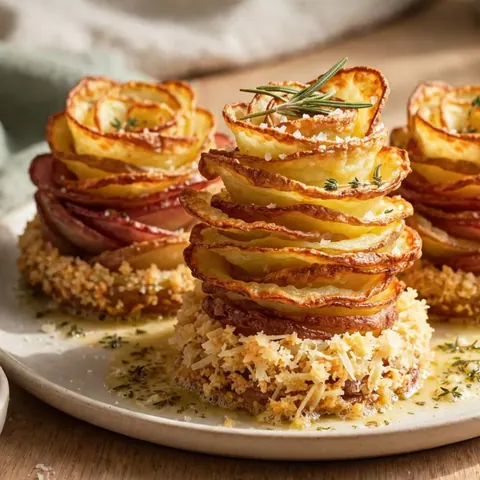
These stunning potato roses feature delicate, spiral-wound layers of red and gold potatoes tossed in garlic-thyme butter and parmesan, baked until perfectly crispy.
Published 8 min read
- Total time
- Prep
- Cook
- Rest
- Serves
- 6
- Makes 12 potato roses
- Cuisine
- French-American
- Calories
- 240
- per serving, estimated

On this page15 sections
Elevate the humble potato into a sculptural masterpiece that captures the essence of fine dining. These crispy parmesan potato roses are the ultimate showstopper for any dinner table, combining the deep, savory crunch of caramelized parmesan with the tender, buttery layers of thinly sliced potatoes. Each portion is perfectly individual, making them as convenient to serve as they are beautiful to behold. Prepare for a dish that tastes just as incredible as it looks.
These parmesan potato roses are a sophisticated way to serve potatoes, perfect for dinner parties or special occasions. By slicing the potatoes into paper-thin rounds and layering them in a muffin tin, you create individual stacks that crisp up beautifully in the oven. The combination of garlic-thyme butter and aged parmesan creates a rich, umami-packed flavor profile that complements any main course. Follow these steps to achieve a perfectly golden, rose-like presentation that will impress guests and satisfy every craving for a crispy, savory side dish.
The appeal
Why you’ll love it
The muffin tin method is essential for success because it forces the potato slices into a vertical, rose-like arrangement. As the potatoes bake, the butter and parmesan melt together to create a crispy, golden-brown crust at the base—often referred to as frico—while the upper petals are exposed to the direct heat of the oven, allowing them to turn thin and shatteringly crisp like a potato chip.
Precision in slicing is key to this recipe. By using a mandoline, you ensure the potatoes are a consistent 1.5mm thickness. This uniformity is what allows the roses to hold their structure and cook evenly throughout. When the potatoes are too thick, they remain soft and limp; when they are thin, they achieve that delicate, fanned-out texture that defines a perfect, restaurant-quality potato rose.
What you need
Ingredients
Makes 12 potato roses.
Main Ingredients
Seasoning
Garnish
Contains:
- Milk
Tools
Equipment
- Mandoline slicer
- Large mixing bowl
- Muffin tin
- Pastry brush
Swaps
Substitutions
Instead ofParmigiano-Reggiano
UsePecorino Romano or any hard, aged Italian-style cheese
Instead ofGarlic-thyme butter
UseMelted unsalted butter mixed with fresh minced garlic and dried thyme
Good to know
Notes
For the best results, use a mix of red and gold potatoes. The different skin colors add visual contrast to the edges of the petals, enhancing the 'rose' appearance. If you cannot find both, one variety works perfectly well, though the visual impact is slightly less pronounced. Always use a high-quality, aged Parmigiano-Reggiano, as the salt content and texture are vital for the frico base that forms at the bottom of the muffin tin.
Equipment choice plays a significant role in the outcome. A standard 12-cup muffin tin is the ideal size for these individual portions. If using a non-stick tin, extra butter is still recommended to ensure the cheese-laden bases release easily without sticking. Ensure the mandoline is set to the correct thickness; even a slight variation can affect the total baking time required for the petals to reach the desired level of crispness.
Prep
Before you start
Before beginning, ensure all potatoes are thoroughly scrubbed to remove any dirt. Use a sharp mandoline slicer to achieve consistent 1.5mm slices, as this is the most critical step for the final texture. Preheat the oven to 400°F (200°C) well in advance to ensure the heat is stable. Prepare the garlic-thyme butter by melting it gently and infusing the aromatics, and have your muffin tin greased and ready to receive the rosebuds. Organize your workspace to maintain a fluid assembly process.
Step by step
Method
Phase 1
Slicing and Seasoning
Step 1: Slice and Season Potatoes
Using a mandoline, carefully slice the scrubbed red and gold potatoes into thin, 1.5mm translucent rounds. Place the slices in a large mixing bowl and pour the melted garlic-thyme butter over them. Add the grated Parmigiano-Reggiano and toss thoroughly until every potato slice is evenly coated with the butter and cheese mixture.
You’ll need: red and gold potatoes · melted garlic-thyme butter · grated Parmigiano-Reggiano
Look for: Potatoes should be coated evenly in the butter and cheese mixture.
Tip: Keep the potato slices uniform in thickness to ensure they cook at the same rate.
Checkpoint
The potato slices should be uniform and translucent. After tossing with the garlic-thyme butter and parmesan, every surface of every slice must be coated. The mixture should smell fragrant with garlic and herbs, and you should feel the tackiness of the cheese on the potatoes, indicating they are ready to be layered into the tin.
Phase 2
Rosebud Assembly
Step 2: Assemble the Rosebuds
Generously grease the cups of a standard muffin tin with extra butter. Take the potato rounds and begin layering them in an overlapping fashion to form a tight, spiral-wound rosebud shape. Place each assembled rosebud directly into a muffin tin cup. Ensure they are packed tightly so they maintain their floral structure during the baking process.
You’ll need: red and gold potatoes
Look for: The potatoes should look like tight rosebuds fanning out in the cups.
Tip: Start from the center and spiral outwards for the best aesthetic shape.
Checkpoint
Each muffin cup should contain a tightly packed, spiral-wound rosebud. The edges of the potato slices should be fanned out slightly to mimic petals. Check that the roses are stable and do not collapse when you lift the tin slightly. This structure is what allows for the characteristic opening of the petals during the high-heat baking process.
Phase 3
Baking and Finishing
Step 3: Bake and Serve
Preheat the oven to 400°F (200°C). Place the muffin tin in the center of the oven and bake for 40 minutes. The butter will bubble in the cups, frying the base in parmesan frico while the top petals open and crisp into amber edges. Once baked, remove the tin from the oven and carefully lift the roses out with a fork. Sprinkle with flaky salt and fresh rosemary before serving.
You’ll need: flaky salt · rosemary
Look for: The edges should be golden-brown and crispy while the base is fried.
Tip: Let the roses rest for a few minutes in the tin before removing to ensure they hold their shape.
Checkpoint
Look for a deep golden-brown color on the petal edges. The butter in the cups should be bubbling aggressively, which signifies the frying process is occurring at the base. Once removed from the oven, the roses should hold their shape when lifted. A final sprinkle of flaky salt and fresh rosemary provides the perfect finish to the dish.
Doneness
How to tell it’s done
The potato roses are done when the top petals are golden-brown and feel firm to the touch, indicating they have reached a crisp, chip-like texture. The base of the roses should be fried in the rendered parmesan and butter, forming a solid, crispy crust that releases cleanly from the muffin tin. If the petals are still soft, continue baking for an additional 3 to 5 minutes, as the moisture content of potatoes can vary slightly.
Avoid these
Common mistakes
A common mistake is slicing the potatoes too thickly, which prevents them from fanning out and becoming crispy. Another error is failing to grease the muffin tin sufficiently, causing the cheese-based crust to stick to the metal. Overcrowding the roses in the tin can also hinder the airflow, leading to uneven browning. Finally, using a cheese that does not melt or crisp well, such as a pre-shredded variety with anti-caking agents, will prevent the formation of the necessary parmesan frico base.
Better results
Tips
Tip 1
To achieve the perfect 'rose' shape, start by placing the smallest potato slices in the center of the muffin cup and layer the larger slices around them. This creates a natural taper that mimics a blooming flower. If a rosebud feels loose, add another small slice to the center to tighten the structure. A tighter roll results in a more dramatic, fanned-out effect once the potatoes have finished baking in the oven.
Tip 2
If you find the edges are browning too quickly before the center is cooked, you can loosely tent the muffin tin with aluminum foil for the first 20 minutes of baking. Remove the foil for the final 20 minutes to allow the petals to achieve that signature shatter-crisp texture. This technique is particularly useful if your oven runs hot or if the potato slices are slightly thicker than 1.5mm.
Make it yours
Variations
Truffle Parmesan Roses
Add a teaspoon of high-quality truffle oil to the melted butter mixture before tossing the potatoes. This adds an earthy aroma that pairs beautifully with the aged parmesan and crispy texture.
Spicy Paprika Roses
Stir a half-teaspoon of smoked paprika into the butter mixture for a subtle, smoky heat that complements the garlic and parmesan, giving the roses a beautiful reddish hue.
On the table
Serving suggestions
These potato roses are best served immediately after baking while the petals are at their crispiest. Arrange them on a platter as a sophisticated side dish for roasted meats or poultry. The individual portions make them ideal for elegant dinner party plating, where each guest receives their own perfectly formed rose. Provide a small fork or appetizer tongs to help guests lift them from the platter without disturbing the delicate petals.
Pair these potatoes with a simple green salad or roasted vegetables to balance the richness of the parmesan and butter. The flaky salt and fresh rosemary added at the end are not just for garnish; they enhance the savory notes of the dish. Serve them at a temperature that allows the flavors to be fully appreciated—warm, but not piping hot—to ensure the texture of the crispy edges remains the highlight of every bite.
Leftovers
Storage & make-ahead
- Fridge
- Store in an airtight container for up to 3 days. Cool completely at room temperature for no more than 2 hours before placing in the refrigerator.
- Reheat
- Reheat in a preheated 375°F (190°C) oven for 5 to 10 minutes until the edges are crispy again. Do not use a microwave, as it will make the potatoes soggy.
Store any leftovers in an airtight container in the refrigerator for up to 3 days. To maintain the best texture, keep them separated by parchment paper if possible. Avoid storing them in a sealed container while still hot, as the steam will soften the crisp edges, turning the potatoes limp. Reheating is required to bring back the original texture and flavor profile of the dish.
Make ahead
You can assemble the potato roses up to 2 hours before baking. Keep the filled muffin tin covered in the refrigerator until you are ready to bake. If preparing further in advance, toss the potato slices in the butter and cheese, but assemble the roses just before the oven is ready to ensure the potatoes do not oxidize or release excess moisture, which can affect the final crispness of the petals.
Questions
Frequently asked questions
Can these be made ahead of time?
Yes, you can assemble the roses in the muffin tin up to 2 hours before baking. Keep them refrigerated until the oven is preheated. However, for the crispiest texture, it is best to bake them fresh just before serving.
Why do potato roses lose their shape?
This usually happens if the roses are not packed tightly enough into the muffin tin. Ensure the potato slices are overlapping properly and that the rosebud is snug within the cup. This tension is necessary to maintain the shape during the baking process.
Can a different type of cheese be used?
While Parmigiano-Reggiano is recommended for its ability to form a crispy frico, other hard, aged cheeses like Pecorino Romano or Grana Padano are suitable alternatives. Avoid soft cheeses, as they will not provide the necessary crust.
Everything in one place: the recipe card below gathers the ingredients, steps and estimated nutrition, ready to print.
Recipe card
Crispy Parmesan Potato Roses for Elegant Dinners
These stunning potato roses feature delicate, spiral-wound layers of red and gold potatoes tossed in garlic-thyme butter and parmesan, baked until perfectly crispy.
- Prep
- Cook
- Rest
- Total
- Servings
- 12 potato roses
Ingredients
Main Ingredients
- 600 g red and gold potatoes, sliced into 1.5mm rounds
Seasoning
- 50 g melted garlic-thyme butter
- 70 g grated Parmigiano-Reggiano
Garnish
- 1/2 tsp flaky salt, for serving
- 1 tbsp fresh rosemary, for serving
Instructions
Slice and Season Potatoes. Using a mandoline, carefully slice the scrubbed red and gold potatoes into thin, 1.5mm translucent rounds. Place the slices in a large mixing bowl and pour the melted garlic-thyme butter over them. Add the grated Parmigiano-Reggiano and toss thoroughly until every potato slice is evenly coated with the butter and cheese mixture.
Assemble the Rosebuds. Generously grease the cups of a standard muffin tin with extra butter. Take the potato rounds and begin layering them in an overlapping fashion to form a tight, spiral-wound rosebud shape. Place each assembled rosebud directly into a muffin tin cup. Ensure they are packed tightly so they maintain their floral structure during the baking process.
Bake and Serve. Preheat the oven to 400°F (200°C). Place the muffin tin in the center of the oven and bake for 40 minutes. The butter will bubble in the cups, frying the base in parmesan frico while the top petals open and crisp into amber edges. Once baked, remove the tin from the oven and carefully lift the roses out with a fork. Sprinkle with flaky salt and fresh rosemary before serving.
Allergens: Milk
Nutrition (estimated, per serving)
- Calories
- 240 kcal
- Protein
- 6.5 g
- Carbs
- 22 g
- Fat
- 15 g
- Fiber
- 2.5 g
- Sugar
- 0.8 g
- Sodium
- 320 mg
Estimates only: values vary with brands, substitutions and portion sizes.
Recipe by EasyCooks Kitchen · easycooksrecipes.com
Share this recipe
Send it to someone who’d love it, or save it for later.
Spotted a mistake in this recipe? Let us know.
Keep cooking


