Brown Sugar Pear Biscuit Cobbler for a Cozy Dessert
This simple cobbler pairs tender, warm pears with a buttery brown sugar glaze and golden biscuit topping. It is the perfect comforting dessert for any occasion.
Published 7 min read
- Total time
- Prep
- Cook
- Rest
- Serves
- 8
- Makes one 9x13 inch baker
- Cuisine
- Southern
- Calories
- 380
- per serving, estimated

On this page15 sections
Transform simple pantry staples into a sophisticated, rustic dessert that captures the essence of comfort. This brown sugar pear biscuit cobbler creates a perfect harmony of tender, caramelized fruit and pillowy pastry, making it an ideal choice for family gatherings or quiet evenings at home.
This cobbler is designed for those who appreciate the classic combination of fruit and warm dough. By using thin, fanned pear slices, the fruit cooks evenly and absorbs the rich, spiced brown sugar glaze, while the biscuit topping provides a light, buttery contrast. It is a straightforward, reliable recipe that relies on high-quality fruit and proper baking techniques to deliver consistent results every single time you prepare it.
The appeal
Why you’ll love it
The method of fanning the pears ensures that the heat penetrates the fruit evenly, allowing the natural sugars to caramelize alongside the brown sugar and cinnamon glaze. This creates a deep, complex flavor profile that permeates every bite of the cobbler, rather than just sitting on the surface.
By placing the biscuit dough directly onto the fruit, the bottom of the biscuits absorbs the aromatic juices released during baking. This results in a dumpling-like texture on the bottom of the biscuit, while the top remains golden and crisp, providing a varied and satisfying mouthfeel in every spoonful.
What you need
Ingredients
Makes one 9x13 inch baker.
Glaze
Topping
Contains:
- Gluten
- Milk
Tools
Equipment
- 9x13 inch enameled baker
- Mixing bowl
- Measuring cups
- Measuring spoons
- Peeler
- Knife
- Serving spoon
Swaps
Substitutions
Instead ofBrown sugar
UseCoconut sugar or maple sugar for a slightly different depth of flavor
Instead ofRefrigerated biscuit dough
UseA simple homemade drop biscuit batter made with flour, butter, and milk
Good to know
Notes
Select firm-ripe pears such as Bosc or Anjou for this recipe. These varieties hold their structure well under heat, preventing the cobbler from becoming mushy. Avoid using overly soft or bruised fruit, as the texture will not be as pleasant after the baking process is complete.
The choice of baking dish is important; an enameled baker or a glass dish works best to promote even heat distribution and allows you to monitor the browning of the biscuits. Ensure the oven is fully preheated before placing the cobbler inside to achieve the perfect rise on the biscuit dough.
Prep
Before you start
Before beginning, ensure all ingredients are at room temperature to help the baking process. Peel and slice your pears carefully, aiming for consistent thickness to ensure they finish cooking at the same time. Have your baking dish ready and clear a workspace to assemble the components without rushing. Ensure your oven is preheated to the correct temperature, as this is vital for the biscuits to rise properly and achieve a golden crust.
Step by step
Method
Phase 1
Pear Preparation
Step 1: Prepare the Pears
Preheat the oven to 375°F (190°C). Peel, core, and slice the pears into thin, uniform pieces. Arrange the pear slices in the bottom of a large 9x13 inch rectangular baker, fanning them out in neat rows to ensure even cooking throughout the dish.
You’ll need: pears
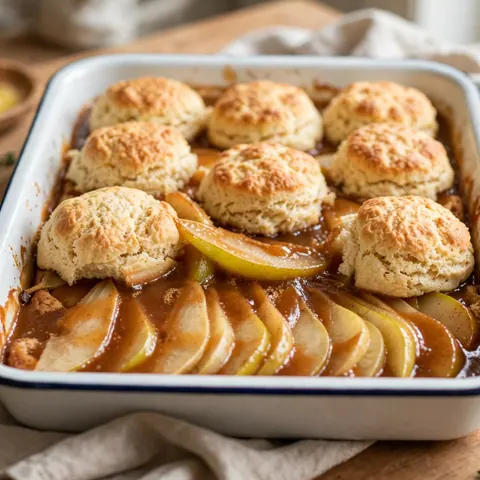
Look for: The pears should be arranged in tight, overlapping rows covering the entire bottom of the baking dish.
Tip: Using ripe but firm pears helps them maintain their shape while becoming tender during the baking process.
Checkpoint
The pears should be neatly arranged in rows, filling the bottom of the pan completely. They should be uniform in thickness to guarantee even cooking. Check that no large gaps are left, as this will help the syrup distribute evenly during the baking phase.
Phase 2
Glazing and Assembly
Step 2: Apply the Glaze and Topping
In a small bowl, whisk together the melted butter, brown sugar, and ground cinnamon until smooth. Drizzle this mixture evenly over the fanned pear slices. Carefully place the pieces of refrigerated biscuit dough on top of the pears, spacing them out to allow room for rising while baking.
You’ll need: unsalted butter · brown sugar · ground cinnamon · refrigerated biscuit dough
Look for: The brown sugar and butter mixture should coat all the pears, and the biscuits should be distributed evenly across the surface.
Tip: Ensure the butter is thoroughly melted so the sugar dissolves into a smooth syrup that reaches every pear slice.
Checkpoint
The brown sugar and butter mixture must be thoroughly whisked to combine the cinnamon evenly. Once drizzled, the syrup should coat all pear slices. The biscuits should be placed deliberately, ensuring they are not touching, to allow the heat to circulate properly during the baking process.
Phase 3
Final Bake
Step 3: Bake and Serve
Place the baker in the preheated oven and bake for 30 to 35 minutes. Monitor the progress until the biscuits are golden brown and the pear syrup is bubbling vigorously around the edges of the dish. Remove from the oven and let it rest for 10 minutes before serving warm.
Look for: The biscuits must be golden brown on top, and the syrup should be thick and bubbling at the edges of the pan.
Tip: If the biscuits brown too quickly, cover the dish loosely with aluminum foil for the final minutes of baking.
Checkpoint
The final indicator of success is the appearance of the bubbling syrup and the deep golden color of the biscuits. The aroma should be sweet and spiced, filling the kitchen. Ensure the dish is allowed to rest, which helps the syrup thicken slightly before serving.
Doneness
How to tell it’s done
The cobbler is perfectly done when the biscuit topping has puffed up and turned a deep golden brown. The fruit underneath should be soft and tender when pierced with a fork, and the glaze should be bubbling thick and dark around the edges of the pan. The internal temperature of the fruit itself is less critical than the visual cues of the bubbling syrup and the browned crust.
Avoid these
Common mistakes
A common mistake is slicing the pears too thick, which prevents them from softening adequately while the biscuits bake. Conversely, slicing them too thin can lead to a watery result. Another error is overloading the top with too many biscuits; ensure there is adequate space between them so they have room to expand and bake through without becoming dense or doughy in the center.
Better results
Tips
Tip 1
For an extra layer of flavor, consider adding a pinch of salt to the butter and sugar mixture. This subtle addition enhances the caramel notes and balances the natural sweetness of the pears, providing a more complex and well-rounded flavor profile that will impress everyone at the table.
Tip 2
If you find that the edges of the biscuits are browning faster than the center, you can loosely tent the baking dish with aluminum foil for the last ten minutes of the bake. This allows the fruit and the biscuit centers to finish cooking without the risk of burning the delicate edges.
Make it yours
Variations
Spiced Apple Variation
Substitute the pears with peeled, cored, and sliced Granny Smith apples. The tartness of the apples pairs beautifully with the brown sugar and cinnamon, creating a classic orchard-inspired dessert that offers a slightly firmer texture than the pear version.
Nutty Crunch Topping
Before baking, sprinkle a handful of chopped pecans or walnuts over the biscuit dough. This adds a delightful crunch and an earthy flavor that complements the sweetness of the pears and the richness of the brown sugar glaze perfectly.
On the table
Serving suggestions
Serve the cobbler warm, ideally shortly after its ten-minute resting period. The contrast between the hot, syrupy fruit and the slightly cooled biscuit top is best experienced when fresh. You can serve it directly from the baking dish to maintain the rustic presentation that makes this dessert so charming.
For a classic finish, consider serving each portion with a small dollop of lightly whipped cream or a scoop of vanilla bean ice cream. The cool, creamy element provides a perfect temperature contrast to the warm, spiced cobbler, elevating the simple ingredients into a truly memorable dessert experience for your guests.
Leftovers
Storage & make-ahead
- Fridge
- Store in an airtight container in the refrigerator for up to 3 days.
- Freezer
- Not recommended, as the texture of the biscuit topping will degrade upon thawing.
- Reheat
- Reheat individual portions in a preheated oven at 350°F until warmed through, or use a microwave for a quicker, though softer, result.
If you have leftovers, allow the cobbler to cool completely at room temperature for no more than two hours. Once cooled, transfer any remaining portions to an airtight container. This helps maintain the texture of the biscuits and prevents the fruit from absorbing excess moisture, which can lead to sogginess over time.
Make ahead
You can prepare the pear slices and the brown sugar glaze in advance and store them separately in the refrigerator. However, for the best results, assemble the cobbler and add the biscuit topping only right before you are ready to put it into the oven, as the raw dough can soften if left sitting too long.
Questions
Frequently asked questions
Can other varieties of pears be used?
Yes, Bosc or Anjou pears are excellent choices because they maintain their shape well during the baking process. Avoid softer varieties like Bartlett, which may break down too much and result in a mushy consistency.
Is it possible to bake this in a round pan?
Yes, a round baking dish can be used. Simply ensure the pears are arranged in a circular pattern to maintain even cooking. The baking time may need slight adjustment depending on the depth of the dish, so monitor the biscuits closely.
Why is it important to let the cobbler rest?
Resting the cobbler for ten minutes allows the hot fruit juices and the sugar syrup to thicken slightly. This makes serving much easier and ensures that the syrup coats the fruit and biscuits perfectly without being overly runny on the plate.
Everything in one place: the recipe card below gathers the ingredients, steps and estimated nutrition, ready to print.
Recipe card
Brown Sugar Pear Biscuit Cobbler for a Cozy Dessert
This simple cobbler pairs tender, warm pears with a buttery brown sugar glaze and golden biscuit topping. It is the perfect comforting dessert for any occasion.
- Prep
- Cook
- Rest
- Total
- Servings
- one 9x13 inch baker
Ingredients
- 6 large pears, peeled, cored, and thinly sliced
Glaze
- 1/2 cup unsalted butter, melted
- 1 cup brown sugar, packed
- 1 tsp ground cinnamon
Topping
- 1 can (16 oz) refrigerated biscuit dough
Instructions
Prepare the Pears. Preheat the oven to 375°F (190°C). Peel, core, and slice the pears into thin, uniform pieces. Arrange the pear slices in the bottom of a large 9x13 inch rectangular baker, fanning them out in neat rows to ensure even cooking throughout the dish.
Apply the Glaze and Topping. In a small bowl, whisk together the melted butter, brown sugar, and ground cinnamon until smooth. Drizzle this mixture evenly over the fanned pear slices. Carefully place the pieces of refrigerated biscuit dough on top of the pears, spacing them out to allow room for rising while baking.
Bake and Serve. Place the baker in the preheated oven and bake for 30 to 35 minutes. Monitor the progress until the biscuits are golden brown and the pear syrup is bubbling vigorously around the edges of the dish. Remove from the oven and let it rest for 10 minutes before serving warm.
Allergens: Gluten, Milk
Nutrition (estimated, per serving)
- Calories
- 380 kcal
- Protein
- 3.5 g
- Carbs
- 65 g
- Fat
- 12 g
- Fiber
- 4.5 g
- Sugar
- 42 g
- Sodium
- 450 mg
Estimates only: values vary with brands, substitutions and portion sizes.
Recipe by EasyCooks Kitchen · easycooksrecipes.com
Share this recipe
Send it to someone who’d love it, or save it for later.
Spotted a mistake in this recipe? Let us know.
Keep cooking


