Easy Green Potion Pudding Cups for Fun Parties
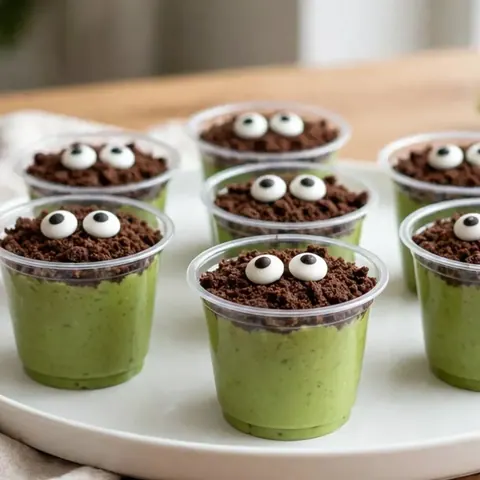
These festive green pudding cups are a delightful treat for any occasion. With a creamy pistachio base, crunchy cookie topping, and playful candy eyes, they are quick to assemble.
Published 8 min read
- Total time
- Prep
- Cook
- Rest
- Serves
- 6
- Makes 6 pudding cups
- Cuisine
- American
- Calories
- 210
- per serving, estimated

On this page15 sections
Transform simple ingredients into a whimsical treat that captures the imagination. These green potion pudding cups are the ultimate solution for anyone needing a quick, festive dessert that looks like it took hours of careful preparation. By combining the vibrant color of pistachio pudding with the deep, dark crunch of chocolate cookies and the playful stare of candy eyes, this dessert delivers a delightful sensory experience. It is a fantastic way to bring a touch of magic to your table without spending all day in the kitchen.
These green potion pudding cups are a delightful dessert designed for simplicity and maximum visual impact. Whether you are hosting a themed party or simply want to surprise your family with something different, this recipe offers a foolproof method for success. The creamy texture of the pudding paired with the crispness of the cookie topping creates a balanced bite that appeals to all ages. With no baking required and minimal cleanup involved, you can assemble these charming cups in mere minutes, leaving you more time to enjoy the occasion with your guests.
The appeal
Why you’ll love it
The method relies on the contrast between the vibrant sage green of the pistachio pudding and the dark, earthy chocolate crumbs. This visual separation makes the dessert immediately appealing and thematic. By using pre-prepared pudding, the preparation time is kept to a minimum, ensuring that the assembly process remains stress-free. The addition of candy eyes provides a final, whimsical touch that turns a standard dessert into a creative centerpiece.
Using individual serving cups ensures that each portion is perfectly sized and easy to distribute during a party. The parchment-lined baking sheet acts as a stable base during assembly, preventing spills and making it easy to move multiple cups at once. By layering the ingredients in a specific order—pudding, crumbs, then eyes—the structure remains stable, preventing the toppings from sinking into the pudding base before serving.
What you need
Ingredients
Makes 6 pudding cups.
Base
Topping
Contains:
- Milk
- Gluten
- Eggs
- Tree nuts
Tools
Equipment
- Small clear serving cups
- Spoon
- Baking sheet
Swaps
Substitutions
Instead ofPistachio pudding
UseVanilla pudding with green food coloring
Instead ofChocolate cookie crumbs
UseCrushed chocolate wafers or dark chocolate sandwich cookies
Good to know
Notes
For the best results, use a high-quality pistachio pudding mix. If you prefer to make your own pudding from scratch, ensure it is fully cooled before assembly to keep the structure firm. You can experiment with different types of chocolate cookies; dark chocolate wafers or sandwich cookies without the filling work exceptionally well for the crumb layer. The key is to achieve a fine, consistent texture that mimics the look of potion ingredients.
The choice of serving vessel is important for the overall aesthetic. Clear, small glasses or plastic cups are ideal as they allow the vibrant green color of the pudding to shine through. If you cannot find candy eyes, small white chocolate chips with a tiny dot of melted chocolate can serve as a suitable alternative. Always ensure that your serving area is clean and well-lit to showcase the bright, inviting colors of the finished dessert.
Prep
Before you start
Before you begin, make sure your work area is clean and that you have all your components ready. Ensure the pistachio pudding is chilled, as it will be much easier to handle and will hold its shape better in the cups. Have your serving cups lined up on a baking sheet to streamline the assembly line. If you are crushing your own cookies, do this in advance and set them in a bowl for easy access. Keep the candy eyes in a small container to avoid losing them during the assembly.
Step by step
Method
Phase 1
Pudding base assembly
Step 1: Prepare the pudding base
Arrange the small clear serving cups on a clean parchment-lined baking sheet to keep the workspace tidy. Carefully spoon the prepared pistachio pudding into each cup until they are filled to your desired level, leaving a small space at the top for the toppings.
You’ll need: pistachio pudding
Look for: Pudding should be smooth and evenly distributed across all serving cups.
Tip: Use a piping bag to fill the cups cleanly without getting pudding on the sides.
Checkpoint
The pudding should be smooth and consistently filled in each cup. Ensure there are no large air bubbles trapped in the pudding, and check that the surface is relatively level before moving on to the next step. If you notice any spills on the sides of the cups, wipe them clean now for a professional look.
Phase 2
Adding the cookie layer
Step 2: Add the crunchy layer
Gently sprinkle the crushed chocolate cookie crumbs over the surface of the green pudding in each cup. Ensure the crumbs create an even layer that covers the top of the pudding, adding a nice texture contrast to the creamy base.
You’ll need: chocolate cookie crumbs
Look for: The pudding surface should be completely covered by the dark cookie crumbs.
Tip: Crush the cookies finely for a uniform look, or leave some larger chunks for extra crunch.
Checkpoint
The cookie crumbs should form a uniform, dark layer that completely obscures the green pudding beneath. Ensure that the crumbs are spread evenly to the edges of the cup. If the crumbs look patchy, add a little more until the surface is fully covered, creating a clean, dark base for the final decorations.
Phase 3
Final decoration
Step 3: Decorate the cups
Carefully place two candy eyes on top of the cookie crumb layer in each cup, positioning them to look like little potion monsters. Once decorated, transfer the cups to a serving plate and keep them chilled until you are ready to serve them to guests.
You’ll need: candy eyes
Look for: Candy eyes should be clearly visible and sitting securely on the cookie crumbs.
Tip: Use tweezers to place the eyes precisely if you want them perfectly centered.
Checkpoint
The candy eyes should be placed securely on the surface of the crumbs. Verify that each cup has two eyes and that they are positioned in a way that is visible from the front. Once the eyes are in place, the dessert is ready to be moved to the refrigerator for the final setting period.
Doneness
How to tell it’s done
The dessert is considered done once the cups are filled, topped, and decorated. Since this is a no-bake recipe, there is no internal temperature to reach. You will know it is complete when the pudding is level, the cookie crumbs form a solid layer, and the candy eyes are firmly set on top. Ensure the cups have been refrigerated for at least thirty minutes before serving to allow the pudding to set properly and the flavors to meld together perfectly.
Avoid these
Common mistakes
One common mistake is overfilling the cups, which can lead to spills when adding the toppings. Aim to leave a small amount of space at the top of each cup. Another issue is adding the cookie crumbs while the pudding is still warm, which can cause the crumbs to become soggy; always ensure the pudding is thoroughly chilled first. Finally, be careful not to press the candy eyes too deeply into the pudding, as this might cause them to sink and lose their intended appearance.
Better results
Tips
Tip 1
For a more intense flavor profile, consider adding a tiny drop of almond extract to the pistachio pudding. This complements the nuttiness of the pistachio perfectly. If you want a more varied texture, you can sprinkle a few mini chocolate chips or crushed nuts along with the cookie crumbs to add an extra layer of crunch that surprises the palate with every spoonful.
Tip 2
If you are serving these at an outdoor event, keep the pudding cups in a cooler with ice packs until the very last moment. The pudding can soften if left in direct sunlight or warm temperatures for too long. By keeping them chilled, you ensure that the texture remains light and creamy, and the candy eyes stay fixed in place without sliding into the pudding mixture.
Make it yours
Variations
Berry Potion
Substitute the pistachio pudding with strawberry pudding to achieve a vibrant pink color. Use crushed vanilla wafers instead of chocolate cookies to maintain the color theme.
Midnight Potion
Use chocolate pudding as the base and sprinkle with crushed chocolate cookies. Add white candy eyes to create a spooky, monochromatic look that is perfect for themed events.
On the table
Serving suggestions
Arrange the finished pudding cups on a large, plain white tray to make the green color pop. For a cohesive theme, you can place the tray in the center of your table and surround it with small pumpkins or seasonal decorations. Because the cups are individual, they are incredibly easy for guests to grab, making them a stress-free option for busy parties and social gatherings.
Provide small spoons alongside the tray so that guests can easily enjoy their dessert. If you are hosting a larger crowd, consider setting up a display where the cups are arranged in rows, creating a visually striking effect. The simplicity of the presentation allows the fun, potion-like appearance of the cups to take center stage, ensuring that your dessert becomes a talking point among your friends and family.
Leftovers
Storage & make-ahead
- Fridge
- Keep in the refrigerator for up to 24 hours, covered tightly.
Store any leftovers in the refrigerator, covered with plastic wrap to prevent the pudding from forming a skin or absorbing other odors. These cups are best enjoyed within twenty-four hours, as the cookie crumbs will lose their crunch over time when exposed to the moisture of the pudding. Keep them in a flat, stable part of the fridge to ensure they do not tip over.
Make ahead
You can prepare the pudding base and store it in individual cups in the refrigerator up to one day in advance. However, do not add the cookie crumbs or the candy eyes until you are ready to serve. Adding the dry toppings too early will cause them to become soft and lose their texture. This approach allows you to assemble the final product in under two minutes when your guests arrive.
Questions
Frequently asked questions
Can this be made ahead of time?
Yes, you can prepare the pudding in the cups ahead of time. However, it is best to add the cookie crumbs and candy eyes just before serving to ensure the toppings remain crunchy and the eyes stay in place.
What can be used if candy eyes are unavailable?
If you cannot find candy eyes, you can use white chocolate chips with a small dot of melted dark chocolate in the center. Alternatively, you can slice small marshmallows and place a chocolate chip on top for a similar effect.
How long can these stay out at a party?
These pudding cups should not be left at room temperature for more than two hours. For the best texture and food safety, keep them chilled in the refrigerator or on a bed of ice until you are ready to serve them to your guests.
Everything in one place: the recipe card below gathers the ingredients, steps and estimated nutrition, ready to print.
Recipe card
Easy Green Potion Pudding Cups for Fun Parties
These festive green pudding cups are a delightful treat for any occasion. With a creamy pistachio base, crunchy cookie topping, and playful candy eyes, they are quick to assemble.
- Prep
- Cook
- Rest
- Total
- Servings
- 6 pudding cups
Ingredients
Base
- 2 cups prepared pistachio pudding (contains tree nuts)
Topping
- 1/2 cup crushed chocolate cookie crumbs
- 12 candy eyes
Instructions
Prepare the pudding base. Arrange the small clear serving cups on a clean parchment-lined baking sheet to keep the workspace tidy. Carefully spoon the prepared pistachio pudding into each cup until they are filled to your desired level, leaving a small space at the top for the toppings.
Add the crunchy layer. Gently sprinkle the crushed chocolate cookie crumbs over the surface of the green pudding in each cup. Ensure the crumbs create an even layer that covers the top of the pudding, adding a nice texture contrast to the creamy base.
Decorate the cups. Carefully place two candy eyes on top of the cookie crumb layer in each cup, positioning them to look like little potion monsters. Once decorated, transfer the cups to a serving plate and keep them chilled until you are ready to serve them to guests.
Allergens: Milk, Gluten, Eggs, Tree nuts
Nutrition (estimated, per serving)
- Calories
- 210 kcal
- Protein
- 3 g
- Carbs
- 32 g
- Fat
- 8 g
- Fiber
- 0.5 g
- Sugar
- 22 g
- Sodium
- 280 mg
Estimates only: values vary with brands, substitutions and portion sizes.
Recipe by EasyCooks Kitchen · easycooksrecipes.com
Share this recipe
Send it to someone who’d love it, or save it for later.
Spotted a mistake in this recipe? Let us know.
Keep cooking


