Purple Potion Cookie Pops for Spooky Parties
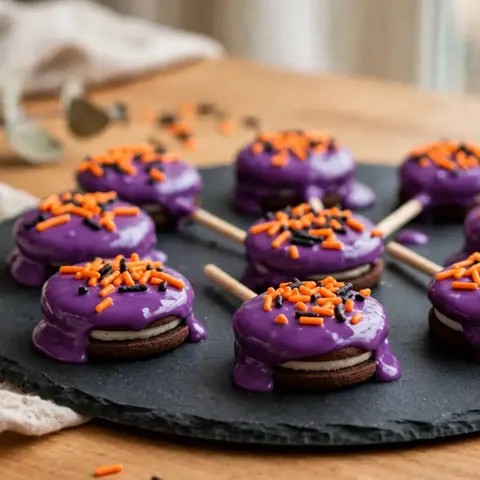
These festive purple potion cookie pops are the perfect treat for any spooky celebration. Simple to assemble and fun to decorate, they bring a magical touch to your dessert table.
Published 7 min read
- Total time
- Prep
- Cook
- Rest
- Serves
- 12
- Makes 12 cookie pops
- Cuisine
- American
- Calories
- 220
- per serving, estimated

On this page15 sections
Purple potion cookie pops are the ultimate whimsical treat for any festive gathering. These delightful snacks combine the classic crunch of chocolate sandwich cookies with a vibrant, sweet candy shell and a sprinkle of spooky flair. They are remarkably simple to prepare, making them an ideal choice for busy hosts who want to create something memorable without spending hours in the kitchen. Whether for a themed celebration or just a fun afternoon project, these pops are sure to capture everyone's attention.
Creating these treats is a straightforward process that yields impressive results. By using chocolate sandwich cookies as a base, you ensure a familiar, beloved flavor profile that pairs perfectly with the sweet candy coating. The addition of lollipop sticks turns a standard cookie into a handheld delight, perfect for sharing. With just a few ingredients and minimal effort, you can transform ordinary pantry items into a stunning, themed dessert that looks like it came from a professional bakery. Follow the steps carefully to achieve a smooth, professional finish every time.
The appeal
Why you’ll love it
The method of using lollipop sticks provides structural integrity to the cookies, allowing them to be dipped and decorated without falling apart. By inserting the sticks into the cream center, the cookie remains intact while becoming a convenient, handheld treat that is easy to serve at parties.
Melting the candy coating until it reaches a thin, pourable consistency ensures an even, smooth finish on the cookies. The immediate application of sprinkles while the candy is still wet is the secret to getting them to adhere perfectly, creating a professional-looking texture and appearance that elevates the final presentation of the pops.
What you need
Ingredients
Makes 12 cookie pops.
Cookie Pops
Coating
Garnish
Contains:
- Gluten
- Milk
- Soy
Tools
Equipment
- Baking sheet
- Parchment paper
- Mixing bowl
- Microwave-safe bowl
- Lollipop sticks
Swaps
Substitutions
Instead ofPurple candy melts
UseWhite chocolate tinted with purple food coloring
Instead ofChocolate sandwich cookies
UseVanilla sandwich cookies or graham crackers
Good to know
Notes
For the best results, use high-quality candy melts or good-quality white chocolate. If the candy seems too thick after melting, a small amount of vegetable oil can be stirred in to thin it out slightly, which helps create a smoother, more even coating on the cookies.
When it comes to equipment, a parchment-lined baking sheet is essential for preventing the cookies from sticking as the candy hardens. If you do not have lollipop sticks, sturdy paper straws or even wooden skewers with the sharp ends trimmed off can serve as suitable alternatives for holding the cookies.
Prep
Before you start
Before beginning, ensure all ingredients are at room temperature to prevent the candy coating from seizing. Organize your workspace by lining a baking sheet with parchment paper, which will act as a non-stick surface for the finished pops. Have your sprinkles ready in a small bowl for quick access. Clear enough space in your refrigerator or on your counter to allow the pops to set undisturbed for at least fifteen minutes, ensuring they remain perfectly shaped and ready for display.
Step by step
Method
Phase 1
Assembling the pops
Step 1: Prepare the cookies
Carefully insert a lollipop stick into the center of each chocolate sandwich cookie. Gently twist the stick to ensure it penetrates the cream filling securely without breaking the cookie layers apart. Lay the prepared pops in rows on a parchment-lined baking sheet to keep them stable while you prepare the dipping station.
You’ll need: chocolate sandwich cookies · lollipop sticks
Look for: The stick should be held firmly in the center of the cookie filling.
Tip: If the cookie is too hard, use a small knife to create a tiny pilot hole in the filling.
Checkpoint
The sticks should be centered firmly within the cookie filling. Each cookie should remain intact, with no cracks or visible damage. Ensure all twelve cookies are lined up on the parchment paper so they are ready for the dipping stage. If any cookies feel loose on their sticks, adjust them before moving forward to ensure they are stable enough for the coating process.
Phase 2
Dipping and decorating
Step 2: Dip and coat
Melt the purple candy in a microwave-safe bowl in thirty-second increments, stirring until completely smooth. Dip each cookie pop into the purple candy, ensuring it is evenly coated. Allow the excess to drip off before placing it back on the parchment-lined sheet. Immediately shower the wet candy coating with orange and black sprinkles to ensure they adhere properly.
You’ll need: purple candy melts · orange and black sprinkles
Look for: The candy should be fully melted and smooth, with no lumps remaining.
Tip: Work with one cookie at a time so the coating remains wet for the sprinkles.
Checkpoint
The candy should be a vibrant purple color and completely smooth. Each cookie should be coated uniformly, with the excess candy allowed to drip off back into the bowl. The sprinkles should be distributed evenly across the surface of the wet candy. Check that the coating covers the edges of the cookies completely to seal them and provide a clean, finished appearance.
Phase 3
Final setting
Step 3: Set and serve
Transfer the finished pops to a clean, flat surface or keep them on the baking sheet until the candy coating has fully hardened. This usually takes about fifteen minutes at room temperature. Once the coating is set and firm to the touch, arrange the pops on a white serving plate and present them immediately to guests for a festive snack.
Look for: The purple coating should be completely opaque and firm when touched.
Tip: Avoid touching the coating until it has completely set to prevent fingerprints.
Checkpoint
The pops should be resting undisturbed on the parchment paper. The candy coating should appear dull or firm, indicating that it has cooled down completely. Carefully lift one pop to check that the coating does not smear. Once they are firm, they are ready to be transferred to a serving plate. The pops should feel solid and secure on their sticks.
Doneness
How to tell it’s done
The cookie pops are considered done when the purple candy coating has fully set and is no longer tacky to the touch. The surface should appear smooth, matte or slightly glossy depending on the brand of candy used, and the sprinkles should be firmly embedded in the coating. There is no internal temperature to monitor for this recipe as it does not involve cooking raw ingredients, but the visual firmness of the outer shell is the primary indicator of completion.
Avoid these
Common mistakes
A common mistake is melting the candy at too high a temperature, which can cause it to burn or become clumpy. Always use short bursts in the microwave and stir frequently. Another error is waiting too long to apply the sprinkles. The candy sets quite quickly, so it is important to have the decorations ready and apply them immediately after dipping to ensure they stick securely. If the coating is too thick, the pop may become heavy and slide off the stick, so aim for a thin, even layer.
Better results
Tips
Tip 1
If you find that the candy coating is hardening too fast while you are working, you can place the bowl in a larger bowl filled with warm water to maintain a gentle, consistent heat. This will keep the candy at the perfect dipping consistency for a longer period, making the process much more manageable, especially when working with a larger batch of cookies.
Tip 2
For a cleaner look, use a spoon to drizzle the candy over the cookies instead of submerging them completely. This method often results in a thinner, more refined coating and allows for better control over the amount of candy used. It also reduces the risk of the cookies breaking or falling off the sticks during the dipping process, which is especially helpful for beginners.
Make it yours
Variations
Festive Holiday Pops
Swap the purple candy for red and green, and use seasonal sprinkles like stars or festive shapes. This variation is perfect for Christmas or other winter celebrations, offering a colorful and fun treat that everyone will enjoy.
Classic White Chocolate
Use white chocolate instead of purple candy for a more sophisticated look. You can drizzle the white-coated pops with dark chocolate for a classic black and white contrast that looks elegant on any dessert table.
On the table
Serving suggestions
Arrange the cookie pops on a white or dark-colored serving platter to make the purple color and the orange and black sprinkles stand out. Providing a decorative container or a foam block to hold the pops upright can add a professional touch to your display, making it easy for guests to grab their own treat without mess.
These pops are perfect for themed dessert tables and pair well with other festive snacks. Because they are individually portioned, they are ideal for parties where guests are mingling. Consider serving them alongside other complementary desserts to create a cohesive and visually appealing spread that fits the theme of your celebration and satisfies everyone's sweet tooth.
Leftovers
Storage & make-ahead
- Fridge
- Not recommended; storage at room temperature is best to maintain the texture of the candy coating.
- Reheat
- Not applicable; serve at room temperature.
Store the finished cookie pops in an airtight container at room temperature in a cool, dry place. Keeping them away from direct sunlight and heat sources will prevent the candy coating from softening or melting. They will remain fresh and tasty for up to one week, making them a great option for parties that require preparation a few days in advance.
Make ahead
These pops are excellent for making ahead of time. You can prepare the cookie pops completely and store them in an airtight container for several days before your event. Avoid refrigerating them, as the moisture in the fridge can cause the candy coating to become sticky or bloom, affecting both the texture and the appearance of the decorations.
Questions
Frequently asked questions
Can different types of sandwich cookies be used for this recipe?
Yes, any variety of sandwich cookie will work well. Vanilla, lemon, or even gluten-free sandwich cookies are all excellent choices. Simply ensure the cookies are firm enough to hold the stick without crumbling when you insert it into the center.
What should be done if the candy coating becomes too thick?
If the candy coating thickens, stir in a teaspoon of vegetable oil or shortening. This will thin the mixture and create a smoother, more fluid consistency that is much easier to work with when dipping the cookies.
How can the pops be kept upright for serving?
A simple way to display them is by using a block of floral foam or a piece of cardboard with holes punched in it. You can wrap these in decorative paper to match your party theme, providing a stable and attractive stand for the pops.
Everything in one place: the recipe card below gathers the ingredients, steps and estimated nutrition, ready to print.
Recipe card
Purple Potion Cookie Pops for Spooky Parties
These festive purple potion cookie pops are the perfect treat for any spooky celebration. Simple to assemble and fun to decorate, they bring a magical touch to your dessert table.
- Prep
- Cook
- Rest
- Total
- Servings
- 12 cookie pops
Ingredients
Cookie Pops
- 12 pieces chocolate sandwich cookies
- 12 pieces lollipop sticks
Coating
- 1 cup purple candy melts
Garnish
- 2 tbsp orange and black sprinkles
Instructions
Prepare the cookies. Carefully insert a lollipop stick into the center of each chocolate sandwich cookie. Gently twist the stick to ensure it penetrates the cream filling securely without breaking the cookie layers apart. Lay the prepared pops in rows on a parchment-lined baking sheet to keep them stable while you prepare the dipping station.
Dip and coat. Melt the purple candy in a microwave-safe bowl in thirty-second increments, stirring until completely smooth. Dip each cookie pop into the purple candy, ensuring it is evenly coated. Allow the excess to drip off before placing it back on the parchment-lined sheet. Immediately shower the wet candy coating with orange and black sprinkles to ensure they adhere properly.
Set and serve. Transfer the finished pops to a clean, flat surface or keep them on the baking sheet until the candy coating has fully hardened. This usually takes about fifteen minutes at room temperature. Once the coating is set and firm to the touch, arrange the pops on a white serving plate and present them immediately to guests for a festive snack.
Allergens: Gluten, Milk, Soy
Nutrition (estimated, per serving)
- Calories
- 220 kcal
- Protein
- 2 g
- Carbs
- 32 g
- Fat
- 10 g
- Fiber
- 1 g
- Sugar
- 22 g
- Sodium
- 120 mg
Estimates only: values vary with brands, substitutions and portion sizes.
Recipe by EasyCooks Kitchen · easycooksrecipes.com
Share this recipe
Send it to someone who’d love it, or save it for later.
Spotted a mistake in this recipe? Let us know.
Keep cooking


