Witch Wand Pretzel Rods
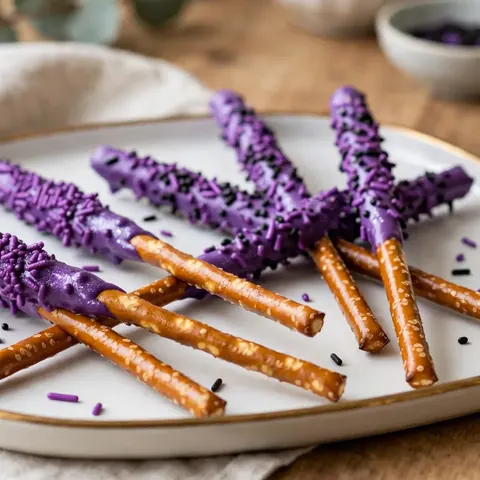
Transform simple pretzel rods into festive witch wands with a quick dip in purple candy and a generous dusting of themed sprinkles. These treats are the perfect addition to any seasonal gathering.
Published 8 min read
- Total time
- Prep
- Cook
- Rest
- Serves
- 12
- Makes 12 witch wands
- Cuisine
- American
- Calories
- 140
- per serving, estimated

On this page15 sections
Create a magical atmosphere for your next gathering with these easy, vibrant witch wand pretzel rods. They combine the perfect crunch of a salty pretzel with the sweet, smooth finish of colored candy, making them a centerpiece for any festive autumn table. These treats are designed for simplicity, requiring minimal ingredients and equipment, yet they deliver a visually stunning result that captures the spirit of the season with every single bite.
These witch wand pretzel rods are a quintessential treat for the fall season. By dipping salty, crunchy pretzel rods into a vibrant purple candy coating and finishing them with a festive sprinkle of black and purple, you create a sophisticated yet playful snack. This recipe focuses on the balance of texture and aesthetics, ensuring that every wand looks professionally finished. Whether you are hosting a party or simply want to add a touch of whimsy to your kitchen, these wands are a reliable and delicious choice that comes together with ease.
The appeal
Why you’ll love it
The method of dipping ensures an even, smooth coating that adheres perfectly to the pretzel surface without causing it to break. By using a deep, narrow bowl for the melted candy, you can submerge the pretzel efficiently, achieving a clean line where the chocolate ends and the handle begins. This technique minimizes waste and provides a consistent appearance across every single wand produced.
Allowing the candy to set on parchment paper is crucial for maintaining the integrity of the coating. The parchment prevents sticking, which keeps the surface of the candy smooth and unblemished when you lift the wands. This simple step ensures that the final presentation is clean and professional, allowing the vibrant colors of the candy and the texture of the sprinkles to stand out as the primary focus of the snack.
What you need
Ingredients
Makes 12 witch wands.
Contains:
- Gluten
- Milk
Tools
Equipment
- Baking sheet
- Parchment paper
- Small white bowl
- Spoon
Swaps
Substitutions
Instead ofPurple candy melts
UseWhite chocolate tinted with purple food coloring
Instead ofPurple and black sprinkles
UseAny variety of Halloween-themed colored sugar or sprinkles
Good to know
Notes
The choice of candy melt is vital for the final texture. Quality candy melts are designed to melt down to a thin, pourable consistency, which is ideal for coating pretzels without making them too heavy or clumpy. If the candy seems too thick, you can add a tiny amount of vegetable shortening to thin it out slightly, which will help it coat the pretzels more evenly and dry to a nice, glossy finish.
When it comes to equipment, a small, deep bowl is superior to a wide, shallow one for this specific task. A deeper container allows for a deeper dip, which provides better coverage and makes it easier to submerge the pretzel without needing a large volume of candy. Always ensure your bowl is completely dry before adding the candy, as even a small amount of moisture can cause the candy to seize and become grainy.
Prep
Before you start
Before you begin, ensure your workspace is clean and organized. Set out your parchment paper, bowls, and all ingredients within easy reach to make the dipping process efficient. If your kitchen is particularly warm, you may want to clear space in the refrigerator for the baking sheet, as a cool environment will help the candy set much faster. Make sure your sprinkles are in a container that allows for easy shaking, as you will need to apply them quickly while the candy is still wet.
Step by step
Method
Phase 1
Preparation and setup
Step 1: Prepare the workspace
Line a large baking sheet with a piece of parchment paper to ensure easy removal of the finished wands. Lay out the twelve pretzel rods in a single layer on the prepared baking sheet, ensuring they are spaced out enough to allow for dipping without them touching each other.
You’ll need: pretzel rods
Look for: Pretzels are laid flat and evenly spaced.
Tip: Use a light-colored surface to see the pretzels clearly.
Checkpoint
At the end of this phase, all pretzel rods are laid out neatly on the parchment-lined baking sheet. The setup should be clean, with no overlapping rods, and your bowl of melted candy should be ready to go. Verify that your workspace is clear of any moisture, as this could interfere with the melting process of the candy, and ensure the sprinkles are positioned for immediate access.
Phase 2
Dipping and decorating
Step 2: Dip and decorate
Melt the purple candy in a small, microwave-safe bowl according to the package instructions until completely smooth. Dip each pretzel rod into the melted candy, covering about two-thirds of the length. Immediately shake the purple and black sprinkles over the wet candy coating while holding the wand over the bowl to catch any excess.
You’ll need: purple candy melts · purple and black sprinkles
Look for: Candy coating is smooth and completely covers the pretzel surface.
Tip: Work quickly so the candy does not harden before adding sprinkles.
Checkpoint
The wands should now be coated in a smooth, even layer of purple candy. Check that the sprinkles are evenly distributed across the dipped portion of each rod. The candy should look vibrant and glossy. If any areas are missing coverage, you can carefully re-dip or touch up the spots while the candy is still soft. The result should look uniform and festive, with no bare pretzel showing on the dipped section.
Phase 3
Setting and final inspection
Step 3: Set and serve
Place each decorated pretzel rod back onto the parchment-lined baking sheet. Allow the candy coating to set completely at room temperature for about 15 minutes. Once the coating is firm to the touch, transfer the wands to a serving plate and enjoy immediately or store for later use.
You’ll need: pretzel rods
Look for: Candy coating is firm and no longer tacky.
Tip: Ensure the room is cool to help the candy set faster.
Checkpoint
The candy coating should be completely firm and matte or glossy depending on the brand, with no signs of stickiness. The wands should be easy to handle and should not leave any marks on your fingers when picked up. The sprinkles should be firmly embedded in the candy. Once the wands are fully set, they are ready to be transferred to a serving plate for an attractive presentation.
Doneness
How to tell it’s done
The witch wands are finished when the candy coating has fully hardened and is no longer tacky to the touch. Gently tap the surface of a wand; it should feel smooth and solid, not soft or sticky. If you notice any soft spots, allow the wands to rest for a few additional minutes in a cool area. Once set, the wands should lift easily from the parchment paper without leaving any residue behind, indicating that they are ready to be served.
Avoid these
Common mistakes
A common mistake is dipping the pretzels into candy that is too hot, which can cause the coating to slide off the pretzel instead of adhering properly. Let the melted candy sit for a minute or two before you begin dipping. Another error is waiting too long to add the sprinkles; if the candy begins to harden, the sprinkles will not stick. Apply them immediately after dipping each rod to ensure they stay firmly in place once the candy has completely cooled.
Better results
Tips
Tip 1
For a more polished look, try tapping the pretzel rod gently against the side of the bowl after dipping to remove any excess candy. This helps create a thinner, more refined coating that dries quickly and looks more professional. If you prefer a thicker coating, you can allow the first layer to set for five minutes and then perform a second, quick dip to build up the volume of the candy.
Tip 2
If you are working in a humid environment, the candy may take longer to set. In these conditions, placing the baking sheet in a cool area or even the refrigerator for 5 to 10 minutes can significantly speed up the process. Just be sure to remove them as soon as they are set to avoid any condensation from forming on the surface of the candy, which can dull the finish and affect the texture.
Make it yours
Variations
White Chocolate Wands
Replace the purple candy melts with white chocolate and use orange and black sprinkles for a different color theme. This variation offers a classic look that works well for any autumn occasion.
Drizzle Finish
After the main coating has set, melt a small amount of contrasting colored candy and use a spoon to drizzle thin lines over the wands for an extra decorative touch.
On the table
Serving suggestions
To serve, arrange the witch wands on a clean white plate or a decorative tray to make the purple colors pop. You can cluster them together to look like a bundle of wands or fan them out for a more dramatic display. They are perfect for a dessert table or as a take-home treat for guests, and their handheld nature makes them incredibly convenient for mingling at parties.
Consider pairing these wands with other seasonal snacks to create a cohesive theme. They look wonderful alongside bowls of popcorn, dark chocolate truffles, or other themed treats. Because they are individual portions, you do not need to worry about utensils or serving plates for guests, which makes them a stress-free addition to any menu. Simply present them beautifully and let the wands serve as both a snack and a decoration.
Leftovers
Storage & make-ahead
- Fridge
- Store in the refrigerator only if the room temperature is too warm; otherwise, room temperature is best.
- Reheat
- Do not reheat; these are intended to be served at room temperature.
Store the finished witch wands in an airtight container at room temperature in a cool, dry place. Keeping them away from direct sunlight and heat sources is essential, as the candy coating can soften or melt if exposed to high temperatures. When stored properly, they will maintain their crunch and appearance for several days, making them a convenient option for preparing ahead of time for your event.
Make ahead
These treats are excellent for making ahead, as they store well for up to one week if kept in a cool, airtight environment. Preparing them a day or two in advance allows you to focus on other aspects of your event. Simply store them in a single layer or use parchment paper between layers to prevent them from sticking together or damaging the sprinkle decorations during storage.
Questions
Frequently asked questions
Can these be made ahead of time?
Yes, these can be made up to a week in advance. Store them in an airtight container in a cool, dry place to ensure they stay fresh and the candy coating remains firm and crisp.
Why is the candy coating sliding off?
The candy is likely too hot when you are dipping the pretzels. Let the melted candy sit for a few minutes to thicken slightly before dipping. Also, ensure the pretzels are completely dry before you start.
Can these be stored in the freezer?
Freezing is not recommended. The moisture in the freezer can cause the candy coating to become sticky or bloom once it is thawed, which ruins the texture and the appearance of the wands.
Everything in one place: the recipe card below gathers the ingredients, steps and estimated nutrition, ready to print.
Recipe card
Witch Wand Pretzel Rods
Transform simple pretzel rods into festive witch wands with a quick dip in purple candy and a generous dusting of themed sprinkles. These treats are the perfect addition to any seasonal gathering.
- Prep
- Cook
- Rest
- Total
- Servings
- 12 witch wands
Ingredients
- 12 pretzel rods
- 1 cup purple candy melts
- 2 tbsp purple and black sprinkles
Instructions
Prepare the workspace. Line a large baking sheet with a piece of parchment paper to ensure easy removal of the finished wands. Lay out the twelve pretzel rods in a single layer on the prepared baking sheet, ensuring they are spaced out enough to allow for dipping without them touching each other.
Dip and decorate. Melt the purple candy in a small, microwave-safe bowl according to the package instructions until completely smooth. Dip each pretzel rod into the melted candy, covering about two-thirds of the length. Immediately shake the purple and black sprinkles over the wet candy coating while holding the wand over the bowl to catch any excess.
Set and serve. Place each decorated pretzel rod back onto the parchment-lined baking sheet. Allow the candy coating to set completely at room temperature for about 15 minutes. Once the coating is firm to the touch, transfer the wands to a serving plate and enjoy immediately or store for later use.
Allergens: Gluten, Milk
Nutrition (estimated, per serving)
- Calories
- 140 kcal
- Protein
- 2 g
- Carbs
- 25 g
- Fat
- 4 g
- Fiber
- 1 g
- Sugar
- 12 g
- Sodium
- 210 mg
Estimates only: values vary with brands, substitutions and portion sizes.
Recipe by EasyCooks Kitchen · easycooksrecipes.com
Share this recipe
Send it to someone who’d love it, or save it for later.
Spotted a mistake in this recipe? Let us know.
Keep cooking


