Easy Monster Peanut Clusters for Halloween
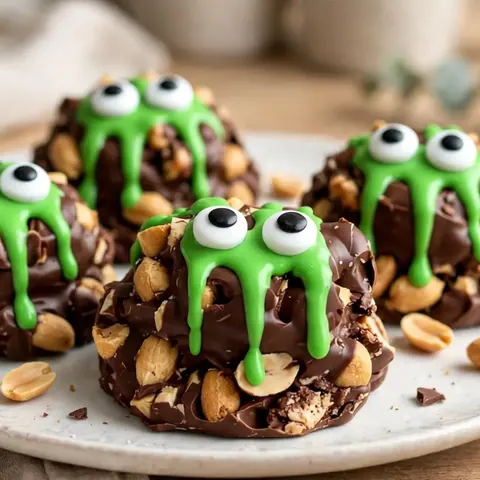
These festive monster peanut clusters are the perfect quick treat for Halloween. Combining crunchy peanuts with rich chocolate and fun candy eyes, they are simple to make and always a hit at parties.
Published 7 min read
- Total time
- Prep
- Cook
- Rest
- Serves
- 12
- Makes 12 clusters
- Cuisine
- American
- Calories
- 180
- per serving, estimated

On this page15 sections
Transform simple ingredients into spooky, delicious monster peanut clusters that are perfect for any Halloween celebration. These no-bake treats are incredibly easy to assemble and look fantastic on any party platter, combining the classic crunch of roasted peanuts with the rich sweetness of chocolate and festive decorations.
Monster peanut clusters are the ultimate quick and fun dessert for the Halloween season. By combining roasted peanuts with melted chocolate, you create a satisfying, crunchy bite that is easy to customize. Adding a drizzle of green candy and spooky candy eyes turns these simple clusters into adorable monsters that children and adults alike will enjoy. This recipe is designed for ease and speed, ensuring you spend less time in the kitchen and more time enjoying the festivities with friends and family during this busy and exciting time of year.
The appeal
Why you’ll love it
The method of melting chocolate and folding in peanuts is highly effective because it ensures an even distribution of ingredients, resulting in a perfect crunch in every bite. By using a parchment-lined baking sheet, the clusters are easily removed once set, preventing any mess or sticking to the pan. This approach also allows for consistent portion control, making it simple to create uniform clusters that look professional and appealing.
The layering technique employed here creates a beautiful contrast between the dark chocolate and the vibrant green drizzle. Adding the candy eyes while the chocolate is still slightly warm ensures they stay in place, creating a stable decoration that survives handling. This simple assembly process makes it accessible for anyone to create visually striking treats without the need for complex baking techniques or specialized kitchen equipment, ensuring a successful result every time.
What you need
Ingredients
Makes 12 clusters.
Clusters
Decoration
Contains:
- Peanuts
- Milk
Tools
Equipment
- Baking sheet
- Parchment paper
- Medium microwave-safe bowl
- Spoon
- Piping bag or small spoon for drizzling
Swaps
Substitutions
Instead ofSemi-sweet chocolate chips
UseMilk chocolate chips or white chocolate for a different flavor profile
Instead ofRoasted peanuts
UseAlmonds or cashews for a different crunch
Good to know
Notes
When selecting ingredients, opt for high-quality semi-sweet chocolate chips for the best flavor balance. Roasted, salted peanuts provide the necessary savory crunch to offset the sweetness of the chocolate. Ensure the candy eyes are fresh to maintain their crisp texture when added to the clusters. If the chocolate seems too thick, adding a tiny amount of vegetable oil can help thin it out for easier drizzling.
For equipment, a sturdy, flat baking sheet is essential for laying out the clusters. Parchment paper is highly recommended over wax paper to ensure the clusters do not stick during the cooling process. A microwave-safe bowl is standard, but a double boiler can also be used if preferred for more controlled melting. Keep a small offset spatula or a butter knife nearby to help shape the mounds if they lose their form on the tray.
Prep
Before you start
Before beginning, ensure all ingredients are measured and ready on your countertop. Clear enough space in your refrigerator to accommodate a full baking sheet, as this will help the chocolate set faster if the room temperature is warm. Have your parchment paper cut to size and ready to line your baking sheet. Ensure the candy eyes are within reach so they can be added immediately after drizzling the green candy, as the chocolate sets quickly once removed from the heat.
Step by step
Method
Phase 1
Melting and Mixing
Step 1: Prepare the chocolate base
Place the chocolate chips in a microwave-safe bowl. Heat in 30-second increments, stirring in between, until the chocolate is fully melted and smooth. Once melted, stir in the roasted peanuts until they are thoroughly coated in the chocolate mixture.
You’ll need: semi-sweet chocolate chips · roasted peanuts
Look for: The chocolate should be glossy and smooth with no lumps remaining.
Tip: Do not overheat the chocolate to avoid seizing.
Checkpoint
The chocolate mixture should be smooth, glossy, and fully combined with the peanuts. Ensure there are no clumps of un-melted chocolate at the bottom of the bowl. The peanuts should be evenly coated, looking like a thick, cohesive mixture that is ready to be scooped onto the baking sheet.
Phase 2
Scooping and Shaping
Step 2: Form the clusters
Line a baking sheet with parchment paper. Use a spoon to drop small mounds of the chocolate and peanut mixture onto the prepared sheet, spacing them evenly apart. Allow them to set slightly at room temperature or in the refrigerator.
You’ll need: semi-sweet chocolate chips · roasted peanuts
Look for: The mounds should hold their shape once placed on the parchment.
Tip: Use two spoons to easily drop the mixture.
Checkpoint
The clusters should be uniform in size and spaced evenly on the parchment paper. They should look like small, craggy mounds. If they appear too flat, use a spoon to gently push the edges inward to create a more compact and appealing shape before they begin to firm up.
Phase 3
Decorating
Step 3: Decorate the monsters
Melt the green candy melts until smooth. Use a spoon or piping bag to drizzle the green candy over the top of each chocolate cluster. Immediately press two candy eyes into the top of each cluster while the chocolate is still tacky so they adhere properly.
You’ll need: green candy melts · candy eyes
Look for: The candy eyes should stick firmly to the chocolate.
Tip: Work quickly before the chocolate fully hardens.
Checkpoint
The green candy should be drizzled in thin lines across the clusters for a fun, monster-like appearance. The candy eyes must be securely pressed into the chocolate, creating a clear, expressive look. Once finished, the entire tray should be moved to a cool place or the refrigerator to set completely.
Doneness
How to tell it’s done
The clusters are ready when the chocolate has fully solidified and no longer feels tacky to the touch. This typically takes about 30 minutes in the refrigerator. When lifted, the clusters should be firm and hold their shape completely. The candy eyes should be firmly embedded in the chocolate, and the green candy drizzle should be set hard, creating a smooth and finished appearance for these festive treats.
Avoid these
Common mistakes
Avoid overheating the chocolate in the microwave, as it can seize and become grainy or scorched, which ruins the texture and flavor. Stirring the chocolate consistently at 30-second intervals is crucial to prevent this. Another common mistake is waiting too long to add the candy eyes; if the chocolate sets too much before you apply them, they will not adhere properly and may fall off once the clusters are moved. Ensure you work in small, manageable batches if you are making a large quantity.
Better results
Tips
Tip 1
To achieve a cleaner look, use a small piping bag for the green candy drizzle instead of a spoon. This allows for thinner, more controlled lines that won't overwhelm the chocolate base. If you want a more varied look, you can vary the number of candy eyes on each cluster, creating one-eyed monsters or multi-eyed creatures to add to the festive Halloween theme.
Tip 2
If the room is particularly warm, keep the clusters in the refrigerator until just before serving. This prevents the chocolate from softening and keeps the candy eyes in place. For a cleaner presentation, you can also use a small cookie scoop to portion the clusters, which ensures that every piece is identical in size and shape, making for a very professional and uniform display.
Make it yours
Variations
Dark Chocolate Sea Salt
Replace the semi-sweet chocolate with dark chocolate and sprinkle a pinch of flaky sea salt over the top of the green drizzle for a sophisticated twist.
White Chocolate Ghost
Use white chocolate instead of semi-sweet for the base, and skip the green drizzle, using only the candy eyes to create ghostly clusters.
On the table
Serving suggestions
Serve the monster peanut clusters on a decorative platter or a plain white plate to make the green and white colors pop. They are excellent as a grab-and-go snack for a party or as part of a larger dessert table. Because they are individual portions, there is no need for extra serving utensils, making them very convenient for guests to pick up and enjoy at their leisure.
Consider arranging them alongside other Halloween-themed snacks like popcorn balls or candy corn to create a complete festive spread. If serving at a children's party, placing them in individual cupcake liners can make them easier to handle and add an extra layer of color to your presentation. They are best enjoyed at room temperature, so remove them from the fridge about 15 minutes before serving for the best texture.
Leftovers
Storage & make-ahead
- Fridge
- Keep in an airtight container in the refrigerator for up to 2 weeks.
- Freezer
- Freeze in an airtight container for up to 1 month. Thaw in the refrigerator before serving.
- Reheat
- These do not require reheating; they are best served chilled or at room temperature.
Store the finished clusters in an airtight container at room temperature in a cool, dry place for up to one week. If your environment is warm, it is best to keep them in the refrigerator to maintain their shape and prevent the chocolate from melting. Always keep the container sealed to prevent the chocolate from absorbing other flavors or odors from the fridge, which can affect the overall quality of the dessert.
Make ahead
These clusters are perfect for making ahead of time. You can prepare them up to three days before your event and store them in the refrigerator. They actually taste better after the flavors have had a chance to meld for a day or two. Just ensure they are kept in a flat, airtight container so they do not get crushed or stick together during storage.
Questions
Frequently asked questions
Can these be made ahead of time?
Yes, these clusters are ideal for making in advance. They can be stored in an airtight container in the refrigerator for up to three days before your event, allowing you to prepare them well ahead of schedule.
Why does chocolate seize during the melting process?
Chocolate seizes when it comes into contact with a small amount of liquid or is overheated. Ensure all bowls and utensils are perfectly dry, and melt the chocolate in short, 30-second intervals, stirring thoroughly between each to prevent overheating.
Can different types of nuts be used?
Absolutely, feel free to substitute the peanuts with almonds, cashews, or even pecans. The key is to ensure the nuts are roasted and salted to provide the best contrast to the sweet chocolate base.
Everything in one place: the recipe card below gathers the ingredients, steps and estimated nutrition, ready to print.
Recipe card
Easy Monster Peanut Clusters for Halloween
These festive monster peanut clusters are the perfect quick treat for Halloween. Combining crunchy peanuts with rich chocolate and fun candy eyes, they are simple to make and always a hit at parties.
- Prep
- Cook
- Rest
- Total
- Servings
- 12 clusters
Ingredients
Clusters
- 12 oz semi-sweet chocolate chips
- 1 cup roasted peanuts
Decoration
- 1/4 cup green candy melts
- 24 candy eyes
Instructions
Prepare the chocolate base. Place the chocolate chips in a microwave-safe bowl. Heat in 30-second increments, stirring in between, until the chocolate is fully melted and smooth. Once melted, stir in the roasted peanuts until they are thoroughly coated in the chocolate mixture.
Form the clusters. Line a baking sheet with parchment paper. Use a spoon to drop small mounds of the chocolate and peanut mixture onto the prepared sheet, spacing them evenly apart. Allow them to set slightly at room temperature or in the refrigerator.
Decorate the monsters. Melt the green candy melts until smooth. Use a spoon or piping bag to drizzle the green candy over the top of each chocolate cluster. Immediately press two candy eyes into the top of each cluster while the chocolate is still tacky so they adhere properly.
Allergens: Peanuts, Milk
Nutrition (estimated, per serving)
- Calories
- 180 kcal
- Protein
- 3.5 g
- Carbs
- 18 g
- Fat
- 11 g
- Fiber
- 1.5 g
- Sugar
- 15 g
- Sodium
- 45 mg
Estimates only: values vary with brands, substitutions and portion sizes.
Recipe by EasyCooks Kitchen · easycooksrecipes.com
Share this recipe
Send it to someone who’d love it, or save it for later.
Spotted a mistake in this recipe? Let us know.
Keep cooking


