Easy Halloween Puppy Chow for Festive Snacking
This simple Halloween puppy chow combines crunchy cereal with rich chocolate, peanut butter, and festive candies. It is the perfect quick treat for any party or gathering.
Published 8 min read
- Total time
- Prep
- Cook
- Rest
- Serves
- 8
- Makes 8 cups
- Cuisine
- American
- Calories
- 280
- per serving, estimated

On this page15 sections
Transform simple pantry staples into a festive Halloween masterpiece with this quick and easy puppy chow recipe. This snack is the perfect combination of textures and flavors, making it a must-have for any seasonal celebration or casual get-together with friends and family during the spooky season.
Halloween puppy chow is a classic American snack that brings together the rich, comforting flavors of chocolate and peanut butter with the satisfying crunch of cereal. By adding a generous dusting of powdered sugar and festive, colorful candies, this recipe elevates the traditional treat into a visually stunning dessert that fits perfectly with the Halloween theme. It is straightforward, requires no baking, and allows for quick preparation, leaving more time to enjoy the festivities. Whether you are hosting a party or just looking for a fun weekend activity, this recipe delivers consistent, delicious results every single time.
The appeal
Why you’ll love it
The method of spreading the coated cereal on a parchment-lined baking sheet is highly effective because it allows the chocolate and peanut butter mixture to set properly without sticking. This technique ensures that each piece of cereal remains distinct and crispy rather than clumping together into a dense, unappealing mass. The use of a fine-mesh sieve for the powdered sugar is essential for achieving an even, professional-looking finish that mimics the appearance of fresh snow, ensuring that every bite has the perfect balance of sweetness and texture.
Adding the candy-coated chocolates in the final step is crucial for maintaining their vibrant appearance and structural integrity. By introducing these elements last, the colors remain bright and distinct against the white sugar, creating an attractive contrast that is visually appealing. This phased approach to assembly ensures that the delicate balance of ingredients is preserved, resulting in a snack that is both beautiful to look at and consistently delicious to eat. The simplicity of the process makes it an accessible project for cooks of any skill level.
What you need
Ingredients
Makes 8 cups.
Base
Topping
Contains:
- Gluten
- Peanuts
- Milk
- Soy
Tools
Equipment
- Large baking sheet
- Parchment paper
- Fine-mesh sieve
- Large mixing bowl
Swaps
Substitutions
Instead ofRice cereal squares
UseCorn cereal squares for a slightly different texture and flavor profile
Instead ofOrange and purple candy-coated chocolates
UseAny seasonal colored chocolate-covered candies or chocolate chips
Good to know
Notes
When selecting ingredients, opt for high-quality chocolate and creamy peanut butter to ensure the best flavor profile. Using rice cereal squares provides the classic crunch associated with traditional puppy chow, but ensure they are fresh to avoid any staleness. The choice of candy-coated chocolates can be customized based on preference, but sticking to orange and purple colors enhances the seasonal theme. Always ensure the powdered sugar is finely ground; if it appears lumpy, whisking it before sifting will help achieve a smoother distribution over the cereal.
The equipment required is minimal, which is one of the great advantages of this recipe. A large, rimmed baking sheet is ideal for holding the cereal, while parchment paper is non-negotiable for easy removal and cleanup. A fine-mesh sieve is the most effective tool for dusting the sugar, as it provides better control than a shaker or spoon. If a sieve is not available, a clean, dry tea strainer can serve as a suitable alternative to achieve the same light and even coverage across the snack.
Prep
Before you start
Before beginning, ensure all ingredients are measured and ready for assembly. Line your large baking sheet with parchment paper to prevent sticking. If you are using a large batch, clear enough counter space to accommodate the baking sheet comfortably. Have your fine-mesh sieve clean and dry, as any moisture will cause the powdered sugar to clump immediately upon contact. Ensure the chocolate and peanut butter mixture is melted and slightly cooled, which helps it adhere to the cereal without making it soggy.
Step by step
Method
Phase 1
Coating and Spreading
Step 1: Prepare the Base
Spread the rice cereal squares evenly across a parchment-lined baking sheet. Ensure the cereal is coated in the melted chocolate peanut butter mixture before arranging it in a single layer to allow for even drying.
You’ll need: rice cereal squares · chocolate peanut butter mixture
Look for: The cereal should be evenly spread and fully coated in the chocolate and peanut butter mixture.
Tip: Using a parchment-lined sheet makes cleanup much faster and prevents the chocolate from sticking to the surface.
Checkpoint
The cereal should be thoroughly coated in the chocolate and peanut butter mixture, appearing glossy and uniform. It must be spread in a single layer on the parchment paper. Check that there are no large clumps of cereal stuck together, as this will prevent the sugar from coating every surface effectively during the next step.
Phase 2
Applying the Sugar
Step 2: Add the Snowy Coating
Use a fine-mesh sieve to dust the powdered sugar liberally over the coated cereal squares. Move the sieve back and forth to ensure an even, snowy layer covers the entire surface of the snack.
You’ll need: powdered sugar
Look for: The cereal should appear coated in a layer of white sugar, mimicking a snowy effect.
Tip: Sifting the sugar prevents large clumps from forming, ensuring a smooth and delicate texture on every piece.
Checkpoint
The cereal should be completely covered in a fine layer of white powdered sugar. The appearance should be uniform, with no dark spots of chocolate visible through the sugar. Ensure the sieve is held at a consistent height to prevent concentrated piles of sugar from forming in one area, which would create an overly sweet taste.
Phase 3
Final Assembly
Step 3: Incorporate the Candies
Toss the orange and purple candy-coated chocolates into the mixture. Gently stir or shake the baking sheet to distribute the candies evenly throughout the coated cereal, then serve on a plate.
You’ll need: orange and purple candy-coated chocolates
Look for: The candies should be scattered uniformly throughout the mix, providing a pop of color against the white sugar.
Tip: Add the candies right before serving to keep them from melting or becoming discolored by the powdered sugar.
Checkpoint
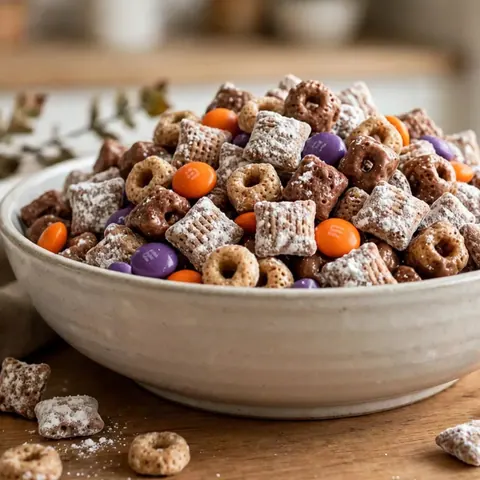
The final snack should look festive, with the vibrant orange and purple candies clearly visible against the white-dusted cereal. The mixture should be dry and easy to pick up without leaving excessive residue on your hands. Ensure the candies are evenly distributed so that every handful contains a variety of colors and textures.
Doneness
How to tell it’s done
The puppy chow is done when the chocolate and peanut butter coating has set to a firm, non-sticky consistency and the powdered sugar is evenly distributed. The cereal should be completely dry to the touch, and the candies should be firmly set within the mixture. There is no protein to cook, so no internal temperature check is required. Simply observe that the chocolate has hardened and the sugar has created a uniform, snowy appearance across all pieces of cereal.
Avoid these
Common mistakes
A common mistake is adding the powdered sugar while the chocolate mixture is still too warm, which causes the sugar to melt and disappear into the coating. Allow the mixture to cool slightly before dusting to ensure that signature snowy look. Another error is over-mixing the candies, which can cause the colored shells to crack or bleed onto the white sugar. Stir the candies in gently at the very end to keep the presentation clean and attractive for serving at your event.
Better results
Tips
Tip 1
To achieve the most professional presentation, sift the powdered sugar in two passes rather than one. This extra effort ensures that even the hidden sides of the cereal squares get a light dusting. If you find that the chocolate is setting too quickly, you can place the baking sheet in the refrigerator for a few minutes to speed up the process, but be careful not to leave it too long, as this can affect the texture of the chocolate.
Tip 2
When serving, consider using a decorative bowl that complements the Halloween theme. Placing the puppy chow in individual clear bags can also make for a wonderful party favor. If you are preparing this for a large crowd, you can easily double the recipe by using two separate baking sheets. Maintaining a single layer on each sheet is key to ensuring that the coating sets properly and that the sugar does not become matted or damp from stacking.
Make it yours
Variations
Spiced Puppy Chow
Add a teaspoon of pumpkin pie spice to the powdered sugar before sifting to give the snack a warm, seasonal flavor that perfectly complements the chocolate and peanut butter base.
Dark Chocolate Version
Substitute the standard chocolate with dark chocolate for a more intense flavor. This balances the sweetness of the sugar and works beautifully with the orange and purple candies.
On the table
Serving suggestions
Serve the puppy chow in a large, wide-mouthed bowl to allow guests to scoop it up easily. Because it is a finger food, providing small napkins or individual serving cups is a thoughtful touch for guests who prefer to keep their hands clean. The bright contrast of the orange and purple candies makes it a centerpiece-worthy snack that adds a festive touch to any table setup during the Halloween season.
For a fun variation, you can serve the puppy chow alongside other themed snacks like popcorn or pretzels to create a sweet and salty snack bar. The versatility of this treat means it pairs well with a variety of beverages, from hot apple cider to cold milk. Always keep a serving scoop nearby so guests can easily portion out their own servings without the need to touch the entire batch, ensuring a hygienic and enjoyable experience for everyone.
Leftovers
Storage & make-ahead
- Fridge
- Store in an airtight container in the refrigerator for up to two weeks if you prefer a chilled snack.
- Freezer
- Freeze in a heavy-duty freezer bag for up to three months; thaw at room temperature before serving.
- Reheat
- This dish is best served at room temperature and does not require reheating.
Store the puppy chow in an airtight container at room temperature to maintain its crisp texture. Keep the container in a cool, dry place away from direct sunlight or heat sources, which could cause the chocolate to soften or the sugar to dissolve. If stored correctly, the snack will remain fresh and crunchy for up to one week, although it is best enjoyed within the first few days for the optimal flavor and texture experience.
Make ahead
This recipe is an excellent candidate for making ahead of time. You can prepare the coated cereal and store it in an airtight container for up to two days before adding the powdered sugar and candies. This allows you to streamline your party preparations. Simply apply the sugar and add the candies just before your guests arrive to ensure the freshest appearance and prevent the sugar from absorbing moisture from the air.
Questions
Frequently asked questions
Can this be made ahead of time?
Yes, this recipe is perfect for making ahead. The coated cereal can be stored in an airtight container for several days before you add the sugar and candies. For the best texture, wait to add the sugar and candies until shortly before serving.
Why is the powdered sugar melting into the chocolate?
This usually happens if the chocolate and peanut butter mixture is still too warm when you add the sugar. Ensure the cereal is completely cool to the touch before dusting. If the room is very humid, the sugar may also absorb moisture, so keep the snack in a dry environment.
Is it possible to use a different type of cereal?
Corn cereal squares are a great alternative to rice cereal squares. Both options provide a similar crunch and neutral base that allows the chocolate and peanut butter flavors to shine through. Avoid using sweetened or flavored cereals, as they can make the final result overly sugary.
Everything in one place: the recipe card below gathers the ingredients, steps and estimated nutrition, ready to print.
Recipe card
Easy Halloween Puppy Chow for Festive Snacking
This simple Halloween puppy chow combines crunchy cereal with rich chocolate, peanut butter, and festive candies. It is the perfect quick treat for any party or gathering.
- Prep
- Cook
- Rest
- Total
- Servings
- 8 cups
Ingredients
Base
- 8 cups rice cereal squares
- 1 cup melted chocolate peanut butter mixture
Topping
- 1 cup powdered sugar
- 1 cup orange and purple candy-coated chocolates
Instructions
Prepare the Base. Spread the rice cereal squares evenly across a parchment-lined baking sheet. Ensure the cereal is coated in the melted chocolate peanut butter mixture before arranging it in a single layer to allow for even drying.
Add the Snowy Coating. Use a fine-mesh sieve to dust the powdered sugar liberally over the coated cereal squares. Move the sieve back and forth to ensure an even, snowy layer covers the entire surface of the snack.
Incorporate the Candies. Toss the orange and purple candy-coated chocolates into the mixture. Gently stir or shake the baking sheet to distribute the candies evenly throughout the coated cereal, then serve on a plate.
Allergens: Gluten, Peanuts, Milk, Soy
Nutrition (estimated, per serving)
- Calories
- 280 kcal
- Protein
- 3.5 g
- Carbs
- 38 g
- Fat
- 12 g
- Fiber
- 1.5 g
- Sugar
- 25 g
- Sodium
- 150 mg
Estimates only: values vary with brands, substitutions and portion sizes.
Recipe by EasyCooks Kitchen · easycooksrecipes.com
Share this recipe
Send it to someone who’d love it, or save it for later.
Spotted a mistake in this recipe? Let us know.
Keep cooking


