Classic Peanut Butter Scotcheroo Bars with Sea Salt
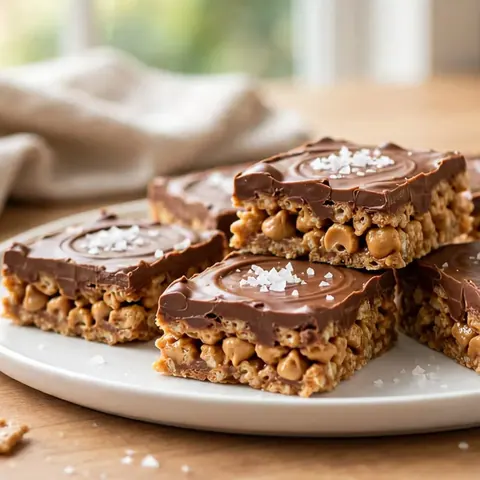
These easy Scotcheroo bars feature a chewy peanut butter cereal base topped with a rich chocolate-butterscotch layer and a sprinkle of sea salt for the perfect sweet and salty treat.
Published 7 min read
- Total time
- Prep
- Cook
- Rest
- Serves
- 16
- Makes 16 squares
- Cuisine
- American
- Calories
- 280
- per serving, estimated

On this page15 sections
Discover the ultimate balance of sweet and savory with these classic Scotcheroo bars. Featuring a satisfyingly crunchy base and a smooth, decadent topping, this recipe is a timeless favorite for any occasion. These bars are incredibly simple to assemble, requiring minimal effort but delivering maximum flavor, making them the perfect go-to dessert for busy home cooks who want to impress with a reliable and delicious treat that never fails to satisfy a crowd.
Scotcheroo bars are a beloved American classic known for their unique blend of textures and flavors. By combining crispy rice cereal with creamy peanut butter and a luscious chocolate-butterscotch topping, these bars offer a delightful experience in every bite. This recipe provides a straightforward method to achieve the perfect consistency, ensuring that each square is sturdy enough to hold its shape while remaining soft and chewy. Whether preparing them for a casual gathering or a quiet weekend treat, this recipe is designed to be approachable and consistently delicious.
The appeal
Why you’ll love it
The method of using a parchment-lined sheet pan ensures that the bars are uniform in thickness and easy to remove once set. By pressing the peanut butter and cereal mixture firmly before adding the topping, the base becomes compact, preventing the bars from crumbling when sliced. This structural integrity is essential for achieving that iconic Scotcheroo appearance and texture that everyone loves.
Melting the chocolate and butterscotch chips together creates a harmonious topping that is more complex than either ingredient alone. The butterscotch adds a deep, caramelized note that complements the saltiness of the peanut butter perfectly. Finishing with a sprinkle of flaky sea salt elevates the flavor profile, cutting through the richness of the chocolate and providing a sophisticated contrast that keeps the palate interested.
What you need
Ingredients
Makes 16 squares.
Base
Topping
Contains:
- Peanuts
- Milk
Tools
Equipment
- Baking sheet
- Parchment paper
- Saucepan
- Spatula
- Measuring cups
Swaps
Substitutions
Instead ofSemi-sweet chocolate chips
UseMilk chocolate chips for a sweeter finish
Instead ofCreamy peanut butter
UseAlmond butter for a nuttier flavor profile
Good to know
Notes
When selecting ingredients, opt for high-quality creamy peanut butter to ensure the base is smooth and binds well. Natural peanut butters that require stirring may contain too much oil and could result in a greasy base, so a standard commercial creamy peanut butter is recommended for the most consistent results. Ensure the crispy rice cereal is fresh to maintain that signature crunch throughout the bars.
The choice of equipment is minimal, but using a heavy-bottomed saucepan for melting the topping is crucial to prevent scorching. If the chocolate begins to set too quickly during the spreading process, simply return the pan to the lowest heat setting for a few seconds. For the sea salt, use a coarse flaky variety rather than fine table salt to ensure the texture remains noticeable against the smooth topping.
Prep
Before you start
Before beginning, ensure all ingredients are measured and ready, as the process moves quickly once the melting starts. Line your baking sheet with parchment paper, leaving a slight overhang on the sides to act as handles for easy removal later. Clear enough space in your refrigerator for the baking sheet to sit perfectly level, which ensures the topping sets evenly without pooling to one side of the pan.
Step by step
Method
Phase 1
Base assembly
Step 1: Prepare the base
Combine the crispy rice cereal with peanut butter in a large bowl. Mix thoroughly until every piece of cereal is evenly coated with the peanut butter mixture. Press this mixture firmly into a parchment-lined baking sheet to create an even, compact slab.
You’ll need: crispy rice cereal · creamy peanut butter
Look for: The mixture should be sticky and hold together firmly in the baking sheet without gaps.
Tip: Use a piece of parchment paper on top of the cereal to press it down without getting your hands messy.
Checkpoint
At the end of this phase, the cereal mixture should be uniformly coated in peanut butter and pressed into a solid, even layer. Check that the corners are filled and the surface is flat. If the mixture feels too loose, press it down more firmly with the back of a spoon or a flat-bottomed measuring cup until it feels compact and unified.
Phase 2
Topping application
Step 2: Make the topping
Melt the chocolate chips and butterscotch chips together in a small saucepan over low heat, stirring constantly until smooth. Pour this mixture immediately over the prepared peanut butter cereal slab. Use a spatula to spread the topping evenly across the surface, ensuring the edges are covered.
You’ll need: semi-sweet chocolate chips · butterscotch chips
Look for: The topping should be glossy, smooth, and easily spreadable without any lumps of unmelted chips.
Tip: Remove from heat just before the chips are fully melted and continue stirring off the heat to prevent burning.
Checkpoint
The topping should be a glossy, smooth, and uniform layer covering the entire surface of the cereal base. Ensure the chocolate-butterscotch blend has reached the edges of the parchment paper. The texture should be consistent throughout, with no visible streaks of unmixed chocolate or butterscotch remaining before you move on to adding the final salt garnish.
Phase 3
Chilling and slicing
Step 3: Finish and chill
Sprinkle the flaky sea salt evenly over the melted chocolate-butterscotch topping while it is still warm and tacky. Transfer the baking sheet to the refrigerator and allow the bars to set completely for at least one hour. Once firm, cut the slab into squares before serving.
You’ll need: flaky sea salt
Look for: The topping should be firm to the touch and no longer tacky before attempting to slice the squares.
Tip: Clean your knife with hot water and dry it between cuts to get perfectly clean edges on your squares.
Checkpoint
The final checkpoint occurs after the required chilling time. The topping must be completely firm and cool to the touch. Before slicing, ensure the bars have spent enough time in the refrigerator to set properly. When cutting, use a steady, downward motion to create clean, sharp edges, resulting in professional-looking squares that are ready for immediate serving.
Doneness
How to tell it’s done
The bars are considered done when the chocolate-butterscotch topping has fully hardened and is no longer tacky to the touch. The base should feel firm and solid when pressed. Use a sharp knife to test a corner; if the knife passes through with a clean cut without dragging or sticking, the bars are ready to be sliced into individual servings.
Avoid these
Common mistakes
A common mistake is overheating the chocolate and butterscotch, which can cause the mixture to seize and become grainy. Always use low heat and remove from the stove as soon as the chips have melted. Another error is failing to press the cereal base firmly enough, which leads to bars that crumble easily. Take the time to ensure the base is packed tightly into the corners of the pan for the best result.
Better results
Tips
Tip 1
For the cleanest slices, let the bars sit at room temperature for about five minutes after removing them from the refrigerator before cutting. This prevents the chocolate topping from cracking under the pressure of the knife. If the bars are too hard to slice, warm the blade of your knife under hot water and wipe it dry before each cut for smooth, effortless results.
Tip 2
If you prefer a more pronounced salty-sweet contrast, consider using a slightly heavier hand with the flaky sea salt. The salt acts as a flavor enhancer, so do not be afraid to distribute it evenly across the entire surface. If you accidentally add too much, you can gently brush off the excess salt before the topping fully hardens, ensuring the flavor remains balanced and enjoyable for everyone.
Make it yours
Variations
Dark Chocolate Version
Substitute the semi-sweet chocolate chips with dark chocolate chips to reduce the overall sweetness and provide a more intense cocoa flavor that pairs beautifully with the butterscotch.
Crunchy Peanut Butter
Use crunchy peanut butter instead of creamy for added texture in the base, which complements the crunch of the rice cereal and creates a more rustic mouthfeel.
On the table
Serving suggestions
Serve these bars on a clean white platter to make the deep colors of the chocolate topping pop. They are perfect for afternoon snacks, dessert tables, or as a thoughtful gift. Because they are rich and satisfying, smaller squares are often sufficient, allowing you to get more servings out of a single batch when hosting larger groups of friends or family members.
Pair these bars with a glass of cold milk or a hot cup of coffee to balance the sweetness of the butterscotch and chocolate. If serving at a party, consider placing the squares in decorative paper liners to make them easier for guests to pick up and enjoy without getting their fingers messy. This small detail adds a polished touch to an otherwise simple and rustic dessert presentation.
Leftovers
Storage & make-ahead
- Fridge
- Keep in an airtight container in the refrigerator for up to 5 days.
- Freezer
- Freeze in a sealed container for up to 3 months; thaw in the fridge before serving.
- Reheat
- These bars are intended to be served chilled or at room temperature; do not reheat.
Store the bars in an airtight container to keep them fresh and prevent them from absorbing other odors in the refrigerator. Place a piece of parchment paper between layers if stacking them to prevent sticking. They will maintain their best texture when kept in a cool, dry place or inside the refrigerator if your kitchen tends to be warm.
Make ahead
These bars are an excellent make-ahead dessert, as they actually improve in flavor after sitting for a few hours. You can prepare them up to two days in advance and keep them stored in the refrigerator. This allows the flavors to meld together perfectly. For the best experience, bring them out of the fridge about ten minutes before serving so the peanut butter base softens slightly.
Questions
Frequently asked questions
Can these bars be made ahead of time?
Yes, these bars are perfect for making ahead. They can be prepared up to two days in advance and stored in the refrigerator. In fact, resting the bars allows the flavors to meld together, often resulting in a better overall taste.
Why is the topping cracking when sliced?
Cracking often happens when the chocolate is sliced while too cold or if the knife is not sharp enough. Try letting the bars sit at room temperature for a few minutes before slicing, or use a warmed knife blade to create cleaner cuts.
Can a different type of cereal be used?
While crispy rice cereal is traditional for this recipe because of its light and airy texture, other puffed grain cereals can be used. However, keep in mind that the texture and overall crunch of the final bars will change significantly with different cereal types.
Everything in one place: the recipe card below gathers the ingredients, steps and estimated nutrition, ready to print.
Recipe card
Classic Peanut Butter Scotcheroo Bars with Sea Salt
These easy Scotcheroo bars feature a chewy peanut butter cereal base topped with a rich chocolate-butterscotch layer and a sprinkle of sea salt for the perfect sweet and salty treat.
- Prep
- Cook
- Rest
- Total
- Servings
- 16 squares
Ingredients
Base
- 6 cups crispy rice cereal
- 1 cup creamy peanut butter
Topping
- 1 cup semi-sweet chocolate chips
- 1 cup butterscotch chips
- 1 tsp flaky sea salt
Instructions
Prepare the base. Combine the crispy rice cereal with peanut butter in a large bowl. Mix thoroughly until every piece of cereal is evenly coated with the peanut butter mixture. Press this mixture firmly into a parchment-lined baking sheet to create an even, compact slab.
Make the topping. Melt the chocolate chips and butterscotch chips together in a small saucepan over low heat, stirring constantly until smooth. Pour this mixture immediately over the prepared peanut butter cereal slab. Use a spatula to spread the topping evenly across the surface, ensuring the edges are covered.
Finish and chill. Sprinkle the flaky sea salt evenly over the melted chocolate-butterscotch topping while it is still warm and tacky. Transfer the baking sheet to the refrigerator and allow the bars to set completely for at least one hour. Once firm, cut the slab into squares before serving.
Allergens: Peanuts, Milk
Nutrition (estimated, per serving)
- Calories
- 280 kcal
- Protein
- 5 g
- Carbs
- 32 g
- Fat
- 16 g
- Fiber
- 1.5 g
- Sugar
- 22 g
- Sodium
- 180 mg
Estimates only: values vary with brands, substitutions and portion sizes.
Recipe by EasyCooks Kitchen · easycooksrecipes.com
Share this recipe
Send it to someone who’d love it, or save it for later.
Spotted a mistake in this recipe? Let us know.
Keep cooking


