Easy Cherry Pineapple Dump Cake
This classic cherry pineapple dump cake is the ultimate stress-free dessert. With only a few pantry staples, you can assemble this warm, fruity, and golden treat in minutes for any occasion.
Published 8 min read
- Total time
- Prep
- Cook
- Rest
- Serves
- 8
- Makes one 9x13 inch baking dish
- Cuisine
- American
- Calories
- 380
- per serving, estimated

On this page15 sections
Discover the effortless magic of a classic dump cake. This recipe relies on simple pantry ingredients to create a rich, fruity dessert that is perfect for any occasion. By layering fruit and dry cake mix, you achieve a delicious texture without the need for complex mixing or multiple bowls. It is the perfect solution for those moments when you need a crowd-pleasing treat with minimal effort and cleanup. Simply assemble, bake, and enjoy the comforting aroma filling your kitchen.
A dump cake is renowned for its straightforward approach to baking, making it a favorite for home cooks seeking convenience. This cherry pineapple combination offers a delightful balance of tart cherries and sweet, juicy pineapple, all topped with a buttery, crisp cake layer. The beauty of this recipe lies in its simplicity; by avoiding the need to prepare a traditional batter, you save significant time while still achieving a warm, satisfying dessert. Serve it warm to fully appreciate the blend of textures and flavors that make this dish a timeless classic.
The appeal
Why you’ll love it
The method works by allowing the heat of the oven to draw the juices from the fruit, which then rise and moisten the dry cake mix. This creates a unique texture that is not quite a cake and not quite a crisp, but a delicious combination of both. The butter on top melts and mingles with the dry mix to form a golden, slightly crunchy crust that contrasts perfectly with the soft fruit base underneath.
Using two different types of fruit provides a complex flavor profile without extra work. The cherry filling provides a thick, jammy consistency, while the pineapple adds brightness and moisture. Because the ingredients are layered rather than stirred, you preserve the individual textures of the fruit, resulting in a dessert that feels more substantial. This technique is highly reliable, ensuring a consistent result every time you prepare it.
What you need
Ingredients
Makes one 9x13 inch baking dish.
Contains:
- Gluten
- Milk
Tools
Equipment
- 9x13 inch baking dish
- Large spoon
- Knife
Swaps
Substitutions
Instead ofYellow cake mix
UseWhite or butter golden cake mix can be used for a slightly different flavor profile.
Instead ofUnsalted butter
UseSalted butter works well if you want to balance the sweetness of the fruit filling.
Good to know
Notes
When choosing your ingredients, ensure the cherry pie filling is of good quality as it forms the bulk of the flavor. For the yellow cake mix, any standard variety will work well. If you prefer a different texture, you can experiment with other fruit fillings, but maintain the ratio of two cans of fruit to one box of cake mix to ensure the proper moisture balance throughout the dish.
The equipment required is minimal, essentially just a standard 9x13 inch baking dish. Using a ceramic or glass dish is ideal as it retains heat well, helping the dessert cook evenly. Ensure your butter is cold when you slice it, as this allows you to place even, thin pieces over the cake mix, which melt gradually to create the perfect crust during the baking process.
Prep
Before you start
Before starting, ensure your oven is preheated to 350°F (175°C) to ensure an even bake. Gather your baking dish and ensure your butter is cold, as it is much easier to slice into thin, uniform pieces when chilled. Have all your cans opened and ready, and clear a workspace on your counter to assemble the layers quickly. This simple preparation ensures that the assembly process remains smooth and efficient, allowing you to get the dessert into the oven without delay.
Step by step
Method
Phase 1
Layering the fruit
Step 1: Prepare the filling
Preheat your oven to 350°F (175°C). Pour the two cans of cherry pie filling into a 9x13 inch baking dish. Spread the drained crushed pineapple evenly over the cherry layer using a large spoon to ensure consistent flavor in every bite.
You’ll need: cherry pie filling · crushed pineapple
Look for: The dish is evenly coated with the fruit mixture.
Tip: Ensure the pineapple is well-drained to prevent the cake from becoming too soggy during the baking process.
Checkpoint
The fruit should be spread in an even, uniform layer across the bottom of the baking dish. Ensure there are no large clumps of pineapple and that the cherry filling is distributed consistently. This foundation is crucial for the moisture levels of the final cake, so take a moment to smooth it out before moving on to the dry ingredients.
Phase 2
Adding the dry mix and butter
Step 2: Assemble the cake
Sprinkle the dry yellow cake mix directly over the fruit layers. Use a spoon to gently distribute the mix so it covers the fruit completely. Arrange the thinly sliced cold butter evenly across the top of the cake mix, ensuring most of the surface is covered.
You’ll need: yellow cake mix · unsalted butter
Look for: The cake mix is covered with a layer of butter slices.
Tip: Covering as much of the cake mix as possible with butter helps ensure all the dry mix becomes moist during baking.
Checkpoint
The yellow cake mix should appear as a smooth, even layer over the fruit. The butter slices should be placed across the surface, covering as much of the dry mix as possible. This arrangement ensures that as the butter melts, it covers the entire top surface, which is essential for developing the characteristic golden, buttery crust during the baking phase.
Phase 3
Baking to perfection
Step 3: Bake and serve
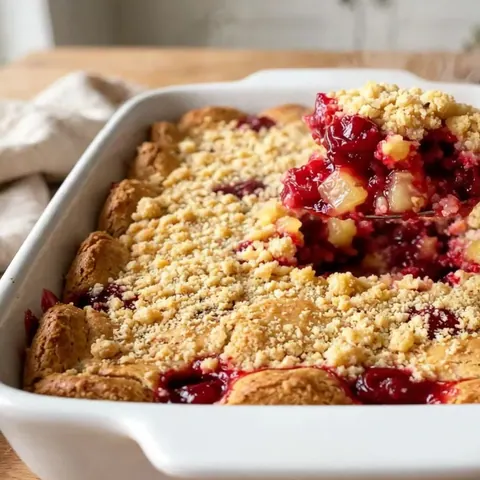
Place the baking dish in the preheated oven and bake for 45 minutes, or until the top is golden brown and the fruit filling is bubbling around the edges. Remove from the oven and let it rest for 10 minutes before serving warm.
You’ll need: cherry pie filling · crushed pineapple · yellow cake mix · unsalted butter
Look for: The top is golden brown and the fruit is bubbling.
Tip: Serving this warm with a scoop of vanilla ice cream makes for an excellent contrast in temperatures.
Checkpoint
The dessert is ready when the edges are bubbling vigorously and the top has turned a beautiful, rich golden brown. The aroma of baked fruit and toasted cake should be prominent. If the center still looks dry or pale, give it a few extra minutes in the oven until you are confident the butter has fully penetrated the cake mix.
Doneness
How to tell it’s done
The dump cake is done when the top has achieved a deep golden brown color and the fruit filling is visibly bubbling, particularly around the edges of the baking dish. The cake mix should be fully moistened by the fruit juices and melted butter, with no dry, powdery spots remaining on the surface. A light tap on the top should reveal a slightly crisp crust that gives way to the warm, soft fruit layer underneath.
Avoid these
Common mistakes
A common mistake is failing to drain the crushed pineapple properly, which can lead to an overly liquid or soggy dessert. Another error is not covering enough of the cake mix with butter; if patches of dry mix remain, they will not cook into the golden crust you desire. Additionally, avoid stirring the layers after assembly, as this disrupts the intended structure and prevents the distinct layers of fruit and cake from forming correctly during the bake.
Better results
Tips
Tip 1
For a more elevated presentation, consider sprinkling a small handful of chopped nuts, such as pecans or walnuts, over the butter slices before baking. This adds a nice crunch and a nutty flavor that complements the sweetness of the fruit. Ensure they are distributed evenly so they toast properly without burning. You can also serve the cake with a light dusting of cinnamon if you enjoy warm spices with your fruit desserts.
Tip 2
If you find that the edges are browning too quickly while the center remains undercooked, you can loosely cover the baking dish with aluminum foil for the first half of the baking time. This allows the fruit to heat through properly without over-browning the crust. Simply remove the foil for the final 15 minutes of baking to ensure the top becomes perfectly golden and crisp, providing that desirable contrast in texture.
Make it yours
Variations
Apple Cinnamon Dump Cake
Replace the cherry filling with two cans of apple pie filling and add one teaspoon of ground cinnamon to the cake mix before sprinkling it over the fruit for a warm, spiced variation.
Berry Blast Dump Cake
Use a mix of strawberry and blueberry pie fillings instead of cherry and pineapple for a vibrant, berry-forward dessert that pairs wonderfully with a side of fresh whipped cream.
On the table
Serving suggestions
This dump cake is best served warm, shortly after it has finished its 10-minute rest. The warmth enhances the fruit flavors and ensures the crust retains its buttery, crisp texture. A large serving spoon is ideal for scooping out portions, ensuring that every plate receives a generous amount of both the fruit base and the golden, crumbly top layer. It is a hearty dessert that stands well on its own.
To take the serving experience to the next level, accompany each portion with a generous scoop of high-quality vanilla bean ice cream. The cold, creamy ice cream melting into the warm, fruity cake creates a classic combination that is hard to beat. You can also add a dollop of fresh whipped cream if you prefer something slightly lighter. Serve immediately while the cake is still warm for the best possible experience for your guests.
Leftovers
Storage & make-ahead
- Fridge
- Store in an airtight container in the refrigerator for up to 3 days.
- Freezer
- Freeze in a freezer-safe container for up to 1 month. Thaw in the refrigerator overnight.
- Reheat
- Reheat individual portions in the microwave until warm, or in a 300°F (150°C) oven until heated through.
Store any leftovers in an airtight container or cover the original baking dish tightly with plastic wrap. Keep it in the refrigerator to maintain freshness. The dessert can be kept for up to three days. When ready to eat, you can enjoy it cold, but it is best when gently reheated to restore that comforting, warm, and soft texture that makes it so appealing when fresh out of the oven.
Make ahead
While this dish is best served fresh, you can assemble the fruit and cake mix layers a few hours in advance and keep them in the refrigerator. However, for the best results, wait to add the butter slices until just before you are ready to bake. This prevents the butter from soaking into the dry mix too early, which helps maintain the desired texture of the crust once it comes out of the oven.
Questions
Frequently asked questions
Can this be made with a different fruit filling?
Yes, you can substitute the cherry or pineapple with almost any canned pie filling. As long as you maintain the total volume of fruit, the recipe will bake successfully.
Why is the top not golden after the recommended baking time?
The top might remain pale if the butter was not distributed evenly or if the oven temperature was slightly low. Ensure the butter covers most of the cake mix.
Can this be frozen for later?
Yes, this dish freezes well. Allow it to cool completely before covering it tightly and placing it in the freezer. Thaw in the refrigerator before reheating as directed.
Everything in one place: the recipe card below gathers the ingredients, steps and estimated nutrition, ready to print.
Recipe card
Easy Cherry Pineapple Dump Cake
This classic cherry pineapple dump cake is the ultimate stress-free dessert. With only a few pantry staples, you can assemble this warm, fruity, and golden treat in minutes for any occasion.
- Prep
- Cook
- Rest
- Total
- Servings
- one 9x13 inch baking dish
Ingredients
- 2 cans cherry pie filling
- 1 can crushed pineapple, drained
- 1 box yellow cake mix
- 1 cup unsalted butter, thinly sliced
Instructions
Prepare the filling. Preheat your oven to 350°F (175°C). Pour the two cans of cherry pie filling into a 9x13 inch baking dish. Spread the drained crushed pineapple evenly over the cherry layer using a large spoon to ensure consistent flavor in every bite.
Assemble the cake. Sprinkle the dry yellow cake mix directly over the fruit layers. Use a spoon to gently distribute the mix so it covers the fruit completely. Arrange the thinly sliced cold butter evenly across the top of the cake mix, ensuring most of the surface is covered.
Bake and serve. Place the baking dish in the preheated oven and bake for 45 minutes, or until the top is golden brown and the fruit filling is bubbling around the edges. Remove from the oven and let it rest for 10 minutes before serving warm.
Allergens: Gluten, Milk
Nutrition (estimated, per serving)
- Calories
- 380 kcal
- Protein
- 2.5 g
- Carbs
- 65 g
- Fat
- 14 g
- Fiber
- 1.5 g
- Sugar
- 42 g
- Sodium
- 320 mg
Estimates only: values vary with brands, substitutions and portion sizes.
Recipe by EasyCooks Kitchen · easycooksrecipes.com
Share this recipe
Send it to someone who’d love it, or save it for later.
Spotted a mistake in this recipe? Let us know.
Keep cooking


