Slow-Cooker Bacon Cheeseburger Dip for Easy Entertaining
This rich and creamy slow-cooker bacon cheeseburger dip brings the classic diner flavors of beef, sharp cheddar, and tangy pickles directly to your appetizer table.
Published 12 min read
- Total time
- Prep
- Cook
- Serves
- 8
- Makes approximately 4 cups of dip
- Cuisine
- American
- Calories
- 420
- per serving, estimated

On this page16 sections
Elevate your next gathering with this decadent, slow-cooker bacon cheeseburger dip that captures the nostalgic essence of a classic diner meal in every single scoop. This recipe is designed to be the ultimate set-it-and-forget-it appetizer, ensuring you spend less time in the kitchen and more time enjoying the company of your guests. It is rich, savory, and perfectly balanced with tangy pickles and crispy bacon, making it a guaranteed favorite for any game day or casual weekend party.
The magic of this dip lies in its simplicity and the way it transforms humble, pantry-friendly ingredients into a sophisticated, molten masterpiece. By using a slow cooker, you allow the deep, savory notes of the ground beef and bacon to harmonize with the creaminess of the cheddar and cream cheese. The addition of secret sauce and dill pickles provides a necessary brightness that cuts through the richness, resulting in a complex flavor profile that keeps everyone coming back for another bite.
The appeal
Why you’ll love it
The slow-cooking method is essential for achieving the perfect, velvety texture that defines a high-quality dip. By cooking on low heat for 90 minutes, the cheeses melt gradually, preventing the proteins from seizing or the fat from separating. This gentle approach ensures that every ingredient, from the seasoned beef to the tangy pickles, is evenly distributed, creating a consistent flavor in every spoonful. The slow cooker also acts as a natural serving vessel, keeping the dip at an ideal temperature for the duration of your event.
Layering the ingredients correctly is the secret to a successful dip that requires minimal active effort. By placing the heavier, denser components like the ground beef and cubed cheese at the base, you create a stable foundation that heats evenly. The cream cheese and secret sauce then act as the binding agents, melting into the base to create the signature molten consistency. This systematic approach guarantees a uniform result every time, eliminating the need for constant stirring or monitoring while the dip reaches its peak deliciousness.
What you need
Ingredients
Makes approximately 4 cups of dip.
Dip Base
Garnish
Contains:
- Milk
- Sesame
- Mustard
Tools
Equipment
- Slow cooker
- Large skillet
- Chef knife
- Cutting board
- Measuring cups
- Serving spoon
Swaps
Substitutions
Instead ofGround chuck
UseUse ground round or ground sirloin for a slightly different fat ratio, ensuring it is fully browned before adding to the slow cooker insert.
Instead ofYellow cheddar queso
UseSubstitute with shredded sharp cheddar cheese if queso is unavailable, though the texture will be slightly thicker and require more frequent stirring during the melting process.
Instead ofBurger secret sauce
UseCreate a quick substitute by mixing equal parts mayonnaise, ketchup, and yellow mustard with a dash of garlic powder and paprika to mimic the classic flavor profile.
Good to know
Notes
When selecting your ingredients, prioritize high-quality ground chuck, as the slightly higher fat content provides superior moisture and flavor compared to leaner alternatives. The choice of yellow cheddar queso is crucial for the dip's color and mouthfeel; look for a variety that melts smoothly without becoming grainy. If you prefer a more pronounced smoky flavor, consider using applewood-smoked bacon, which complements the savory profile of the beef and the tanginess of the pickles perfectly, creating a balanced and robust overall experience.
For the best results, use a standard ceramic slow cooker insert, which provides even heat distribution across the bottom and sides. If your slow cooker has a tendency to run hot, check the consistency after 75 minutes to ensure the dip is not overheating. While the recipe calls for specific amounts of pickles and secret sauce, feel free to adjust these slightly to suit your personal preference for tanginess. Always ensure your garnishes are added just before serving to maintain their texture and visual appeal.
Prep
Before you start
Before you begin, ensure that all your ingredients are measured and ready, especially the ground beef, which must be fully browned and drained of excess fat. Having your pickles diced and your cheese cubed beforehand makes the assembly process seamless and quick. Verify that your slow cooker insert is clean and dry, and ensure you have a sturdy serving spoon and appropriate dipping vessels like waffle chips or toasted slider buns ready. Preparation is the key to a stress-free cooking process that allows you to focus on the final assembly.
Step by step
Method
Phase 1
Base assembly and preparation
Step 1: Prepare the base components
Begin by browning the ground chuck in a large skillet over medium-high heat until it is thoroughly cooked through. Once browned, drain any excess fat carefully from the pan. Ensure the ground chuck reaches an internal temperature of 160°F (71°C) to guarantee safety. Set the meat aside briefly while you prepare the remaining dip components according to the specified measurements.
You’ll need: ground chuck
Internal temperature 160°F (71°C)
Look for: The ground beef should be deeply browned and no longer pink in the center.
Tip: To achieve the best flavor, season the beef lightly with salt and pepper during the browning process before transferring it to the slow cooker.
Step 2: Combine ingredients in the slow cooker
Place the browned ground chuck, crispy bacon, cubed yellow cheddar queso, cream cheese, burger secret sauce, and diced dill pickles into the ceramic slow cooker insert. Stir the mixture gently to ensure an even distribution of the ingredients before securing the lid. This layering method allows the flavors to meld effectively as the cheeses begin to melt and combine with the savory beef and tangy pickles during the cooking cycle.
You’ll need: ground chuck · crispy bacon · yellow cheddar queso · cream cheese · burger secret sauce · dill pickles
Look for: All ingredients should be layered evenly within the ceramic insert for consistent melting.
Tip: Cut the cream cheese into smaller cubes before adding to the pot to ensure it melts smoothly and incorporates fully into the cheese dip base.
Checkpoint
At the end of this phase, all ingredients should be layered neatly in the slow cooker insert. The beef should be browned, the bacon chopped, and the cheeses cubed, creating a solid foundation for the slow-cooking process. Ensure the ingredients are evenly distributed, as this is the most critical step for achieving a consistent texture. Before moving on, verify that the lid is securely in place, as this is necessary to trap the heat and moisture required for the slow-melting process to begin effectively.
Phase 2
Simmering and melting process
Step 3: Slow cook the dip
Set the slow cooker to the low setting and cook the mixture for 90 minutes. During this time, the heat will gradually melt the queso and cream cheese, creating a velvety and cohesive dip. Monitor the progress occasionally to ensure the edges do not become too hot. The goal is a uniform, molten consistency where the beef and bacon are suspended throughout the rich, cheesy sauce without any separation of the fats.
You’ll need: ground chuck · crispy bacon · yellow cheddar queso · cream cheese · burger secret sauce · dill pickles
Look for: The dip should be bubbling gently and possess a smooth, velvety, and molten consistency.
Tip: Resist the urge to lift the lid too often, as this releases heat and moisture, which can prolong the cooking time and affect the final texture.
Checkpoint
After 90 minutes of cooking on low, the dip should be transformed into a cohesive, bubbling, and velvety mixture. The aroma should be savory and inviting, with the tang of the pickles and the richness of the cheese becoming apparent. The mixture should be uniform throughout, with no signs of separation or uneven melting. If you notice any spots that appear thicker than others, a gentle stir will help to incorporate everything fully before you proceed to the final garnishing and serving stage of the process.
Phase 3
Final garnish and service
Step 4: Garnish and serve
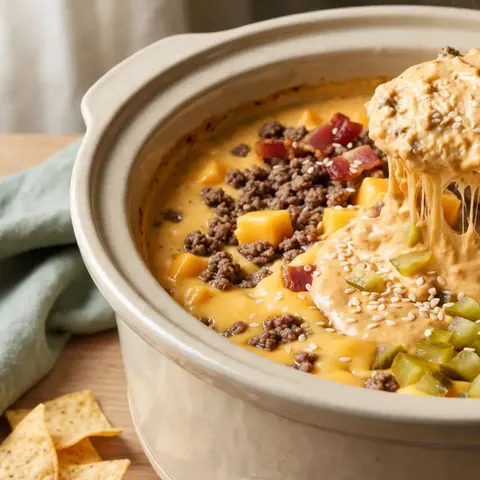
Once the dip has achieved a smooth and bubbling consistency, turn off the slow cooker. Carefully garnish the surface with a generous sprinkle of toasted sesame seeds and additional diced dill pickles for a fresh pop of flavor and texture. Serve the dip directly from the warm ceramic insert while it remains hot and molten, accompanied by waffle-cut potato chips or toasted slider bun wedges for dipping and scooping.
You’ll need: sesame seeds · dill pickles
Look for: The dip should be hot, glossy, and finished with the vibrant colors of the seeds and pickles.
Tip: Keep the slow cooker on the warm setting if you are serving this over an extended period to maintain the perfect dipping consistency for your guests.
Checkpoint
The final result should be a beautiful, piping-hot dip that is ready to be enjoyed immediately. The garnish of toasted sesame seeds and extra pickles should provide a fresh, visual contrast to the rich, golden hue of the cheese dip. The consistency should be perfect for scooping, remaining thick enough to cling to chips or toasted bun wedges without dripping. Once you have added the final touches, the dip is ready to be the centerpiece of your appetizer spread for your guests to enjoy.
Doneness
How to tell it’s done
The dip is officially done when the cheese mixture is completely molten, glossy, and smooth, with no remaining lumps of cream cheese or unmelted queso. The beef should be fully incorporated, and the entire mixture should be bubbling gently around the edges. When you stir the dip, it should pull away from the sides of the ceramic insert cleanly. The internal temperature of the beef has already been verified during the initial browning phase, so focus on achieving a uniform, hot, and creamy consistency throughout the entire vessel.
Avoid these
Common mistakes
Avoid the common mistake of adding raw ground meat directly to the slow cooker, as this will result in a greasy and unappealing texture. Always brown and drain the beef thoroughly before starting the dip. Another frequent error is using a high heat setting, which can cause the cheese to separate or scorch at the bottom of the insert. Stick to the low setting to ensure a gradual melt. Finally, do not overcrowd the slow cooker, as this prevents even heat circulation and may lead to inconsistent melting of the cheeses.
Cook safely
Food safety
Safe internal temperatures
Cook to at least these temperatures, measured with an instant-read thermometer in the thickest part.
| Food | Minimum internal temperature |
|---|---|
| Ground meat | 160°F (71°C) |
Better results
Tips
Tip 1
To keep the dip at the perfect consistency throughout your party, keep the slow cooker on the warm setting. If the dip begins to thicken too much as it sits, stir in a small splash of warm milk or a little extra secret sauce to loosen the texture without compromising the flavor. This simple adjustment ensures that every guest enjoys the same smooth, molten experience from the first scoop to the last, regardless of how long the dip has been sitting out during the event.
Tip 2
Presentation is just as important as taste when it comes to appetizers. When serving, place the slow cooker on a heat-proof trivet and arrange your dipping vessels in a visually appealing manner around the base. Using a variety of textures, such as crunchy waffle-cut chips alongside soft, toasted slider bun wedges, provides a delightful contrast that keeps the eating experience interesting. The visual appeal of the vibrant yellow cheese, paired with the colorful garnishes, makes this a standout dish that invites everyone to dig in immediately.
Make it yours
Variations
Spicy Jalapeño Twist
Incorporate 1/2 cup of finely diced pickled jalapeños into the dip during the assembly phase to add a vibrant, spicy kick that cuts through the richness of the cheese and beef. This simple addition elevates the flavor profile significantly for those who enjoy a bit of heat in their appetizers.
Smoky BBQ Style
Replace the secret sauce with your favorite hickory-smoked barbecue sauce to give the dip a deeper, wood-fired flavor profile that pairs beautifully with the crispy bacon and ground beef. This variation offers a robust, tangy twist that is perfect for outdoor gatherings or casual backyard parties.
Crispy Onion Topping
For added texture, finish the dip with a generous layer of crispy fried onions just before serving, providing a satisfying crunch that mimics a classic diner burger topping. The contrast between the creamy, molten dip and the crunchy onions creates a delightful sensory experience in every single bite.
Herb-Infused Version
Stir in two tablespoons of finely chopped fresh chives or parsley when garnishing the dip to add a fresh, aromatic note that balances the savory, indulgent flavors of the cheese. These fresh herbs provide a bright, clean finish that cuts through the richness of the beef and cheddar.
On the table
Serving suggestions
When serving this dip, variety is key to a great experience for your guests. Offer a selection of dippers that can stand up to the thick, hearty nature of the cheeseburger dip. Waffle-cut potato chips are ideal because their sturdy shape and ridges are perfect for scooping up a generous amount of the dip without breaking. Toasted slider bun wedges provide a soft, bread-like base that perfectly mimics the experience of eating a real cheeseburger, making them a popular choice for those who want a more substantial bite.
Consider placing the serving vessels in a way that allows guests to easily access the dip from all sides. A small ladle or a large, sturdy spoon is essential for portioning the dip onto plates or into small bowls. If you are serving a large crowd, you might want to divide the dip into two smaller slow cookers to maintain the temperature throughout the party. This thoughtful arrangement ensures that the dip remains the focus of the table and that everyone can enjoy it comfortably throughout the entire gathering.
Leftovers
Storage & make-ahead
- Fridge
- Store in an airtight container in the refrigerator for up to 3 days. Allow to cool for no more than 2 hours before refrigerating.
- Freezer
- Freezing is not recommended as the dairy-based texture will likely separate and become grainy upon thawing.
- Reheat
- Reheat gently on the stovetop over low heat or in the microwave in short intervals, stirring frequently until smooth and hot.
If you have leftovers, allow the dip to cool for no more than two hours before transferring it to an airtight container. Properly sealed, the dip can be refrigerated for up to three days. When you are ready to enjoy it again, reheat it gently on the stovetop over low heat or in the microwave in short intervals, stirring frequently to ensure the cheese remains smooth and does not separate. Avoid freezing the dip, as the dairy components will likely lose their creamy texture upon thawing.
Make ahead
You can prepare the dip components in advance to save time on the day of your event. Brown the ground beef and store it in the refrigerator until you are ready to assemble the dip. You can also dice the pickles and chop the bacon a day ahead. When you are ready to cook, simply combine all the prepared ingredients in the slow cooker insert, add the cheese and sauce, and proceed with the cooking instructions. This organized approach makes hosting effortless and stress-free.
Questions
Frequently asked questions
Can this dip be made in advance?
Yes, you can certainly prepare the components ahead of time. Brown the ground beef and store it in the refrigerator along with the chopped bacon and diced pickles. When you are ready to serve, simply combine all the ingredients in the slow cooker and cook as directed. This method is perfect for hosting, as it reduces your active kitchen time and ensures that the dip is fresh and hot when your guests arrive. Just remember to keep the refrigerated components chilled until the very last moment.
Why does the dip sometimes separate?
Separation usually occurs if the dip is cooked at too high a temperature or if the heat is uneven. Using the low setting on your slow cooker is critical for a gradual, uniform melt. If you notice any signs of fat separation, a vigorous stir with a sturdy spoon will usually bring the emulsion back together. Ensure that your cheeses are cubed to a similar size before adding them, as this helps them melt at the same rate, preventing the cheese proteins from clumping or separating from the fats.
What is the best way to keep the dip warm during a party?
The best way to keep the dip at the ideal serving temperature is to leave it in the slow cooker on the warm setting throughout your event. This low, consistent heat will maintain the dip's molten, velvety consistency without the risk of scorching or drying out. If you notice it getting slightly thick after a few hours, you can stir in a tablespoon of warm milk to restore the desired texture. This ensures that the last guest to arrive enjoys the same quality as the first.
How can the cheese be substituted?
While yellow cheddar queso is recommended for its superior melting properties and classic color, you can experiment with other cheeses. Sharp cheddar, Monterey Jack, or even a blend of pepper jack can be used, though you may need to add a small amount of milk or cream to achieve the same smooth, dip-able texture. When using shredded cheese, ensure it is freshly grated, as pre-shredded varieties often contain anti-caking agents that can interfere with the way the cheese melts and combines with the other ingredients.
What should be served alongside this dip?
The best accompaniments for this dip are items that can handle its hearty, thick texture. Waffle-cut potato chips are a favorite because their shape and ridges are perfect for scooping. Toasted slider bun wedges are also excellent, as they add a soft, bready element that makes the dip feel like a complete meal. For a lighter option, you could also offer sturdy vegetable sticks like celery or bell peppers, which provide a crisp, refreshing contrast to the rich, savory flavors of the bacon cheeseburger dip.
Everything in one place: the recipe card below gathers the ingredients, steps and estimated nutrition, ready to print.
Recipe card
Slow-Cooker Bacon Cheeseburger Dip for Easy Entertaining
This rich and creamy slow-cooker bacon cheeseburger dip brings the classic diner flavors of beef, sharp cheddar, and tangy pickles directly to your appetizer table.
- Prep
- Cook
- Total
- Servings
- approximately 4 cups of dip
Ingredients
Dip Base
- 1 lb ground chuck, browned and seasoned
- 1 1/2 cups crispy bacon, chopped
- 16 oz yellow cheddar queso, cubed
- 8 oz cream cheese
- 1/2 cup burger secret sauce
- 3/4 cup diced dill pickles
Garnish
- 1 tbsp sesame seeds, for serving
- 1/4 cup diced dill pickles, for serving
Instructions
Prepare the base components. Begin by browning the ground chuck in a large skillet over medium-high heat until it is thoroughly cooked through. Once browned, drain any excess fat carefully from the pan. Ensure the ground chuck reaches an internal temperature of 160°F (71°C) to guarantee safety. Set the meat aside briefly while you prepare the remaining dip components according to the specified measurements.
Combine ingredients in the slow cooker. Place the browned ground chuck, crispy bacon, cubed yellow cheddar queso, cream cheese, burger secret sauce, and diced dill pickles into the ceramic slow cooker insert. Stir the mixture gently to ensure an even distribution of the ingredients before securing the lid. This layering method allows the flavors to meld effectively as the cheeses begin to melt and combine with the savory beef and tangy pickles during the cooking cycle.
Slow cook the dip. Set the slow cooker to the low setting and cook the mixture for 90 minutes. During this time, the heat will gradually melt the queso and cream cheese, creating a velvety and cohesive dip. Monitor the progress occasionally to ensure the edges do not become too hot. The goal is a uniform, molten consistency where the beef and bacon are suspended throughout the rich, cheesy sauce without any separation of the fats.
Garnish and serve. Once the dip has achieved a smooth and bubbling consistency, turn off the slow cooker. Carefully garnish the surface with a generous sprinkle of toasted sesame seeds and additional diced dill pickles for a fresh pop of flavor and texture. Serve the dip directly from the warm ceramic insert while it remains hot and molten, accompanied by waffle-cut potato chips or toasted slider bun wedges for dipping and scooping.
Allergens: Milk, Sesame, Mustard
Nutrition (estimated, per serving)
- Calories
- 420 kcal
- Protein
- 18.5 g
- Carbs
- 9 g
- Fat
- 34 g
- Fiber
- 0.5 g
- Sugar
- 3 g
- Sodium
- 850 mg
Estimates only: values vary with brands, substitutions and portion sizes.
Recipe by EasyCooks Kitchen · easycooksrecipes.com
Share this recipe
Send it to someone who’d love it, or save it for later.
Spotted a mistake in this recipe? Let us know.
Keep cooking


