Creamy Peanut Butter Fudge
Create a dense, velvety peanut butter fudge in your own kitchen. This simple recipe delivers a rich, melt-in-your-mouth texture that is perfect for any occasion.
Published 13 min read
- Total time
- Prep
- Cook
- Rest
- Serves
- 16
- Makes 16 squares
- Cuisine
- American
- Calories
- 240
- per serving, estimated
On this page15 sections
Master the art of creating decadent, velvety peanut butter fudge right in your own home kitchen with this straightforward and reliable method. By focusing on the essential interaction between high-quality peanut butter and butter, you will achieve a dense, melt-in-your-mouth texture that rivals even the finest confectioneries. This recipe is designed to be approachable for every home cook, providing clear, step-by-step instructions that ensure consistent, professional results every single time you prepare this classic, beloved, and timeless sweet treat.
Peanut butter fudge is a timeless classic that relies on simplicity and technique to achieve its characteristic rich, creamy, and dense profile. This recipe provides a foolproof approach to creating a perfectly balanced confection that highlights the nutty depth of peanut butter while maintaining a smooth, luxurious texture. Whether you are preparing a batch for a special gathering, a holiday celebration, or simply as an indulgent treat to have on hand, this method offers the reliability and quality needed to ensure your fudge is always the highlight of the dessert table. By following these precise steps, you will enjoy a consistent, high-quality result that delivers deep, satisfying flavor in every single bite.
The appeal
Why you’ll love it
The method focuses on the precise emulsion of fats, which is the secret to achieving a smooth, velvet-like consistency. By gently heating the peanut butter and butter together, you create a stable base that prevents the fudge from becoming grainy or separating as it sets. This controlled melting process ensures the final product remains cohesive, dense, and luxurious, providing the perfect mouthfeel that characterizes high-quality, homemade fudge. The careful cooling process then builds the necessary structure, allowing the fudge to hold its shape perfectly while retaining that signature melt-in-your-mouth quality that makes this dessert so incredibly satisfying to eat.
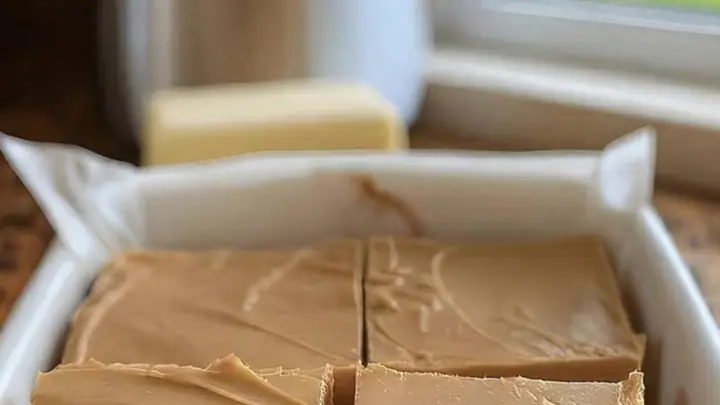
Furthermore, the use of a ceramic dish for setting the fudge promotes even cooling, which is essential for developing the ideal texture throughout the entire block. Because ceramic has excellent heat retention properties, it allows the mixture to firm up gradually rather than too quickly, which helps prevent unwanted crystallization. This steady cooling process is vital for ensuring that the fats remain finely distributed, resulting in a dense, uniform structure that cuts cleanly into beautiful squares. By paying attention to these physical properties during the setting phase, you guarantee that each piece of fudge remains consistent in both flavor and texture, providing a professional-grade experience that is both reliable and truly delightful.
What you need
Ingredients
Makes 16 squares.
Contains:
- Peanuts
- Milk
Tools
Equipment
- Medium saucepan
- Parchment-lined ceramic dish
- Small metal spatula
- Fork
Swaps
Substitutions
Instead ofUnsalted butter
UseSalted butter can be used if you decrease the added salt elsewhere in the recipe to maintain the desired flavor balance.
Instead ofCreamy peanut butter
UseNatural peanut butter is not recommended as the oil separation may affect the final texture and stability of the fudge significantly.
Good to know
Notes
When selecting ingredients for this recipe, the quality of your peanut butter is paramount. Use a standard commercial creamy peanut butter, as its consistent fat content and emulsifiers are crucial for maintaining the fudge's stability. Avoid natural varieties that separate, as the excess oil can lead to a greasy finish that prevents the fudge from setting correctly. The butter should be high-quality unsalted butter to ensure the most authentic and well-rounded flavor profile for your finished dessert. Always check that your ceramic dish is of a suitable size to ensure the fudge reaches the desired thickness, which is key to the final mouthfeel of the squares.
Regarding equipment, a medium saucepan with a heavy bottom is ideal for melting the butter and peanut butter without creating hot spots that could scorch the mixture. A small metal spatula is the most effective tool for this recipe, as its precision allows you to scrape every bit of the mixture from the sides of the pan and press the fudge firmly into the corners of your ceramic dish. Parchment paper is essential for lining the dish, as it ensures the fudge releases cleanly without breaking or sticking, allowing you to achieve perfectly shaped squares every time. Always ensure your tools are clean and dry before beginning the process to avoid any unwanted moisture.
Prep
Before you start
Before you begin, ensure your workspace is clean, organized, and free of distractions. Prepare your ceramic dish by lining it completely with parchment paper, allowing the edges to overhang slightly, which will make removing the set fudge much easier later on. Measure all your ingredients accurately using standard measuring tools to ensure the ratios remain consistent. Have your small metal spatula ready and clear a space in your refrigerator where the dish can sit undisturbed while it cools. Proper preparation is the foundation of a successful dessert, and having everything ready before you turn on the stove will help you focus on the cooking process and achieve the perfect fudge consistency.
Step by step
Method
Phase 1
Melting and Emulsification
Step 1: Melting the base
Combine the creamy peanut butter and unsalted butter in a medium saucepan over low heat. Stir the mixture gently and consistently until both ingredients are fully melted and incorporated into a smooth, uniform liquid consistency. Remove the saucepan from the heat source immediately to prevent any scorching or separation of the natural oils, ensuring the base remains silky and perfectly emulsified for the next stage of the preparation.
You’ll need: creamy peanut butter · unsalted butter
Look for: Watch for the butter and peanut butter to become completely melted, smooth, and glossy without any visible streaks or separation.
Tip: Keep the heat low to ensure the butter melts slowly, preventing the peanut butter from overheating and losing its characteristic creamy, rich texture.
Checkpoint
At the end of this phase, the peanut butter and butter should be completely melted together into a single, glossy, and smooth liquid. The mixture should be uniform in color, with no streaks or visible pockets of separated fat. It is crucial that the base is fully emulsified before you move to the next step, as this provides the foundation for the final texture. If you notice any separation, stir the mixture gently but firmly until it becomes cohesive and shiny again. This phase is about creating a perfectly balanced, stable foundation that will ensure your final fudge is dense, creamy, and free of any graininess or texture issues.
Phase 2
Spreading the Fudge
Step 2: Spreading the fudge
Transfer the prepared fudge mixture into the prepared parchment-lined ceramic dish. Use a small metal spatula to spread the mixture evenly, pressing it firmly into the corners to create a level, dense surface. Ensure the thickness is uniform across the entire dish to guarantee that each square will have the same consistent texture and appearance once set. Smooth the top surface with the back of the spatula to create a professional, polished finish before cooling begins.
Look for: The surface should be flat, level, and pressed firmly into the corners, showing a uniform thickness across the entire square of the dish.
Tip: Lightly greasing the spatula with a tiny amount of oil can help prevent the fudge from sticking, making it easier to achieve a perfectly smooth top.
Checkpoint
By the end of this phase, the fudge should be spread evenly into the ceramic dish, with the surface smoothed and the edges pressed firmly into the corners. The mixture should look uniform and feel like a thick, smooth paste. Ensure there are no air pockets or uneven spots in the dish, as this will affect the final appearance of the squares. This consistency is exactly what you need to achieve the signature dense, melt-in-your-mouth quality that makes this fudge so incredibly appealing. The surface should be flat and level, indicating that the fudge is ready for the final setting process in the refrigerator.
Phase 3
Setting and Slicing
Step 3: Setting and serving
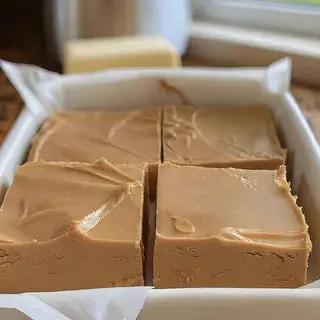
Place the ceramic dish in the refrigerator to allow the fudge to set completely for at least two hours. Once firm, remove the fudge from the dish using the parchment paper edges as handles. Place the block on a cutting board and slice it into clean, uniform squares using a sharp knife. Serve the squares at room temperature for the best experience, allowing the fudge to soften slightly for that signature melt-in-your-mouth quality that defines a perfectly prepared batch.
Look for: The fudge should feel firm to the touch and hold its shape perfectly when lifted, indicating it has cooled and set to the ideal consistency.
Tip: For the cleanest cuts, run your knife under warm water and wipe it dry between each slice to ensure the edges of the fudge remain sharp.
Checkpoint
After the cooling period, the fudge should be completely firm to the touch, feeling dense and solid throughout. It should release easily from the ceramic dish when you lift it by the parchment paper edges. When you slice into the block, the knife should reveal a smooth, consistent interior without any crumbling or stickiness. If the fudge feels solid and holds its shape perfectly when you lift a piece, it is ready to be served. This checkpoint confirms that the setting process was successful, resulting in a perfectly textured treat that is ready to be enjoyed at room temperature for the best possible experience.
Doneness
How to tell it’s done
The fudge is properly done when it has set into a firm, dense block that holds its shape when lifted from the dish. The surface should feel smooth and matte rather than tacky or oily. When you slice into it, the knife should glide through with a bit of resistance, indicating the correct density. There is no protein to cook here, so there is no specific internal temperature to reach. Instead, rely on the visual and tactile cues of firmness and uniform texture. If the fudge feels too soft or sticky after two hours, it may need additional time in the refrigerator to fully firm up before you attempt to slice it into individual pieces.
Avoid these
Common mistakes
A common mistake is using natural peanut butter, which contains separated oils that can cause the fudge to become greasy and prevent it from setting into a firm, dense block. Another error is failing to maintain low heat, which can scorch the peanut butter and ruin the delicate flavor profile. Additionally, rushing the cooling process by placing the fudge in the freezer rather than the refrigerator can lead to uneven setting or unwanted crystallization. Ensure you follow the temperature guidelines and allow the fudge to set gradually in the refrigerator to maintain the integrity of the emulsion and achieve the best possible final result for your homemade dessert.
Better results
Tips
Tip 1
To achieve the most consistent and professional results, always use a high-quality, standard creamy peanut butter. The emulsifiers in these brands are key to preventing the oils from separating, which is essential for maintaining the fudge's structure and smooth, velvety mouthfeel. If you are preparing this for a special event, consider cutting the fudge into smaller, bite-sized squares, which makes them easier to serve and enjoy. Remember that fudge is a rich confection, so smaller portions are often preferred by guests. Keeping the fudge at room temperature for about ten minutes before serving will help it reach the ideal, melt-in-your-mouth consistency that highlights its delicate and creamy texture perfectly.
Tip 2
Temperature control is the most critical factor when working with fudge. When melting the base, keep the heat as low as possible to avoid burning the peanut butter, which can impart a bitter flavor and ruin the delicate balance of the recipe. If you find the mixture is setting too quickly while you are trying to spread it, ensure your ceramic dish is at room temperature rather than chilled. Patience is key during the setting phase, so avoid the temptation to speed it up in the freezer, as this can affect the fat distribution and result in a less smooth finish. Proper care at every stage will ensure your homemade fudge is consistently delicious and visually stunning.
Make it yours
Variations
Sea Salt Peanut Fudge
Sprinkle a light dusting of flaky sea salt over the top of the fudge immediately after spreading it into the dish. The salt provides a sophisticated contrast to the richness, enhancing the overall nutty flavor profile of the peanut butter in every single bite.
Crunchy Peanut Fudge
Stir in a half-cup of chopped roasted peanuts into the fudge mixture after the base has been fully melted. This variation adds a pleasant, satisfying crunch that complements the velvety, dense texture of the creamy peanut butter base perfectly, creating a delightful contrast in mouthfeel.
Maple Peanut Fudge
Add a tablespoon of pure maple syrup to the base while melting the butter and peanut butter. The maple adds a subtle, earthy sweetness that pairs exceptionally well with the peanut butter, giving the fudge a warm, comforting flavor profile that is ideal for cooler weather.
Spiced Peanut Fudge
Whisk in a half-teaspoon of ground cinnamon into the melted peanut butter mixture. The spice provides a subtle, warming note that balances the intensity of the peanut butter, resulting in a complex and aromatic dessert that is perfect for serving during the autumn and winter months.
On the table
Serving suggestions
When serving your homemade peanut butter fudge, presentation is everything. Arrange the squares neatly on a clean, plain white plate to allow the rich, golden-brown color of the fudge to stand out. Because the fudge is quite dense and decadent, it pairs wonderfully with a simple, unsweetened beverage like black coffee or a light tea, which helps to balance the sweetness and intensity of the peanut butter. If you are serving it as part of a larger dessert spread, place the squares alongside lighter options to provide a variety of textures and flavors that will appeal to all your guests and ensure that everyone finds something they truly enjoy.
Consider serving the fudge at room temperature, as this is when the texture is at its most luxurious and the flavor is most pronounced. Allowing the squares to sit out for a few minutes before eating lets the natural fats soften slightly, resulting in that signature melt-in-your-mouth experience that is the hallmark of a great fudge. If you are hosting a formal event, you can place each square in a small decorative paper liner, which not only looks professional but also makes the fudge easier for guests to handle without getting their fingers sticky. This small touch adds a refined element to your presentation, making your simple homemade treat feel like a truly special occasion dessert.
Leftovers
Storage & make-ahead
- Fridge
- Store in the refrigerator only if necessary due to extreme heat, as room temperature is preferred for the ideal texture.
- Freezer
- Freezing is not recommended for this fudge, as it can alter the delicate texture and cause undesirable changes to the fats.
- Reheat
- Do not reheat the fudge, as it is intended to be enjoyed at room temperature for the best flavor and creamy consistency.
Store the fudge in an airtight container at room temperature for up to one week to maintain its best flavor and texture. If your environment is particularly warm, you may choose to keep the container in a cool, dry place away from direct sunlight, which can cause the fats to soften too much. Avoid storing the fudge in the refrigerator unless it is very hot, as the cool air can cause the fats to solidify and make the texture feel slightly firm or dry. Always ensure the container is properly sealed to prevent the fudge from absorbing any unwanted odors from other foods stored nearby.
Make ahead
This recipe is excellent for making ahead, as the fudge keeps very well and actually develops a more cohesive texture after sitting for a day. You can prepare the fudge up to three days before you plan to serve it, storing it in an airtight container at room temperature. If you prefer to have it ready even further in advance, you can slice the fudge and layer it with parchment paper in a container, which makes it easy to remove individual pieces as needed. The fudge will maintain its quality and flavor profile beautifully, making it a reliable and stress-free dessert option for any upcoming gathering or occasion.
Questions
Frequently asked questions
Can this fudge be made without a ceramic dish?
Yes, you can use any square or rectangular baking pan made of glass or metal. Just ensure you line the pan thoroughly with parchment paper so the fudge releases cleanly. A ceramic dish is simply recommended for its excellent heat retention properties, which promote a more steady and even cooling process, but other materials will work perfectly well if they are prepared properly and lined with parchment.
Why is the fudge grainy instead of smooth?
Grainy fudge is usually caused by the ingredients not being fully melted or by the mixture cooling too quickly, which encourages fat separation. Ensure you stir the peanut butter and butter together thoroughly until they are completely incorporated. Also, avoid rushing the cooling process by using the freezer; allowing the fudge to set gradually in the refrigerator is essential for maintaining a smooth, velvety texture throughout the entire block of fudge.
Can natural peanut butter be used in this recipe?
Natural peanut butter is generally not recommended because the oil separates from the solids, which can lead to a greasy finish that prevents the fudge from setting into a firm, dense block. For the best results and a consistent, professional-quality texture, use a standard commercial creamy peanut butter, which contains the necessary emulsifiers to keep the fudge stable, smooth, and perfectly set for slicing into clean, uniform squares.
How can the fudge be sliced into clean squares?
To achieve perfectly clean and professional-looking squares, use a sharp, thin-bladed knife. Running the blade under warm water and wiping it completely dry between each cut will prevent the knife from sticking to the fudge, allowing you to create sharp, clean edges. This simple technique is the secret to ensuring your fudge looks as good as it tastes when you serve it to your guests or family.
Does this recipe need to be refrigerated?
Once the fudge has set completely, it can be stored at room temperature in an airtight container for up to one week. You only need to refrigerate it if your kitchen environment is particularly warm, which could cause the fudge to lose its shape. Storing it at room temperature is actually preferred, as it ensures the texture remains soft, creamy, and ready to enjoy at any time without needing to wait for it to soften.
Everything in one place: the recipe card below gathers the ingredients, steps and estimated nutrition, ready to print.
Recipe card
Creamy Peanut Butter Fudge
Create a dense, velvety peanut butter fudge in your own kitchen. This simple recipe delivers a rich, melt-in-your-mouth texture that is perfect for any occasion.
- Prep
- Cook
- Rest
- Total
- Servings
- 16 squares
Ingredients
- 2 cups creamy peanut butter
- 1/2 cup unsalted butter
Instructions
Melting the base. Combine the creamy peanut butter and unsalted butter in a medium saucepan over low heat. Stir the mixture gently and consistently until both ingredients are fully melted and incorporated into a smooth, uniform liquid consistency. Remove the saucepan from the heat source immediately to prevent any scorching or separation of the natural oils, ensuring the base remains silky and perfectly emulsified for the next stage of the preparation.
Spreading the fudge. Transfer the prepared fudge mixture into the prepared parchment-lined ceramic dish. Use a small metal spatula to spread the mixture evenly, pressing it firmly into the corners to create a level, dense surface. Ensure the thickness is uniform across the entire dish to guarantee that each square will have the same consistent texture and appearance once set. Smooth the top surface with the back of the spatula to create a professional, polished finish before cooling begins.
Setting and serving. Place the ceramic dish in the refrigerator to allow the fudge to set completely for at least two hours. Once firm, remove the fudge from the dish using the parchment paper edges as handles. Place the block on a cutting board and slice it into clean, uniform squares using a sharp knife. Serve the squares at room temperature for the best experience, allowing the fudge to soften slightly for that signature melt-in-your-mouth quality that defines a perfectly prepared batch.
Allergens: Peanuts, Milk
Nutrition (estimated, per serving)
- Calories
- 240 kcal
- Protein
- 7 g
- Carbs
- 6 g
- Fat
- 21 g
- Fiber
- 1.5 g
- Sugar
- 3 g
- Sodium
- 180 mg
Estimates only: values vary with brands, substitutions and portion sizes.
Recipe by EasyCooks Kitchen · easycooksrecipes.com
Share this recipe
Send it to someone who’d love it, or save it for later.
Spotted a mistake in this recipe? Let us know.
Keep cooking


