Classic Butter Marble Loaf Cake with Velvety Zebra Swirl
Discover the secret to a perfect zebra swirl in this classic butter marble loaf cake. With a velvety crumb and rich chocolate notes, it is the ultimate treat for afternoon tea.
Published 8 min read
- Total time
- Prep
- Cook
- Rest
- Serves
- 10
- Makes one 9-inch loaf
- Cuisine
- American
- Calories
- 320
- per serving, estimated

On this page16 sections
This classic butter marble cake has the most velvety crumb and an impossible zebra swirl. Whether you are looking for a show-stopping dessert or a simple afternoon treat, this recipe delivers a perfect balance of vanilla and chocolate in every single slice.
The marble cake is a timeless classic that brings together the best of two worlds: the aromatic warmth of vanilla butter cake and the intense, deep notes of chocolate. Achieving that signature zebra swirl may look like a daunting professional task, but it is actually quite straightforward when you follow the right technique. This recipe focuses on creating a high-quality, moist base that holds its shape, allowing the distinct ribbons of chocolate to stand out beautifully against the golden vanilla background. Perfect for coffee mornings or tea time, this loaf is sure to impress.
The appeal
Why you’ll love it
The method of creaming the butter and sugar until fluffy is essential for building the structure of the cake. By incorporating air into the fat, you create tiny pockets that expand during baking, resulting in a light and tender crumb. This mechanical leavening is what gives the cake its characteristic velvety texture that melts in the mouth.
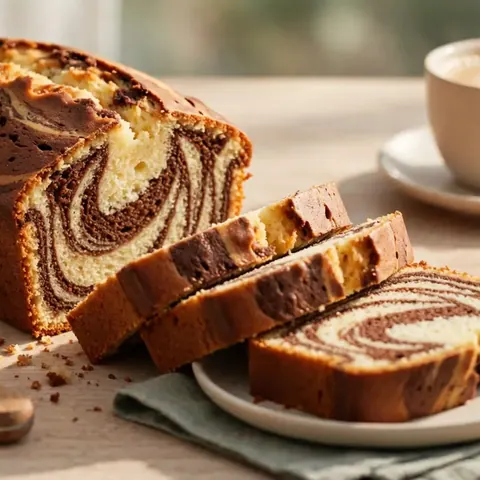
Alternating the batters in the pan ensures that the chocolate and vanilla flavors are distributed evenly throughout the loaf. Using a knife to create figure-eight motions is the key to achieving the distinct marble pattern without over-mixing the two batters. This careful handling prevents the colors from bleeding, maintaining the visual appeal of the zebra-like swirl.
What you need
Ingredients
Makes one 9-inch loaf.
Batter
Chocolate Swirl
Garnish
Contains:
- Gluten
- Eggs
- Milk
Tools
Equipment
- Stand mixer or electric hand mixer
- Loaf pan
- Mixing bowls
- Serrated knife
- Rubber spatula
- Sifter
Swaps
Substitutions
Instead ofDutch cocoa powder
UseRegular unsweetened cocoa powder can be used, though the color will be slightly lighter.
Instead ofAll-purpose flour
UseCake flour can be substituted for an even more delicate, fine-grained crumb.
Good to know
Notes
For the best results, use high-quality butter and pure vanilla extract. The quality of these primary ingredients significantly impacts the depth of flavor in the finished cake. Dutch-processed cocoa powder is recommended for the chocolate portion, as it offers a deeper color and a smoother, less acidic chocolate flavor than natural cocoa powder, which is ideal for this specific visual contrast.
The choice of loaf pan can affect the baking time. A standard 9-inch metal pan is ideal for even heat conduction. If using a glass pan, consider lowering the oven temperature slightly or increasing the baking time, as glass retains heat differently. Always ensure the baking powder is fresh, as it provides the necessary lift to make the loaf light and airy.
Prep
Before you start
Before beginning, ensure all ingredients are measured and at room temperature. This is particularly important for the butter and eggs, as temperature discrepancies can cause the batter to break or curdle. Preheat your oven to 350°F (175°C) and line your loaf pan with parchment paper, leaving an overhang on the sides for easy removal. Have your mixing bowls, spatula, and sifter ready on the counter to keep the process organized. By preparing your workspace in advance, you can focus on the delicate task of folding and swirling without rushing.
Step by step
Method
Phase 1
Creaming the foundation
Step 1: Cream the base
In a large bowl, cream the softened butter and sugar together using an electric mixer until the mixture is light, airy, and fluffy. Add the eggs one at a time, beating well after each addition to ensure proper emulsification. Pour in the milk and vanilla extract, then mix until just combined.
You’ll need: softened butter · sugar · eggs · milk · pure vanilla extract
Look for: The mixture should look pale, smooth, and significantly increased in volume.
Tip: Ensure the eggs are at room temperature to prevent the butter from curdling.
Checkpoint
The butter and sugar should be pale yellow and look like a thick, smooth paste. As the eggs are added, the mixture should become light, fluffy, and emulsified. If the mixture looks grainy or separated, continue beating on medium speed until it returns to a smooth, cohesive consistency before adding the milk and vanilla.
Phase 2
Creating the contrast
Step 2: Prepare the batters
Sift the flour and baking powder into the wet mixture. Gently fold the dry ingredients into the batter using a spatula until no streaks of flour remain. Remove one-third of the vanilla batter and place it in a separate bowl. Sift the cocoa powder into this smaller portion, add the extra two tablespoons of milk, and fold until smooth.
You’ll need: all-purpose flour · baking powder · Dutch cocoa powder · milk
Look for: The chocolate batter should be uniform in color and smooth in texture.
Tip: Do not overmix the batter once the flour is added to keep the cake tender.
Checkpoint
The vanilla batter should be thick and smooth, holding its shape when dropped from a spoon. Once you divide the batter and fold in the cocoa, the chocolate portion should be a rich, dark brown color. Ensure the cocoa powder is fully incorporated so there are no dry pockets or white streaks remaining in the chocolate batter.
Phase 3
Swirling and baking
Step 3: Assemble and bake
Grease a loaf pan. Spoon alternating scoops of vanilla and chocolate batter into the pan. Run a knife through the batter in figure-eight motions to create the marble effect. Bake at 350°F (175°C) for 45 minutes until the cake is domed and a toothpick comes out clean. Dust with powdered sugar after cooling.
You’ll need: powdered sugar
Internal temperature 160°F (71°C)
Look for: The cake is done when it springs back to the touch and reaches an internal temperature of 160°F (71°C).
Tip: Do not over-swirl, or the colors will blend into a single muddy brown.
Checkpoint
The batter should be spooned into the pan in distinct, alternating dollops. After the knife has been passed through in figure-eights, the top should show a clear, beautiful pattern of light and dark. The cake is baked when the top feels firm to the touch and has a beautiful, golden-brown crust that has risen uniformly.
Doneness
How to tell it’s done
The cake is ready when it is golden brown on top and has risen significantly. A skewer or toothpick inserted into the center of the loaf should come out clean or with only a few moist crumbs attached. Because this recipe contains eggs, it is important that the center reaches an internal temperature of 160°F (71°C) to ensure it is fully set and safe to consume. Let the cake rest in the pan for at least 15 minutes before unmolding.
Avoid these
Common mistakes
A common mistake is overmixing the batter after adding the flour, which develops too much gluten and leads to a tough, dense cake. Another frequent error is swirling the knife too many times between the chocolate and vanilla layers, which results in a muddy color rather than a defined marble effect. Finally, ensure the butter is truly softened, not melted, as melted butter cannot hold the air needed for a fluffy texture during the creaming phase.
Cook safely
Food safety
Safe internal temperatures
Cook to at least these temperatures, measured with an instant-read thermometer in the thickest part.
| Food | Minimum internal temperature |
|---|---|
| Egg dishes | 160°F (71°C) |
Better results
Tips
Tip 1
To ensure the best marble effect, drop the batter by the spoonful rather than pouring it. This gives you more control over the distribution of the two colors. When running the knife through the batter, avoid touching the bottom of the pan too aggressively, as this can cause the batter to stick or burn at the base of the loaf.
Tip 2
If you find the top of the cake is browning too quickly before the center is done, you can loosely tent it with a piece of aluminum foil. This prevents the top from drying out or burning while allowing the heat to continue cooking the center of the loaf. This simple trick ensures a moist cake with a perfectly golden crust every time.
Make it yours
Variations
Orange Marble Cake
Add one tablespoon of freshly grated orange zest to the vanilla batter for a bright, citrusy twist that pairs wonderfully with the deep chocolate swirl.
Coffee Marble Loaf
Dissolve one teaspoon of instant espresso powder in the milk used for the chocolate batter to enhance the depth of the cocoa and create a mocha-inspired marble effect.
On the table
Serving suggestions
For an elegant presentation, slice the cake with a serrated knife using a gentle sawing motion. This prevents the delicate crumb from compressing and ensures the beautiful zebra swirl is visible in every slice. Serve the cake at room temperature, perhaps with a light dusting of powdered sugar or a side of fresh berries to add a touch of brightness.
If you want to elevate the serving experience, consider pairing a slice with a dollop of unsweetened whipped cream or a small side of fruit compote. The simplicity of the marble cake makes it a versatile companion to various accompaniments, but it is equally delicious on its own with a hot cup of tea or fresh coffee.
Leftovers
Storage & make-ahead
- Fridge
- Store in an airtight container for up to 5 days, though room temperature is preferred for the best texture.
- Freezer
- Wrap the cooled loaf tightly in plastic wrap and store in a freezer-safe bag for up to 2 months. Thaw at room temperature.
- Reheat
- If desired, warm individual slices in the microwave for 10-15 seconds, or lightly toast them until just warm.
Keep the cooled cake in an airtight container at room temperature for up to three days. For longer storage, wrap the loaf tightly in plastic wrap and then in a layer of foil to prevent it from drying out. Avoid storing the cake in the refrigerator, as the cold environment can cause the starches to recrystallize, making the crumb taste stale.
Make ahead
This cake is actually better the day after it is baked, as the flavors have time to mellow and the crumb becomes even more moist. You can bake it a day in advance, let it cool completely, and wrap it tightly. It will maintain its texture perfectly, making it an excellent option for entertaining or for quick morning tea service.
Questions
Frequently asked questions
Why is the marble cake dry?
A dry cake is often the result of overbaking or measuring the flour incorrectly. Always spoon the flour into the measuring cup and level it off with a knife rather than scooping directly from the bag, which can pack the flour down and lead to using too much.
Can salted butter be used?
Yes, you can use salted butter, but be aware that it will add a savory note to the cake. If you choose to use salted butter, omit any additional salt that might be called for in similar recipes to keep the flavor profile balanced and pleasant for a dessert.
How can the cake be checked for doneness?
The best way to check is with a toothpick or a cake tester inserted into the center of the loaf. It should come out clean or with just a few moist crumbs. Additionally, the cake should reach an internal temperature of 160°F (71°C) to ensure the eggs are properly cooked.
Everything in one place: the recipe card below gathers the ingredients, steps and estimated nutrition, ready to print.
Recipe card
Classic Butter Marble Loaf Cake with Velvety Zebra Swirl
Discover the secret to a perfect zebra swirl in this classic butter marble loaf cake. With a velvety crumb and rich chocolate notes, it is the ultimate treat for afternoon tea.
- Prep
- Cook
- Rest
- Total
- Servings
- one 9-inch loaf
Ingredients
Batter
- 125 g softened butter
- 1 1/2 cups sugar
- 3 large eggs
- 1 cup milk
- 1 tsp pure vanilla extract
- 2 1/2 cups all-purpose flour
- 2 tsp baking powder
Chocolate Swirl
- 3 tbsp Dutch cocoa powder
- 2 tbsp milk
Garnish
- powdered sugar, for serving
Instructions
Cream the base. In a large bowl, cream the softened butter and sugar together using an electric mixer until the mixture is light, airy, and fluffy. Add the eggs one at a time, beating well after each addition to ensure proper emulsification. Pour in the milk and vanilla extract, then mix until just combined.
Prepare the batters. Sift the flour and baking powder into the wet mixture. Gently fold the dry ingredients into the batter using a spatula until no streaks of flour remain. Remove one-third of the vanilla batter and place it in a separate bowl. Sift the cocoa powder into this smaller portion, add the extra two tablespoons of milk, and fold until smooth.
Assemble and bake. Grease a loaf pan. Spoon alternating scoops of vanilla and chocolate batter into the pan. Run a knife through the batter in figure-eight motions to create the marble effect. Bake at 350°F (175°C) for 45 minutes until the cake is domed and a toothpick comes out clean. Dust with powdered sugar after cooling.
Allergens: Gluten, Eggs, Milk
Nutrition (estimated, per serving)
- Calories
- 320 kcal
- Protein
- 4.5 g
- Carbs
- 42 g
- Fat
- 15 g
- Fiber
- 1 g
- Sugar
- 25 g
- Sodium
- 180 mg
Estimates only: values vary with brands, substitutions and portion sizes.
Recipe by EasyCooks Kitchen · easycooksrecipes.com
Share this recipe
Send it to someone who’d love it, or save it for later.
Spotted a mistake in this recipe? Let us know.
Keep cooking