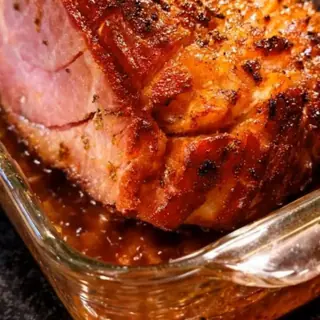
Honey Glazed Baked Ham: A Perfectly Juicy and Glossy Centerpiece
Discover the secret to a perfectly juicy honey glazed baked ham that features a beautifully caramelized, sticky crust. This classic dish is ideal for gatherings, offering tender, moist slices every time. Follow this reliable method to achieve professional results at home with simple ingredients.
Published 13 min read
- Total time
- Prep
- Cook
- Rest
- Serves
- 12
- Cuisine
- American
- Calories
- 320
- per serving, estimated

On this page16 sections
Transform a standard centerpiece into a culinary masterpiece with this honey glazed baked ham method. By focusing on slow roasting and a carefully balanced glaze, you achieve a professional-quality result that is both visually stunning and incredibly flavorful. This guide provides the foundational techniques required to ensure your ham remains tender, juicy, and perfectly caramelized every single time you prepare it. Whether you are hosting a festive gathering or a weekend dinner, this recipe delivers consistent, mouthwatering results that impress every guest.
The secret to an exceptional baked ham lies in the balance between gentle heat and a high-quality, caramelized glaze. This recipe employs a slow-roasting technique that preserves the natural moisture of the meat, while the honey-based glaze creates a glossy, sticky exterior that is both visually appealing and delicious. By following these precise steps, you will master the art of the perfect ham, ensuring that every slice is tender, flavorful, and beautifully presented. This method is designed to be straightforward, allowing you to focus on the quality of your ingredients and the perfection of your technique for a truly memorable dining experience.
The appeal
Why you’ll love it
The slow-roasting method is essential because it allows the heat to penetrate the center of the ham gradually, preventing the exterior from drying out before the middle is fully cooked. By keeping the pan covered during the initial phase, you create a self-basting environment that retains moisture. This results in meat that is exceptionally tender and succulent, providing the perfect canvas for the sweet and savory glaze that follows. Consistent temperature control ensures that the protein fibers remain relaxed rather than contracting, which is the primary reason for the superior texture achieved through this specific roasting process.
The glaze application technique is designed to maximize caramelization while avoiding the common issue of burning the sugars. By brushing the honey mixture onto the ham in the final stage and basting frequently, you build up a rich, deep, and glossy crust. This layering effect ensures that the flavor is evenly distributed across the surface, providing a perfect contrast between the savory meat and the sweet, caramelized exterior. The combination of honey creates a complex flavor profile that adheres beautifully to the ham, resulting in a professional, restaurant-quality finish that is both sticky and visually stunning.
What you need
Ingredients
Makes 12 servings.
Main
Glaze
Tools
Equipment
- Large roasting pan
- Basting brush
- Carving knife
- Meat thermometer
- Aluminum foil
- Cutting board
Swaps
Substitutions
Instead ofHoney
UsePure maple syrup provides a similar viscous texture and deep sweetness that works beautifully as a glaze base.
Instead ofBone-in ham
UseA spiral-cut ham can be substituted, though it requires careful monitoring to prevent the edges from drying out during the roasting process.
Instead ofHoney
UseAgave nectar can be used for a slightly more neutral sweetness while maintaining the necessary sticky consistency for the glaze.
Good to know
Notes
Choosing the right ham is the first step toward success. A bone-in ham is highly recommended because the bone helps distribute heat evenly and adds significant depth of flavor to the meat during the roasting process. When selecting your ham, look for one with a good layer of fat on the exterior, as this fat will render down and help keep the meat moist. If you are using a pre-cooked ham, the goal is simply to heat it through and develop the glaze, so monitor the temperature closely to ensure the texture remains tender and does not become tough.
Regarding equipment, a heavy-duty roasting pan is vital for even heat distribution. If you do not have a dedicated roasting pan, a deep glass baking dish is a suitable alternative, provided it is large enough to hold the ham comfortably without touching the sides. The use of a reliable meat thermometer is non-negotiable in this recipe; it is the only way to guarantee the ham is cooked to the safe internal temperature of 145°F (63°C) without overcooking. Always have a quality basting brush on hand to apply the glaze evenly, reaching into all the scored areas for maximum flavor coverage.
Prep
Before you start
Before you begin, ensure your workspace is clean and well-organized. Take the ham out of the refrigerator thirty minutes before roasting to bring it closer to room temperature, which helps in achieving an even cook. Preheat your oven precisely to 325°F (165°C), as this lower temperature is the key to maintaining moisture. Prepare your roasting pan by placing the ham in the center, and have your aluminum foil ready to cover it tightly. Gather your glaze ingredients and have them measured and ready to whisk, so you can focus entirely on the cooking process once the ham is in the oven, ensuring a smooth and stress-free preparation.
Step by step
Method
Phase 1
Initial roasting phase
Step 1: Prepare the ham and oven
Preheat your oven to 325°F (165°C). Place the ham in a large roasting pan, fat side up. Score the surface of the ham in a diamond pattern to allow the glaze to penetrate deeply. Cover the pan tightly with aluminum foil to trap moisture during the initial roasting period, ensuring the meat remains tender and succulent throughout the cooking process.
You’ll need: bone-in ham
Look for: The oven reaches the set temperature and the ham is scored evenly across the entire surface area.
Tip: Ensure the ham is at room temperature for about thirty minutes before placing it in the oven to promote even cooking throughout the thickest parts of the roast.
Step 2: Roast the ham
Roast the ham in the preheated oven for approximately one and a half hours. The goal is to gently bring the internal temperature up without drying out the exterior. Check the progress carefully by using a meat thermometer inserted into the thickest part of the meat, avoiding the bone to get an accurate reading as it cooks.
You’ll need: bone-in ham
Look for: The ham is heated through and feels slightly firm to the touch, indicating it is ready for the glaze application.
Tip: Keep the roasting pan covered with foil during this phase to maintain a humid environment, which helps keep the meat fibers moist and tender before glazing.
Checkpoint
At the end of this phase, the ham should be heated through and feel slightly firm to the touch. The surface will be warm and ready to accept the glaze. Check that the internal temperature is rising steadily. The kitchen should be filled with the subtle aroma of roasting meat, and the ham should appear plump and moist under the foil cover. Ensure the roasting pan is clean and the ham is positioned correctly for even heat distribution before you move on to the glazing process, as this sets the foundation for the final texture.
Phase 2
Glazing and caramelization phase
Step 3: Prepare the honey glaze
While the ham is roasting, whisk the honey in a small bowl until it is smooth and ready for application. This glaze will create the signature sticky, glossy coating that makes the dish stand out. Keep the mixture at room temperature until the ham is ready to be glazed, ensuring easy application and a smooth, even finish across the entire surface of the meat.
You’ll need: honey
Look for: The honey has a uniform, pourable consistency that is ready to be brushed onto the meat.
Tip: If the honey is too thick to brush easily, gently warm it in a microwave-safe dish for ten seconds to improve its flow and integration.
Step 4: Apply the glaze
Remove the foil from the roasting pan and brush the honey generously over the surface of the ham, ensuring it drips into the scored diamond cuts. Return the ham to the oven, uncovered, and continue roasting for another thirty minutes, basting with the pan juices every ten minutes to build up layers of caramelized flavor and a deep, glossy finish. Ensure the ham reaches an internal temperature of 145°F (63°C) and let it rest for at least 3 minutes.
You’ll need: bone-in ham · honey
Internal temperature 145°F (63°C)
Look for: The glaze is bubbling vigorously and has transformed into a rich, dark amber color that clings to the surface of the ham.
Tip: Pay close attention during the final minutes, as the high sugar content can caramelize quickly; if the edges darken too fast, tent them lightly with foil.
Checkpoint
When this phase is complete, the ham will have developed a rich, dark amber color with a thick, sticky, and glossy glaze covering the entire surface. The aroma will be intense, sweet, and savory. Check that the glaze has bubbled and caramelized into the diamond scores, creating a beautiful visual texture. The ham should appear succulent and well-coated, with no signs of burnt spots or dry edges. This is the stage where the final flavor is locked in, so ensure the glaze is evenly applied and has properly adhered to the meat for the best result.
Phase 3
Final resting and carving phase
Step 5: Rest and carve
Remove the ham from the oven once it reaches an internal temperature of 145°F (63°C). Let the meat rest for at least fifteen minutes on a cutting board before carving. This resting period is crucial as it allows the juices to redistribute throughout the meat, resulting in slices that are incredibly moist, tender, and easy to handle without falling apart. Ensure the meat is rested for at least 3 minutes before serving.
You’ll need: bone-in ham
Internal temperature 145°F (63°C)
Look for: The ham has reached a safe internal temperature of 145°F (63°C) and the juices have settled after resting on the cutting board.
Tip: Use a sharp carving knife to slice against the grain for the most tender bites, ensuring each slice captures some of that delicious, sticky exterior glaze.
Checkpoint
The ham should now be at a stable 145°F (63°C) and have rested for at least fifteen minutes. When you carve into it, the meat should be exceptionally tender, moist, and easy to slice. The juices should be clear, and the interior should appear perfectly cooked and succulent. The glaze should be firm enough to stay on the slices, providing a perfect contrast to the savory meat. The ham is now ready to be plated and served, showcasing the successful balance of flavors and textures achieved through the careful roasting and resting process.
Doneness
How to tell it’s done
To determine when the ham is perfectly finished, use a digital meat thermometer. Insert the probe into the thickest part of the meat, ensuring it does not touch the bone, which can provide a false reading. The internal temperature must reach 145°F (63°C). Once this temperature is reached, the ham is safe to consume. The meat should look moist and have a deep, glossy amber crust from the caramelized glaze. After removing it from the oven, allow it to rest for at least fifteen minutes, as this is essential for the juices to redistribute, ensuring every slice remains succulent and tender when served to your guests.
Avoid these
Common mistakes
A common mistake is failing to score the ham properly, which prevents the glaze from penetrating the meat and results in a flat flavor profile. Always use a sharp knife to create a diamond pattern across the surface. Another error is neglecting to cover the ham initially, which causes the exterior to dry out before the center is cooked. Additionally, avoid using too much heat in the final stage, as the high sugar content in the glaze can burn quickly; if the ham begins to darken too rapidly, reduce the oven temperature or tent the edges with foil to protect the delicate, sticky crust.
Cook safely
Food safety
Safe internal temperatures
Cook to at least these temperatures, measured with an instant-read thermometer in the thickest part.
| Food | Minimum internal temperature |
|---|---|
| Whole cuts of meat | 145°F (63°C)Then rest at least 3 minutes |
Better results
Tips
Tip 1
For a deeper flavor profile, consider adding a splash of orange juice to your honey glaze. These additions complement the natural sweetness of the honey and the saltiness of the ham, creating a more complex and professional result. Always whisk your glaze thoroughly to ensure the ingredients are perfectly emulsified, which helps the mixture adhere more effectively to the meat during the final roasting stage, preventing it from sliding off into the roasting pan.
Tip 2
When carving the ham, use a long, sharp carving knife and steady, rhythmic strokes to create thin, uniform slices. If the ham is very large, start by removing a few slices from the side to create a flat base, which will make the rest of the carving process much safer and more efficient. Arrange the slices slightly overlapping on a warm platter to showcase the beautiful, glossy glaze on each piece, making the presentation as impressive as the flavor of the dish itself.
Make it yours
Variations
Spiced Honey Glaze
Incorporate one teaspoon of ground cinnamon and a half-teaspoon of ground nutmeg into the honey mixture. These warming spices add a festive, aromatic depth that works exceptionally well with the natural saltiness of the ham, creating a sophisticated flavor profile perfect for holiday gatherings or special winter dinners.
Mustard Honey Glaze
Stir two tablespoons of Dijon mustard into the honey. The sharp, tangy heat of the mustard perfectly cuts through the sweetness of the honey, providing a balanced and vibrant glaze that enhances the savory notes of the ham and creates a beautiful, tangy, and caramelized exterior crust.
Citrus Honey Glaze
Add the zest of one orange and a tablespoon of fresh orange juice to your glaze. The bright, acidic notes of the citrus provide a refreshing contrast to the rich, sticky honey, resulting in a complex and well-balanced glaze that elevates the entire dish and adds a lovely, fragrant aroma to the meat.
Garlic Herb Glaze
Whisk in two cloves of finely minced garlic and a tablespoon of fresh, chopped thyme into the glaze. These savory additions provide an earthy and aromatic dimension to the sweetness of the honey, creating a rustic and deeply flavorful crust that pairs wonderfully with the tender, succulent meat of the roasted ham.
On the table
Serving suggestions
Serve the ham on a large, warmed platter to ensure it stays at the perfect temperature while being presented to your guests. Arrange the slices in an overlapping pattern, which not only looks elegant but also helps keep the meat moist by preventing air exposure. You can garnish the platter with fresh herbs like parsley or rosemary to add a pop of color that contrasts beautifully with the deep, glossy amber of the honey-glazed exterior, making the dish the undeniable centerpiece of your meal.
Pair the ham with classic sides that balance its sweet and savory profile, such as roasted root vegetables, creamy mashed potatoes, or a fresh green salad with a sharp vinaigrette. These sides provide a variety of textures and flavors that complement the richness of the ham without overpowering it. Ensure you have a serving fork and a sharp knife nearby so guests can easily serve themselves, as the tender slices will be effortless to portion and enjoy during the dinner service.
Leftovers
Storage & make-ahead
- Fridge
- Store in an airtight container in the refrigerator for up to 3 days. Ensure the ham is cooled within 2 hours of roasting for food safety.
- Freezer
- Wrap tightly in plastic wrap followed by aluminum foil. Freeze for up to 2 months. Thaw in the refrigerator overnight before reheating.
- Reheat
- Reheat slices in a covered dish with a splash of water or broth at 300°F (150°C) until warmed through, ensuring the glaze does not burn.
Allow the ham to cool completely before transferring it to an airtight container. It can be stored in the refrigerator for up to three days. Ensure the container is well-sealed to prevent the meat from absorbing other odors in the fridge or drying out, which can affect the overall quality and texture of the leftovers.
Make ahead
You can prepare the glaze up to two days in advance and keep it in the refrigerator. When you are ready to cook, simply bring the glaze to room temperature or gently warm it until it reaches a pourable consistency. The ham itself is best roasted fresh, though it can be prepped by scoring the surface a few hours before cooking to save time when you are ready to start the oven.
Questions
Frequently asked questions
Can this ham be made ahead of time?
While the ham is best served fresh from the oven to ensure maximum tenderness, you can certainly prepare the glaze in advance and keep it refrigerated. The ham can also be scored ahead of time to save effort. If you need to cook it early, simply reheat the slices gently in the oven with a splash of liquid to keep them moist, ensuring the glaze does not dry out during the reheating process.
How can the glaze be prevented from burning?
The key to preventing the glaze from burning is to manage the oven temperature and the timing of the application. Apply the glaze only during the final thirty minutes of roasting and baste frequently. If the surface begins to darken too quickly, tent the ham loosely with aluminum foil. This protects the sugars from direct heat while still allowing them to caramelize and form that signature sticky, glossy finish you want.
What is the best way to keep the ham moist?
To ensure the ham remains succulent, keep it covered with aluminum foil during the initial roasting phase to trap the natural moisture. Always use a meat thermometer to pull the ham from the oven exactly when it reaches 145°F (63°C), as overcooking is the primary cause of dry meat. Finally, the fifteen-minute resting period is essential for allowing the juices to redistribute, which keeps every slice moist and tender when serving.
Is it possible to use a different type of sweetener for the glaze?
Yes, you can substitute honey with pure maple syrup for a deeper, more intense flavor, or even agave nectar for a milder profile. Avoid using granulated white sugar, as it does not provide the same depth of flavor or the necessary sticky consistency required for a proper ham glaze. The natural viscosity in honey or maple syrup is crucial for the beautiful, dark, and caramelized crust that makes this dish so visually appealing.
How is it determined if the ham is fully cooked?
The only reliable way to know if your ham is cooked is to use a meat thermometer. Insert it into the thickest part of the ham, ensuring you do not touch the bone, which can give an inaccurate reading. When the thermometer registers 145°F (63°C), the ham is safe and ready to be removed from the oven. Resting the meat for fifteen minutes afterward allows the internal temperature to stabilize and ensures the juices settle for the best possible texture.
Everything in one place: the recipe card below gathers the ingredients, steps and estimated nutrition, ready to print.
Recipe card
Honey Glazed Baked Ham: A Perfectly Juicy and Glossy Centerpiece
Discover the secret to a perfectly juicy honey glazed baked ham that features a beautifully caramelized, sticky crust. This classic dish is ideal for gatherings, offering tender, moist slices every time. Follow this reliable method to achieve professional results at home with simple ingredients.
- Prep
- Cook
- Rest
- Total
- Servings
- 12 servings
Ingredients
Main
- 1 whole bone-in ham (about 10 lbs)
Glaze
- 1 cup honey
Instructions
Prepare the ham and oven. Preheat your oven to 325°F (165°C). Place the ham in a large roasting pan, fat side up. Score the surface of the ham in a diamond pattern to allow the glaze to penetrate deeply. Cover the pan tightly with aluminum foil to trap moisture during the initial roasting period, ensuring the meat remains tender and succulent throughout the cooking process.
Roast the ham. Roast the ham in the preheated oven for approximately one and a half hours. The goal is to gently bring the internal temperature up without drying out the exterior. Check the progress carefully by using a meat thermometer inserted into the thickest part of the meat, avoiding the bone to get an accurate reading as it cooks.
Prepare the honey glaze. While the ham is roasting, whisk the honey in a small bowl until it is smooth and ready for application. This glaze will create the signature sticky, glossy coating that makes the dish stand out. Keep the mixture at room temperature until the ham is ready to be glazed, ensuring easy application and a smooth, even finish across the entire surface of the meat.
Apply the glaze. Remove the foil from the roasting pan and brush the honey generously over the surface of the ham, ensuring it drips into the scored diamond cuts. Return the ham to the oven, uncovered, and continue roasting for another thirty minutes, basting with the pan juices every ten minutes to build up layers of caramelized flavor and a deep, glossy finish. Ensure the ham reaches an internal temperature of 145°F (63°C) and let it rest for at least 3 minutes.
Rest and carve. Remove the ham from the oven once it reaches an internal temperature of 145°F (63°C). Let the meat rest for at least fifteen minutes on a cutting board before carving. This resting period is crucial as it allows the juices to redistribute throughout the meat, resulting in slices that are incredibly moist, tender, and easy to handle without falling apart. Ensure the meat is rested for at least 3 minutes before serving.
Nutrition (estimated, per serving)
- Calories
- 320 kcal
- Protein
- 28.5 g
- Carbs
- 18.2 g
- Fat
- 14.8 g
- Fiber
- 0.1 g
- Sugar
- 17.5 g
- Sodium
- 1,150 mg
Estimates only: values vary with brands, substitutions and portion sizes.
Recipe by EasyCooks Kitchen · easycooksrecipes.com
Share this recipe
Send it to someone who’d love it, or save it for later.
Spotted a mistake in this recipe? Let us know.
Keep cooking


