Chocolate Wacky Cake: One-Pan, Egg-Free and Ready in an Hour
Depression-era chocolate wacky cake mixes right in the baking pan: no eggs, no butter in the batter, just a deep, moist chocolate crumb finished with glossy swirled frosting.
Published 13 min read
- Total time
- Prep
- Cook
- Rest
- Serves
- 9
- Makes one 8-inch square cake
- Cuisine
- American
- Calories
- 340
- per serving, estimated

On this page15 sections
This is the chocolate cake that needs almost nothing from the pantry and even less from the cook. No eggs, no butter in the batter, no mixer, no bowls stacked in the sink: everything stirs together right in the baking dish, bakes into a deep, moist chocolate crumb, and finishes under a thick swirl of glossy fudge frosting. One pan in, one pan out, and an hour later the kitchen smells like the best kind of afternoon.
Wacky cake — sometimes called crazy cake or war cake — dates back to the lean years when eggs, butter and milk were scarce, and bakers discovered that a splash of vinegar and a spoonful of baking soda could do the work of both. The chemistry still holds up beautifully today. Cocoa, flour and sugar are sifted straight into the baking dish, three wells are pressed into the dry mix, and water, oil, vinegar and vanilla pour in before a fork stirs everything into a thin, glossy batter. Thirty minutes in the oven, the crumb sets tender and dark, and a quick cocoa frosting goes on thick with dramatic swirls. It is the rare cake that tastes like it took far more effort than it did, ideal for last-minute guests, bake sales or an ordinary weeknight that deserves dessert.
The appeal
Why you’ll love it
The method works because of a simple acid-base reaction. Baking soda needs an acid to release its gas, and the tablespoon of vinegar provides it the moment water hits the pan. Because the batter is stirred quickly and goes straight into a hot oven, that lift is captured at its strongest, giving the cake a surprisingly open, tender crumb without a single egg to toughen it. Oil, rather than butter, coats the flour proteins more completely, which keeps the crumb soft for days and lets the chocolate flavor come through cleanly.
Mixing in the pan itself is not just a shortcut; it changes the texture for the better. There is no risk of overbeating, so the gluten stays relaxed and the crumb stays fine and moist. Sifting the dry ingredients directly into the dish aerates them evenly, so the cocoa disperses without streaks and the soda finds the vinegar uniformly across the whole cake. The thin batter also self-levels in the glass dish, which is why the top bakes flat and even, ready for frosting without any trimming or fuss.
What you need
Ingredients
Makes one 8-inch square cake.
Cake
Frosting
Contains:
- Gluten
- Milk
Tools
Equipment
- 8x8-inch square glass baking dish
- Fine-mesh sieve
- Whisk
- Measuring cups and spoons
- Electric hand mixer
- Offset spatula
- Wire cooling rack
- Serrated knife
Swaps
Substitutions
Instead ofWhite vinegar
UseApple cider vinegar or fresh lemon juice works the same way, reacting with the baking soda to lift the cake.
Instead ofVegetable oil
UseAny neutral oil such as canola, sunflower or melted coconut oil keeps the crumb moist without adding flavor.
Instead ofWhole milk
UseHeavy cream thinned with a little water, or a plain unsweetened soy or oat milk, loosens the frosting to a spreadable consistency.
Instead ofUnsweetened cocoa powder
UseDutch-processed cocoa gives a darker color and a smoother, less sharp chocolate flavor in both the cake and the frosting.
Good to know
Notes
Use natural unsweetened cocoa powder for a brighter, sharper chocolate note, or Dutch-processed for a darker, smoother one; both work here because the leavening comes from soda and vinegar rather than cocoa acidity alone. Neutral vegetable oil lets the chocolate lead, though melted coconut oil adds a faint sweetness. Whole milk in the frosting gives the cleanest, glossiest finish, but any plain unsweetened milk alternative spreads just as well.
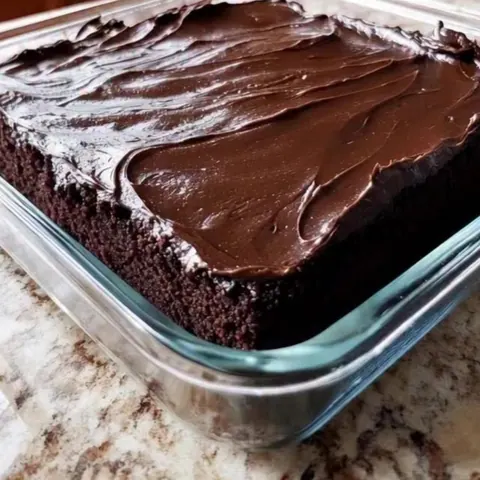
An 8x8-inch square glass baking dish is the classic vessel and the one shown here; it heats gently and lets the thin batter self-level. If the only dish is dark metal, lower the oven to 325°F (165°C) and start checking five minutes early. A fine-mesh sieve does the sifting, an offset spatula builds the swirls, and a simple hand mixer handles the frosting — no stand mixer required anywhere in this recipe.
Prep
Before you start
Pull the butter for the frosting out of the refrigerator first so it has time to soften while the cake bakes and cools; it should give slightly when pressed but still hold its shape. Measure every ingredient before starting, since the batter comes together in the pan fast and there is no second chance once the water hits the soda.
Step by step
Method
Phase 1
Mixing in the pan
Step 1: Sift the dry ingredients into the pan
Preheat the oven to 350°F (175°C) and set an oven rack in the center. Sift the flour, sugar, cocoa, baking soda and salt directly into the ungreased 8x8-inch glass baking dish through a fine-mesh sieve, breaking up any clumps of cocoa with your fingers.
You’ll need: all-purpose flour · granulated sugar · unsweetened cocoa powder · baking soda · kosher salt
Look for: The dry mix should look evenly brown with no pale streaks of flour or sugar left in the pan.
Tip: Sifting straight into the pan is the whole point of wacky cake: no bowl to wash and no mixer to drag out.
Step 2: Make three wells for the wet ingredients
With the back of a spoon, press three shallow wells into the dry mix: one large one in the center and two smaller ones on either side. This old-fashioned trick keeps the oil, vinegar and vanilla separated until the water goes in, so the leavening reaction starts exactly when it should.
You’ll need: vegetable oil · white vinegar · vanilla extract
Look for: The wells should hold their shape, with clean ridges of dry mix between them.
Tip: Pour the oil into the big well and the vinegar and vanilla into the two small wells to keep them from mingling early.
Step 3: Pour in the water and stir it all together
Pour the cup of water over everything, then stir with a fork or a small whisk until the batter is smooth and glossy, scraping the corners of the dish so no dry pockets hide there. Take about a minute and a half; the batter will be thin, more like a thick drink than a dough, and that is exactly right.
You’ll need: water
Look for: No streaks of dry powder should remain and the batter should flow slowly off the whisk in a thin ribbon.
Tip: A few small lumps are fine, but keep stirring until the bottom corners are clean — they hide dry cocoa more often than anywhere else.
Step 4: Level the batter and get it into the oven
Tap the dish gently on the counter twice to release large air bubbles, then tilt and rotate the dish so the batter settles into an even layer. Slide it onto the center rack of the preheated oven, setting it on a small baking sheet to catch any stray drips from the thin batter.
Look for: The surface should look level and shiny, with the batter reaching roughly the same depth at every corner.
Tip: Glass conducts heat gently, which suits this delicate crumb; if the dish is dark metal instead, check for doneness five minutes early.
Checkpoint
By the end of this phase the batter is smooth, glossy and thin, poured level in the ungreased glass dish and already sliding into the oven. Run the whisk through one last time and check the bottom corners of the pan — dry cocoa hides there more than anywhere else, and a missed pocket bakes into a hard streak. The surface should look even and wet with no pale flour patches.
Phase 2
Baking and cooling
Step 5: Bake until a pick comes out clean
Bake for 28 to 32 minutes, rotating the dish once halfway through if the oven runs uneven. The cake is done when the top springs back from a light touch and a wooden pick inserted in the center comes out with only a few moist crumbs attached, never wet batter.
Look for: A pick with two or three clinging crumbs is perfect; wet batter means two to four more minutes in the oven.
Tip: Resist opening the door before the 20-minute mark — the soda-and-vinegar lift is delicate while the crumb is still setting.
Step 6: Cool the cake completely
Set the dish on a wire cooling rack and leave the cake until it reaches room temperature, at least 45 minutes. A warm crumb will melt the butter in the frosting and turn those glossy swirls into a greasy sheen, so treat this pause as part of the recipe, not a delay.
Look for: The bottom of the dish should feel barely warm against the palm, and the cake should have pulled slightly from the sides.
Tip: Speed things up by placing the dish in the refrigerator for 20 minutes once it has cooled for 15 at room temperature.
Checkpoint
The baked cake should be risen evenly across the top, deeply chocolate-brown, and spring back from a light touch with no shiny wet patches in the middle. A wooden pick in the center should come out with moist crumbs but no batter.
Phase 3
Frosting and serving
Step 7: Beat the butter and cocoa until smooth
Beat the softened butter with an electric hand mixer on medium speed for about a minute, until it looks creamy and pale. Add the cocoa powder and beat again, scraping the bowl once, until the mixture is uniformly dark with no dry streaks of powder clinging to the sides.
You’ll need: unsalted butter · unsweetened cocoa powder
Look for: The butter-cocoa base should look glossy and hold a soft peak when the beaters are lifted.
Tip: Butter that gives slightly when pressed but still holds its shape whips far better than butter left out for hours.
Step 8: Add the sugar, milk and vanilla
Add the confectioners' sugar one cup at a time, beating on low speed so it does not fly out of the bowl, then pour in the vanilla and 3 tablespoons of milk. Beat on medium for two minutes, adding the last tablespoon of milk only if the frosting still feels stiff.
You’ll need: confectioners' sugar · whole milk · vanilla extract
Look for: The frosting should spread in thick ribbons and hold a swirl without slumping or cracking.
Tip: Stop and scrape the bowl halfway through — a pocket of unmixed sugar at the bottom is the most common frosting flaw.
Step 9: Frost the cake in deep swirls
Spoon all the frosting onto the center of the cooled cake. Spread it to the edges with an offset spatula, then go back over the top with the tip of the spatula, lifting and turning to build tall, glossy swirls. Work confidently; the frosting skins over quickly and re-swirling later pulls up crumbs.
Look for: Deep ribboned swirls with peaks that hold their shape, and frosting reaching all four edges of the square.
Tip: Dip the spatula in hot water and wipe it dry between passes for the sharpest, most polished swirls.
Step 10: Slice and serve
Cut the frosted cake into nine squares with a sharp knife, wiping the blade with a damp cloth between cuts so each piece shows a clean edge against the moist crumb. Lift the first slice out with a spatula and serve it while the frosting still has that fresh, glossy sheen.
Look for: The crumb should cut cleanly, dark and even, with the frosting holding its swirl on top.
Tip: For the neatest squares, chill the frosted cake for 10 minutes before slicing, then bring the pieces back to room temperature.
Checkpoint
The finished cake carries a thick layer of fudge frosting with tall, glossy swirls that hold their shape right to the edges of the square. The frosting should look smooth and satiny, not grainy or greasy, and a spatula dipped back in should drag through it cleanly. When a slice is cut, the crumb should be dark, even and moist, holding together without crumbling apart.
Doneness
How to tell it’s done
The cake is done when the top springs back slowly from a gentle fingertip press and a wooden pick inserted in the center comes out with a few moist crumbs but no wet batter. The edges will have pulled slightly away from the sides of the glass dish, and the surface will look matte rather than shiny.
Avoid these
Common mistakes
The most common failure is overworking the batter. Once the water is in, stir only until the dry streaks disappear; extra stirring builds gluten and turns a tender crumb dense and rubbery. The second mistake is frosting a warm cake: even mild warmth melts the butter and the swirls slide into a flat, greasy film, so let the dish cool fully, bottom included.
Better results
Tips
Tip 1
Sift, do not scoop. Cocoa powder clumps stubbornly, and those clumps survive a quick stir to bake into bitter streaks. Pushing the dry ingredients through a fine-mesh sieve straight into the pan costs thirty seconds and guarantees a uniform, dark crumb. The same sieve over the confectioners' sugar keeps the frosting silky instead of grainy.
Tip 2
Treat the vinegar as an ingredient, not an oddity. It is fully neutralized by the baking soda in the oven and leaves no sour taste — only lift and tenderness. Measure it precisely, though: too little and the cake bakes flat and tight, too much and the crumb coarsens. Keep the batter moving quickly from pan stirring to hot oven, because the reaction starts the moment they meet.
Make it yours
Variations
Cinnamon-Spice Wacky Cake
Whisk 1 teaspoon of ground cinnamon and a pinch of ground cloves into the dry mix for a warm, spiced chocolate cake that suits cold-weather baking.
Mocha Wacky Cake
Replace the cup of water with strong brewed coffee, cooled, to deepen the chocolate flavor and give the crumb a subtle roasted edge.
Vanilla Wacky Cake
Omit the cocoa, increase the vanilla to 2 teaspoons, and frost with a simple vanilla buttercream for a pale, tender snacking cake.
Chocolate Chip Version
Scatter 1/2 cup of chocolate chips over the batter in the pan before baking; they sink slightly and melt into pockets of chocolate.
On the table
Serving suggestions
Cut the cake into nine generous squares and serve them at room temperature, when the crumb is at its most tender and the frosting has a soft sheen rather than a hard chill. A cold glass of milk alongside is the classic pairing, and the deep chocolate flavor also welcomes black coffee or a dark roast.
For presentation, lift each square from the dish with a flat spatula rather than a fork, and set it frosting-side up so the swirls stay intact. If serving at a gathering, dust the platter edge with a whisper of cocoa powder for contrast, or top each square with a single fresh raspberry just before it goes to the table.
Leftovers
Storage & make-ahead
- Fridge
- Refrigerate covered for up to 5 days; bring slices to room temperature for 20 minutes before serving.
- Freezer
- Freeze the unfrosted cake wrapped tightly for up to 1 month; thaw wrapped at room temperature, then frost.
- Reheat
- Warm an unfrosted square in the microwave for 10-15 seconds; frosted slices are best served at room temperature, not heated.
Cover the frosted cake loosely with plastic wrap or keep it in a cake carrier at room temperature for up to two days; the oil in the crumb keeps it moist far longer than a butter cake would be. For longer storage, refrigerate it covered for up to five days and let slices sit out for twenty minutes before serving so the frosting softens back to its glossy best.
Make ahead
The cake layer bakes and cools beautifully a day ahead: wrap the unfrosted cake tightly in plastic once it is completely cool and keep it at room temperature overnight. Make the frosting the same day it will be used, since butter-based frostings firm up in the refrigerator and need re-beating. For a longer lead time, bake the cake, wrap it well, and freeze it unfrosted for up to a month; thaw it wrapped at room temperature, then frost.
Questions
Frequently asked questions
Why is it called wacky cake?
The name comes from the unusual method: the dry ingredients are mixed directly in the baking pan, wells are pressed into the mix, and the wet ingredients pour in without a bowl or a mixer. It also goes by crazy cake and war cake, a nod to its origins in the lean wartime and Depression years when eggs, butter and milk were rationed and home bakers still wanted chocolate cake. The quirky technique survived because it genuinely works.
Does the vinegar make the cake taste sour?
No. The vinegar reacts with the baking soda during mixing and baking, neutralizing completely in the oven. What remains is lift, a tender crumb and a slight moistness — no sour flavor at all. The same reaction is why the cake rises without eggs. Apple cider vinegar or lemon juice can be swapped in with identical results, so choose whichever is already in the pantry.
Can this be made without a mixer?
The cake itself never needs a mixer — a fork or small whisk stirs the batter right in the dish. The frosting is the only place an electric hand mixer helps, because beating the butter and cocoa until creamy and incorporating the confectioners' sugar smoothly takes sustained effort. A determined arm and a sturdy wooden spoon can do it, but plan on several minutes of vigorous beating to reach the same glossy, spreadable consistency.
Can this be frozen?
Yes, and it freezes best unfrosted. Cool the baked cake completely, wrap it tightly in plastic wrap and then foil, and freeze for up to a month. Thaw it still wrapped at room temperature for a few hours, then frost freshly. Frosted cake can be frozen too, though the swirls lose their definition; freeze the squares uncovered until firm, then wrap individually for easy single servings.
Why is the batter so thin compared to other cakes?
Wacky cake batter is intentionally thinner because it relies on the baking soda and vinegar reaction rather than eggs for structure. A thin, pourable batter lets that gas expand easily through the crumb, which is what keeps the finished cake so moist and tender. Do not add extra flour to thicken it — the cake sets fully in the oven and the loose batter is exactly what the method calls for.
Everything in one place: the recipe card below gathers the ingredients, steps and estimated nutrition, ready to print.
Recipe card
Chocolate Wacky Cake: One-Pan, Egg-Free and Ready in an Hour
Depression-era chocolate wacky cake mixes right in the baking pan: no eggs, no butter in the batter, just a deep, moist chocolate crumb finished with glossy swirled frosting.
- Prep
- Cook
- Rest
- Total
- Servings
- one 8-inch square cake
Ingredients
Cake
- 1 1/2 cups all-purpose flour
- 1 cup granulated sugar
- 3 tbsp unsweetened cocoa powder
- 1 tsp baking soda
- 1/2 tsp kosher salt
- 1 cup water
- 1/3 cup vegetable oil
- 1 tbsp white vinegar
- 1 tsp vanilla extract
Frosting
- 6 tbsp unsalted butter, softened
- 1/3 cup unsweetened cocoa powder
- 2 cups confectioners' sugar, sifted
- 3-4 tbsp whole milk
- 1 tsp vanilla extract
Instructions
Sift the dry ingredients into the pan. Preheat the oven to 350°F (175°C) and set an oven rack in the center. Sift the flour, sugar, cocoa, baking soda and salt directly into the ungreased 8x8-inch glass baking dish through a fine-mesh sieve, breaking up any clumps of cocoa with your fingers.
Make three wells for the wet ingredients. With the back of a spoon, press three shallow wells into the dry mix: one large one in the center and two smaller ones on either side. This old-fashioned trick keeps the oil, vinegar and vanilla separated until the water goes in, so the leavening reaction starts exactly when it should.
Pour in the water and stir it all together. Pour the cup of water over everything, then stir with a fork or a small whisk until the batter is smooth and glossy, scraping the corners of the dish so no dry pockets hide there. Take about a minute and a half; the batter will be thin, more like a thick drink than a dough, and that is exactly right.
Level the batter and get it into the oven. Tap the dish gently on the counter twice to release large air bubbles, then tilt and rotate the dish so the batter settles into an even layer. Slide it onto the center rack of the preheated oven, setting it on a small baking sheet to catch any stray drips from the thin batter.
Bake until a pick comes out clean. Bake for 28 to 32 minutes, rotating the dish once halfway through if the oven runs uneven. The cake is done when the top springs back from a light touch and a wooden pick inserted in the center comes out with only a few moist crumbs attached, never wet batter.
Cool the cake completely. Set the dish on a wire cooling rack and leave the cake until it reaches room temperature, at least 45 minutes. A warm crumb will melt the butter in the frosting and turn those glossy swirls into a greasy sheen, so treat this pause as part of the recipe, not a delay.
Beat the butter and cocoa until smooth. Beat the softened butter with an electric hand mixer on medium speed for about a minute, until it looks creamy and pale. Add the cocoa powder and beat again, scraping the bowl once, until the mixture is uniformly dark with no dry streaks of powder clinging to the sides.
Add the sugar, milk and vanilla. Add the confectioners' sugar one cup at a time, beating on low speed so it does not fly out of the bowl, then pour in the vanilla and 3 tablespoons of milk. Beat on medium for two minutes, adding the last tablespoon of milk only if the frosting still feels stiff.
Frost the cake in deep swirls. Spoon all the frosting onto the center of the cooled cake. Spread it to the edges with an offset spatula, then go back over the top with the tip of the spatula, lifting and turning to build tall, glossy swirls. Work confidently; the frosting skins over quickly and re-swirling later pulls up crumbs.
Slice and serve. Cut the frosted cake into nine squares with a sharp knife, wiping the blade with a damp cloth between cuts so each piece shows a clean edge against the moist crumb. Lift the first slice out with a spatula and serve it while the frosting still has that fresh, glossy sheen.
Allergens: Gluten, Milk
Nutrition (estimated, per serving)
- Calories
- 340 kcal
- Protein
- 3 g
- Carbs
- 55 g
- Fat
- 12 g
- Fiber
- 2 g
- Sugar
- 40 g
Estimates only: values vary with brands, substitutions and portion sizes.
Recipe by EasyCooks Kitchen · easycooksrecipes.com
Share this recipe
Send it to someone who’d love it, or save it for later.
Spotted a mistake in this recipe? Let us know.
Keep cooking


