Crazy Wacky Cake with Fluffy White Frosting, One Bowl
A deep, moist chocolate wacky cake mixed right in the pan, no eggs or milk needed, finished with a cloud of swirled white frosting. Pure pantry magic in about an hour.
Published 12 min read
- Total time
- Prep
- Cook
- Rest
- Serves
- 9
- Makes one 8-inch square cake
- Cuisine
- American
- Calories
- 410
- per serving, estimated

On this page15 sections
Deep, dark chocolate with a crumb so moist the fork glides straight through, all crowned with tall swirls of white frosting. This crazy wacky cake skips the eggs, the milk and the butter in the sponge, yet bakes up tender and rich every single time. Everything mixes right in the baking dish, the pantry does the rest, and about an hour later a square of pure chocolate comfort is sitting on the counter waiting for its frosting.
Wacky cake, also called crazy cake or depression cake, dates back to lean kitchens when eggs, milk and butter were rationed or simply too dear, so bakers leaned on vinegar and baking soda to do the rising. That old trick turned out to be a keeper: the acid and the soda fizz together in the pan, creating thousands of tiny bubbles that lift the batter into a sponge that stays moist for days. There is no creaming, no separate bowls for wet and dry, and no mixer needed for the cake itself — just five dry ingredients, five wet ones and a fork. The white frosting is the classic counterpart: butter, confectioners' sugar and a splash of cream whipped into a cloud, spread thick over the chocolate and swirled so every slice carries a ridge of sweetness.
The appeal
Why you’ll love it
The rise in this cake comes from a chemical handshake rather than eggs. Baking soda is a base, and vinegar is an acid; the moment water joins them, they react and release carbon dioxide into the batter. Because the batter goes into a hot oven almost immediately, the bubbles expand before the crumb sets, which is why the sponge bakes up tall and open instead of dense. Oil does the tenderizing that butter would normally do, and it does it better for this purpose: liquid fat coats the flour proteins evenly, keeping the crumb soft and moist even after a night in the refrigerator.
Mixing everything in the pan is not just a shortcut — it protects the reaction. The three-well method keeps the vinegar and the baking soda separated until the water arrives, so the fizz happens at the moment of stirring rather than fizzing out while the batter waits. Overmixing is the only real danger here: once the flour hydrates and the bubbles form, extra stirring knocks the air back out and toughens the crumb. Stir until the streaks disappear, stop, and get the dish into the oven.
What you need
Ingredients
Makes one 8-inch square cake.
Fluffy White Frosting
Contains:
- Gluten
- Milk
Tools
Equipment
- 8-inch square glass baking dish
- Whisk
- Rubber spatula
- Hand mixer or stand mixer
- Toothpick
- Wire cooling rack
Swaps
Substitutions
Instead ofWhite vinegar
UseApple cider vinegar works the same way; the flavor disappears once the cake bakes.
Instead ofUnsweetened cocoa powder
UseDutch-processed cocoa gives a darker, smoother chocolate flavor with no other changes.
Instead ofUnsalted butter
UseUse an equal amount of plant-based butter sticks for a dairy-free frosting that still whips fluffy.
Instead ofHeavy cream
UseWhole milk or any unsweetened plant milk thins the frosting the same way; add one tablespoon at a time.
Good to know
Notes
Use natural unsweetened cocoa powder for a brighter, sharper chocolate flavor, or Dutch-processed for a deeper, almost fudge-like tone — both work with the same amount. White vinegar is the classic choice and its tang vanishes completely in the bake; apple cider vinegar behaves identically. The oil should be a neutral one, such as vegetable or canola, so the chocolate leads. For the frosting, butter straight from the counter should dent easily under a finger; butter that is too cold leaves lumps, and butter too soft makes a frosting that slides instead of holding swirls.
An 8-inch square glass dish bakes this cake evenly and shows off the layers, but a metal pan of the same size works too — check it five minutes early, since metal conducts heat faster. A hand mixer handles the frosting in a few minutes; a stand mixer does it even faster. If the confectioners' sugar looks clumpy in the bag, push it through a sieve before beating, or the finished frosting will feel faintly gritty on the tongue. Sifted sugar also means less dust cloud when the mixer starts.
Prep
Before you start
Take the butter for the frosting out of the refrigerator first, so it has the whole baking time to soften properly — it should give easily to a gentle press by the time the cake comes out. Measure everything before starting, since the batter comes together quickly once the water hits the pan and there is no time to hunt for the vinegar mid-fizz. Check that the baking soda is fresh: half a teaspoon in a splash of vinegar should foam vigorously on contact. Set the oven rack in the center position and have a toothpick and a wire rack standing by.
Step by step
Method
Phase 1
Phase 1: The dry base
Step 1: Heat the oven and prep the dish
Heat the oven to 350°F (175°C). Rub an 8-inch square glass baking dish with a thin film of vegetable oil, tipping out any excess, or line the bottom with a strip of parchment so the cake releases cleanly after baking.
Look for: The oven should reach full temperature before the batter goes in, so the baking soda gets to work immediately.
Tip: A light oil film is enough; too much greasing can fry the edges of the sponge.
Step 2: Whisk the dry base
Whisk the flour, granulated sugar, cocoa powder, baking soda and kosher salt directly in the ungreased pan if you like, or in a large bowl. Whisk for a full minute so the cocoa and baking soda are evenly distributed and no dark streaks remain.
You’ll need: all-purpose flour · granulated sugar · unsweetened cocoa powder · baking soda · kosher salt
Look for: The mixture should look like uniform dry chocolate sand with no visible pockets of white flour or cocoa.
Tip: Sifting the cocoa first breaks the bitter little lumps that survive a quick whisk.
Checkpoint
By the end of this phase the oven is at a steady 350°F (175°C), the dish is lightly oiled, and the dry ingredients look like one uniform, chocolate-sandy mixture with no white streaks of flour or dark pockets of cocoa. Whisk a full minute — this is the only chance the baking soda gets to spread evenly through the batter, and uneven distribution shows up as bitter, soapy patches in the finished crumb. If the mixture smells strongly of cocoa and looks completely even, move on.
Phase 2
Phase 2: Mix, bake and cool
Step 3: Make the three wells
With the back of a spoon, press three hollows into the dry mixture: one larger well in the center and two smaller ones on either side. Pour the vanilla extract into one small well, the vegetable oil into the other, and the white vinegar into the big center well.
You’ll need: vanilla extract · vegetable oil · white vinegar
Look for: Each well should hold its shape and reach down close to the bottom of the pan without exposing the bare dish.
Tip: The classic three-well setup keeps the vinegar and soda apart until the last second, so the fizz happens in the bowl, not before.
Step 4: Pour and stir
Pour the cool water straight over the wells and the dry mixture, then stir with a fork or small whisk until the batter is completely smooth, about one minute. A few tiny lumps are fine; keep scraping the corners of the dish so no dry flour hides there.
You’ll need: water
Look for: The batter should pour slowly off the fork like warm chocolate sauce, glossy and even.
Tip: Do not overmix; once the streaks vanish, stop, or the crumb turns tough.
Step 5: Bake the cake
Scrape the batter level with a spatula and bake on the center rack for 30 to 35 minutes, until a toothpick poked in the middle comes out with only a few moist crumbs attached and the top springs back when pressed gently.
Look for: The edges pull slightly away from the sides of the dish and the top looks matte, with gentle, even cracks.
Tip: Rotate the dish once at the 20-minute mark for an even rise if the oven runs hot at the back.
Step 6: Cool completely
Set the dish on a wire rack and let the cake cool fully, at least one hour, before any frosting touches it. A warm sponge melts buttercream into a slick shine instead of holding the tall, fluffy swirls that make this cake look so generous.
Look for: The bottom of the dish should feel cool against the palm of a hand, not just lukewarm.
Tip: Speed this along by chilling the cooled-warm cake in the refrigerator for 30 minutes.
Checkpoint
The batter should now be smooth and glossy, pouring slowly off the fork like warm chocolate sauce, and it should smell of cocoa with only the faintest vinegary edge that will bake away. After 30 to 35 minutes in the oven, a toothpick in the center comes out with moist crumbs but no wet batter, the edges pull slightly from the glass, and the top springs back from a gentle press. Give the cake a full hour of cooling before the next phase — a dish that still feels warm to the palm is not ready.
Phase 3
Phase 3: Frost and swirl
Step 7: Whip the white frosting
Beat the softened butter with a hand mixer on medium speed for two minutes, until pale and creamy. Add the confectioners' sugar, heavy cream, vanilla extract and fine salt, then beat on low until absorbed and on high for three minutes, until the frosting is white, tall and billowy.
You’ll need: unsalted butter · confectioners' sugar · heavy cream · vanilla extract · fine salt
Look for: The frosting should hold a firm peak from the beater and look glossy, with no gritty whisper of sugar left.
Tip: If it stiffens past spreading consistency, beat in cream a teaspoon at a time.
Step 8: Swirl and serve
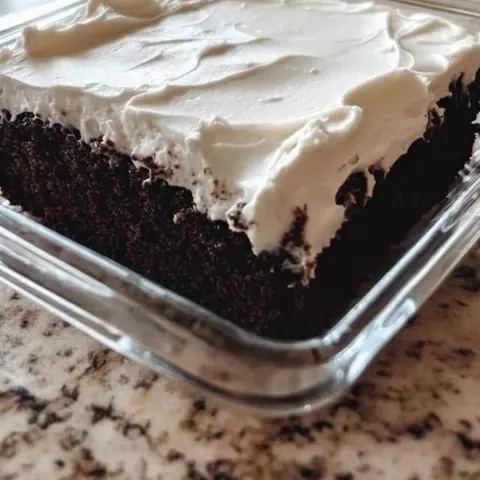
Pile the frosting onto the cooled cake and spread generously to the corners with an offset spatula or the back of a spoon, lifting and turning as you go to build tall, soft swirls across the top. Slice into nine squares and serve straight from the dish.
Look for: The swirls should stand in soft peaks about half an inch tall, catching the light without looking wet.
Tip: Dip the spatula in hot water and wipe it dry between passes for the smoothest ribboned swirls.
Checkpoint
The frosting should be bright white, tall and billowy, holding a firm peak from the beater with a glossy sheen and zero grittiness when a little is tasted. Spread generously to every corner of the dish, then lift and turn the spatula to build soft swirls about half an inch tall that catch the light. The finished cake should slice cleanly into nine squares, each showing a moist, deep chocolate crumb under a thick white ridge of frosting, ready to serve straight from the glass dish.
Doneness
How to tell it’s done
The cake is done when a toothpick poked into the center comes out with a few moist crumbs clinging to it but no wet batter, when the top springs back slowly from a gentle press, and when the edges have pulled a thin margin away from the glass. The surface should look matte and dry, with shallow, even cracks — a glossy sheen means more time is needed. The frosting is done when it holds a firm, glossy peak from the beater and tastes smooth, not gritty, on the tongue. There is no raw protein in this recipe, so no internal temperature check applies; visual and touch cues are the reliable guides.
Avoid these
Common mistakes
The most common slip is frosting a cake that is still warm, which turns buttercream into a transparent slick that slides off the edges — patience for a full hour of cooling is the fix. Overmixing the batter knocks out the carbon dioxide bubbles the vinegar and soda just made, giving a flat, tight crumb, so stir only until smooth. Cold butter makes lumpy frosting: beat it alone for a full two minutes before adding anything. Finally, adding all the cream at once can overshoot into a frosting that will not hold swirls; thin it a tablespoon at a time.
Better results
Tips
Tip 1
For the most dramatic swirls, pile all the frosting in the center of the cake first, then spread outward with long, confident strokes and finish with a light touch of the spatula tip, lifting at the end of each pass. A spatula dipped in hot water and wiped dry glides through the buttercream and leaves ribboned ridges like the ones in the video. If serving straight from the glass dish, warm the slices slightly — ten seconds in the microwave makes the chocolate crumb taste fresh-baked.
Tip 2
Weigh the flour if a scale is on hand: 1 1/2 cups should be about 180 grams, and a heavy hand with the scoop is the most common cause of a dry wacky cake. Spoon the flour into the cup and level it with a knife instead of scooping directly from the bag. Taste the frosting before spreading and adjust the salt — that quarter teaspoon is what keeps the sweetness from flattening the chocolate underneath.
Make it yours
Variations
Mocha Swirl
Dissolve one teaspoon of instant espresso powder in the cup of water before mixing. The coffee deepens the chocolate without tasting of coffee, and pairs especially well with the sweet white frosting.
Cinnamon Snickerdoodle Top
Stir one teaspoon of ground cinnamon into the dry ingredients, then dust the frosted top lightly with cinnamon-sugar just before serving for a warm, bakery-case twist.
Chocolate Chip Studded
Fold half a cup of semi-sweet chocolate chips into the batter right before baking. They melt into fudgy pockets throughout the crumb and make the cake even more of a chocolate statement.
Double Chocolate Frosting
Beat a quarter cup of sifted cocoa powder into the finished buttercream for a two-tone-free, all-chocolate cake. Add the cocoa with the powdered sugar and an extra tablespoon of cream to keep the texture billowy.
On the table
Serving suggestions
Serve the cake straight from the square glass dish so everyone sees the layers: dark chocolate crumb under a thick, swirled white top. Cut nine generous squares with a sharp knife wiped clean between slices, and lift each piece out with a small offset spatula so the frosting swirl stays intact on the plate.
A cold glass of milk is the traditional partner, and hot coffee or espresso works beautifully against the sweetness of the frosting. For a slightly dressier plate, add a few whole raspberries alongside the square — their tartness cuts the buttercream — though the cake honestly needs nothing at all beyond the fork and a quiet moment.
Leftovers
Storage & make-ahead
- Fridge
- Covered in the dish, the frosted cake keeps 5 days refrigerated; soften slices 15 minutes at room temperature before serving.
- Freezer
- Freeze unfrosted cake up to 2 months, wrapped tightly; thaw overnight in the refrigerator and frost fresh.
- Reheat
- Warm a frosted slice 10–15 seconds in the microwave; the crumb tastes fresh-baked and the frosting turns glossy and soft.
Keep the frosted cake in the dish, loosely covered, in the refrigerator for up to five days; the oil in the sponge keeps it moist far longer than a butter cake would last. Let slices sit at room temperature for fifteen minutes before serving so the frosting softens and the crumb loosens. Cover the cut face with plastic wrap once a few squares are gone to keep the exposed edges from drying.
Make ahead
Bake the cake up to two days before serving: cool it completely, wrap the whole dish tightly and keep it at room temperature, then frost shortly before serving for the freshest look. The frosting itself can be made up to three days ahead — store it covered in the refrigerator and rewhip it for two minutes with the hand mixer, adding a teaspoon of cream if needed to bring back the billowy, spreadable texture.
Questions
Frequently asked questions
Why does this cake have no eggs or milk?
Wacky cake comes from lean times when eggs, milk and butter were scarce, so bakers relied on vinegar and baking soda for the rise and oil for tenderness. The result proved so reliably moist that the recipe outlived the rationing. The absence of eggs and dairy in the sponge is the whole point of the dish, not a shortcut.
Can the vinegar be tasted in the finished cake?
No. The vinegar exists only to react with the baking soda and create the bubbles that lift the cake. Once baked, any tang disappears completely, and the cake simply tastes deep and chocolatey. Apple cider vinegar works identically if that is what the pantry holds.
Can this cake be mixed in a bowl instead of the pan?
Yes. Whisk the dry ingredients in a large bowl, make the three wells there, and pour the batter into the greased dish after mixing. Cleaning the mixing bowl is the only trade-off. The texture and rise are identical either way, so choose whichever fits the amount of washing up preferred.
Why must the cake cool before frosting?
Buttercream is mostly butter, and warmth melts it into a thin, translucent layer that slides off the edges instead of holding tall swirls. A fully cooled cake — cool to the touch on the bottom of the dish, about an hour on a rack — lets the frosting sit proud and thick, exactly the generous look that makes this cake so appealing.
Can the frosting be made dairy-free?
Yes. Substitute plant-based butter sticks for the butter and an unsweetened plant milk for the heavy cream, in the same amounts. Beat the plant butter alone for the full two minutes first, since it softens differently, and the frosting whips up white, tall and swirl-ready just like the classic version.
Everything in one place: the recipe card below gathers the ingredients, steps and estimated nutrition, ready to print.
Recipe card
Crazy Wacky Cake with Fluffy White Frosting, One Bowl
A deep, moist chocolate wacky cake mixed right in the pan, no eggs or milk needed, finished with a cloud of swirled white frosting. Pure pantry magic in about an hour.
- Prep
- Cook
- Rest
- Total
- Servings
- one 8-inch square cake
Ingredients
- 1 1/2 cups all-purpose flour
- 1 cup granulated sugar
- 3 tbsp unsweetened cocoa powder
- 1 tsp baking soda
- 1/2 tsp kosher salt
- 1 tsp vanilla extract
- 1/3 cup vegetable oil
- 1 tbsp white vinegar
- 1 cup water, cool
Fluffy White Frosting
- 1/2 cup unsalted butter, softened
- 2 cups confectioners' sugar, sifted
- 2 tbsp heavy cream
- 1 tsp vanilla extract
- 1/4 tsp fine salt
Instructions
Heat the oven and prep the dish. Heat the oven to 350°F (175°C). Rub an 8-inch square glass baking dish with a thin film of vegetable oil, tipping out any excess, or line the bottom with a strip of parchment so the cake releases cleanly after baking.
Whisk the dry base. Whisk the flour, granulated sugar, cocoa powder, baking soda and kosher salt directly in the ungreased pan if you like, or in a large bowl. Whisk for a full minute so the cocoa and baking soda are evenly distributed and no dark streaks remain.
Make the three wells. With the back of a spoon, press three hollows into the dry mixture: one larger well in the center and two smaller ones on either side. Pour the vanilla extract into one small well, the vegetable oil into the other, and the white vinegar into the big center well.
Pour and stir. Pour the cool water straight over the wells and the dry mixture, then stir with a fork or small whisk until the batter is completely smooth, about one minute. A few tiny lumps are fine; keep scraping the corners of the dish so no dry flour hides there.
Bake the cake. Scrape the batter level with a spatula and bake on the center rack for 30 to 35 minutes, until a toothpick poked in the middle comes out with only a few moist crumbs attached and the top springs back when pressed gently.
Cool completely. Set the dish on a wire rack and let the cake cool fully, at least one hour, before any frosting touches it. A warm sponge melts buttercream into a slick shine instead of holding the tall, fluffy swirls that make this cake look so generous.
Whip the white frosting. Beat the softened butter with a hand mixer on medium speed for two minutes, until pale and creamy. Add the confectioners' sugar, heavy cream, vanilla extract and fine salt, then beat on low until absorbed and on high for three minutes, until the frosting is white, tall and billowy.
Swirl and serve. Pile the frosting onto the cooled cake and spread generously to the corners with an offset spatula or the back of a spoon, lifting and turning as you go to build tall, soft swirls across the top. Slice into nine squares and serve straight from the dish.
Allergens: Gluten, Milk
Nutrition (estimated, per serving)
- Calories
- 410 kcal
- Protein
- 2 g
- Carbs
- 66 g
- Fat
- 15 g
- Fiber
- 2 g
- Sugar
- 48 g
- Sodium
- 250 mg
Estimates only: values vary with brands, substitutions and portion sizes.
Recipe by EasyCooks Kitchen · easycooksrecipes.com
Share this recipe
Send it to someone who’d love it, or save it for later.
Spotted a mistake in this recipe? Let us know.
Keep cooking


