Triple Layer Cookie Brownie Bars in One Pan
Chocolate chip cookie dough, whole sandwich cookies and fudgy brownie batter stack into one showstopping pan of bars that bakes in about 40 minutes.
Published Updated 12 min read
- Total time
- Prep
- Cook
- Rest
- Serves
- 16
- Makes 16 bars
- Cuisine
- American
- Calories
- 340
- per serving, estimated

On this page15 sections
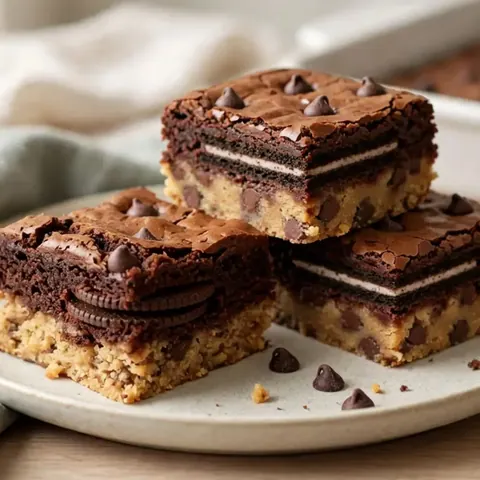
Three desserts, one pan, zero fuss. A layer of chocolate chip cookie dough goes in first, a grid of whole chocolate sandwich cookies sits right on top, and thick brownie batter pours over everything with a scatter of chocolate chips. Forty minutes later the dish comes out with crackly brownie tops, golden edges and clean, layered squares when sliced. No decorating, no fussing, no second pan to wash.
These triple layer bars settle the eternal dessert dilemma: cookie or brownie. The answer here is both, stacked. The cookie dough bakes into a golden, buttery base while the sandwich cookies hold their shape in the middle, a hidden surprise in every square. The brownie layer on top stays thick and fudgy, with a shiny, crackled crust and just enough chocolate chips to make the top sparkle. Everything assembles in one dish in about twenty minutes, using a roll of store-bought cookie dough, a batch of brownie batter made ahead and a sleeve of sandwich cookies. It is the kind of pan to bring to a potluck, a bake sale or a Tuesday when the week demands chocolate. Cut into sixteen generous squares, it feeds a crowd without any decorating skills required.
The appeal
Why you’ll love it
The stacking order does the structural work. Pressing the chilled cookie dough flat gives the bars a dense, even foundation, and laying the sandwich cookies in rows creates a built-in grid: when the pan is sliced, each square naturally captures one whole cookie at its center. Because the cookies sit on dough rather than being folded into batter, they stay intact instead of dissolving, so the middle layer reads clearly in every cut.
The brownie batter is deliberately thick, and that thickness is what keeps the layers honest. A heavy batter blankets the cookies and settles into the gaps without pushing them aside, so nothing floats or shifts during baking. Whisked-ahead batter also carries the sugar and egg structure that dries into the classic crackly top, while a short, gentle fold keeps the crumb fudgy rather than cakey once the flour goes in.
What you need
Ingredients
Makes 16 bars.
Contains:
- Gluten
- Eggs
- Milk
- Soy
Tools
Equipment
- 9x13-inch baking dish
- Parchment paper
- Spatula
- Offset spatula or flat measuring cup
- Wire rack
- Sharp knife
Swaps
Substitutions
Instead ofStore-bought chocolate chip cookie dough
UseOne batch of homemade chocolate chip cookie dough, chilled firm so it presses into an even base
Instead ofChocolate sandwich cookies
UseAny filled chocolate cookie of similar size; keep them whole so the middle layer stays distinct
Instead ofHomemade brownie batter
UseA good-quality boxed brownie mix prepared on the thick side, or a favorite brownie recipe made ahead
Instead ofChocolate chips
UseAn equal amount of chopped semi-sweet chocolate, which melts into glossier pools across the top
Good to know
Notes
Use a firm, chilled cookie dough, whether store-bought or made ahead, so it presses into an even sheet without sticking to your fingers. Any plain filled chocolate cookie works for the middle layer; just keep them whole and similar in size so the rows stay tidy. The brownie batter should be thick and glossy, closer to fudge than to cake batter, since a thin batter would soak the cookies and blur the layers together.
A 9x13-inch ceramic or metal baking dish both work; parchment with overhanging sides makes lifting the cooled slab out for clean cutting much easier. Check the bake at 35 minutes, since ovens vary. If the top browns faster than the center sets, tent the dish loosely with foil for the final minutes. A sharp knife wiped between cuts is the difference between bakery-neat squares and smudged edges.
Prep
Before you start
Heat the oven to 350°F (175°C) and position a rack in the center. Line a 9x13-inch baking dish with parchment, leaving a two-inch overhang on the long sides, or grease it well. Take the cookie dough out of the refrigerator a few minutes ahead so it is firm but pressable; if it is very stiff, knead it briefly on the counter to soften. Measure out the sandwich cookies and plan the grid before placing anything. Have the brownie batter ready in its bowl at room temperature, thick and spreadable, and set out a spatula for spreading and the chocolate chips for the top.
Step by step
Method
Phase 1
Build the base
Step 1: Press in the cookie base
Grease a 9x13-inch baking dish or line it with parchment, leaving overhang on the two long sides for lifting later. Press the chilled chocolate chip cookie dough across the bottom in one flat, even layer, going edge to edge. Keep it about a quarter inch thick so the base bakes through without turning doughy.
You’ll need: chocolate chip cookie dough
Look for: The dough should cover the dish in one smooth, unbroken sheet with no bare spots showing.
Tip: Use the bottom of a measuring cup or an offset spatula to flatten the dough cleanly and evenly.
Step 2: Arrange the sandwich cookies
Set the whole chocolate sandwich cookies on top of the cookie dough in neat rows, flat side down, until the surface is covered. Leave a small gap between the rows; the dough puffs slightly around them as it bakes and holds each cookie in place. Do not press them down hard.
You’ll need: chocolate sandwich cookies
Look for: Rows should sit snugly side by side, each cookie resting flat on the dough beneath it.
Tip: Count the rows first and plan the grid so the last cookie fits without crowding.
Checkpoint
At the end of this phase the dish holds two quiet layers: a flat, even sheet of cookie dough covering the bottom edge to edge, and neat rows of whole sandwich cookies resting on top without being pressed in. Nothing should look wet or messy yet, and no cookie should be tilted or stacked. Check that the dough reaches every corner, since bare spots will bake into thin, fragile edges. The pan is now ready for batter, so move on without delay so the dough stays cold and easy to handle.
Phase 2
Add the brownie layer
Step 3: Pour in the brownie batter
Spoon the prepared brownie batter over the cookies, working from the center outward so it flows into the gaps between the rows. Guide it with a spatula rather than stirring, since stirring would disturb the cookie layer underneath. The batter should be thick enough to blanket everything without running to the corners on its own.
You’ll need: brownie batter
Look for: The batter should settle into the gaps between cookies and start creeping over the tops.
Tip: A thick, room-temperature batter spreads more easily than one straight from the refrigerator.
Step 4: Spread and settle the batter
Spread the batter with the spatula until every cookie is completely covered and the surface looks level from edge to edge. Tap the dish firmly on the counter two or three times to release trapped air pockets and settle the batter around the cookies. Check the corners once more before moving on.
You’ll need: brownie batter
Look for: No cookie should peek through; the surface should look smooth and level across the whole dish.
Tip: Spoon batter into the gaps between cookies first, then spread over the tops for full coverage.
Step 5: Scatter the chocolate chips
Scatter the chocolate chips evenly across the batter, letting a few land close to the edges where they melt into the golden border. Aim for an even scatter rather than a pile in the middle, so every square picks up chips. Leave the chips on the surface; they sink slightly as the bars bake.
You’ll need: chocolate chips
Look for: The chip layer should look even from edge to edge, with no bare patches of batter.
Tip: Press any stray chips gently into the batter so they do not scatter when the dish moves.
Checkpoint
The brownie layer should now hide every cookie: pour the batter into the gaps first, then spread gently over the tops so nothing peeks through, and the surface should look smooth and level from edge to edge. The chocolate chips should sit in an even scatter across the top, not piled in one corner. Give the dish a couple of taps on the counter to settle the batter and release trapped air. At this point the assembled pan should look neat and ready for the oven, with no cookies tilted or exposed.
Phase 3
Bake, cool and cut
Step 6: Bake until set
Bake in a 350°F (175°C) oven for 35 to 40 minutes, turning the dish once halfway through so the edges bake evenly. The bars are done when the top looks crackly and set, the edges are golden, and a toothpick in the center comes out with moist crumbs but no wet batter.
Look for: A crackly, matte brownie top with golden edges and a center that no longer looks wet.
Tip: Start checking at 35 minutes; the cookie base keeps baking slightly from residual heat after it comes out.
Step 7: Cool the pan completely
Set the dish on a wire rack and let the bars cool for at least 30 minutes. The layers finish setting as they cool, and the crackly top firms up. Resist cutting early, since warm bars smear; this wait is what keeps the three layers distinct and clean in every slice.
Look for: The top should look matte and firm, and the pan should no longer feel warm at the edges.
Tip: A rack under the dish keeps the cookie base from steaming and going soft as it cools.
Step 8: Cut into squares
Lift the cooled slab out by the parchment, set it on a cutting board, and cut into 16 squares with a sharp knife, wiping the blade between cuts. Press the knife straight down rather than sawing so the cookie layer stays neat. Serve the squares warm or at room temperature.
Look for: Each square should show three distinct layers: golden cookie, whole cookie, fudgy brownie.
Tip: A long knife pressed straight down, rather than sawed, keeps the cookie layer from smearing.
Checkpoint
Out of the oven, the top should be crackly and matte with golden, slightly pulled-in edges, and a toothpick in the center should bring out moist crumbs but no wet batter. The pan will still look puffed in the middle; it settles as it cools. Let it rest a full 30 minutes on a wire rack so the cookie base and brownie layer both firm up. Lift the slab out by the parchment, cut into sixteen squares with a clean, straight press of the knife, and each one should reveal its golden base, whole cookie and fudgy top.
Doneness
How to tell it’s done
The bars are done when the brownie layer looks matte and crackly across the top, the edges have turned golden and slightly pulled from the sides, and a toothpick inserted in the center comes out with moist crumbs but no wet batter. The whole pan should no longer wobble when nudged gently. The cookie base finishes setting as the bars cool, so err slightly under rather than over. If the top colors deeply before the center passes the toothpick test, tent with foil and give it a few more minutes. Cut only after a 30-minute rest so each square holds its three layers.
Avoid these
Common mistakes
The most common slip is spreading the cookie dough too thick, which leaves the base underbaked while the brownie overbakes; keep it flat at about a quarter inch. Crowding the cookies edge to edge is another: a small gap lets the dough rise around them and locks them in place. A batter that is too thin soaks the cookies and blurs the layers, so keep it thick and spread it gently rather than stirring. Pouring batter straight onto tilted cookies leaves bare spots, so check coverage before the chips go on. Finally, cutting warm bars smears the layers, so give the pan a full half hour on the rack.
Better results
Tips
Tip 1
Press the cookie dough with confidence rather than patience: the back of a measuring cup or an offset spatula flattens it faster and more evenly than fingertips alone, and a cold, even base is what keeps the bottom layer from turning doughy. If the dough warms up and starts sticking, slide the pan into the refrigerator for five minutes and finish pressing afterwards.
Tip 2
For the neatest slices, chill the fully cooled slab for twenty minutes before cutting, then use a long, sharp knife pressed straight down. Wipe the blade with a damp cloth between cuts and the squares come out bakery-clean, with all three layers visible. Warm the cut squares for a few seconds in the microwave before serving if a softer, fudgier bite is preferred.
Make it yours
Variations
Peanut butter swirl
Warm a few tablespoons of peanut butter until spoonable and drizzle it over the brownie layer before scattering the chocolate chips. Drag a knife through in loose figure eights so the swirl stays visible after baking.
Extra chocolate version
Stir a handful of chocolate chips into the brownie batter before pouring, then keep the full half cup on top. The interior turns extra fudgy while the top keeps its crackly, chip-studded finish.
Mint cookie bars
Use mint-filled chocolate sandwich cookies for the middle layer so the cookies flavor every square from the center out. Keep everything else the same for a cool, chocolatey twist.
Salted caramel drizzle
Drizzle warmed caramel sauce lightly over the cut, cooled squares and finish with a small pinch of flaky salt on each one. Add it just before serving so the tops keep their crackle.
On the table
Serving suggestions
Cut the pan into sixteen squares and arrange them on a platter with the cut sides showing off the three layers, since the cross-section is the whole point of these bars. They are excellent at room temperature, when the cookie base stays tender and the brownie layer is at its fudgiest.
For dessert service, place a square on a small plate and add a scoop of vanilla ice cream or a spoonful of softly whipped cream alongside; the contrast of cold and fudgy works beautifully. A dusting of confectioners' sugar just before guests arrive makes the platter look finished without covering the crackly tops. Warm individual squares for about ten seconds in the microwave if serving after dinner.
Leftovers
Storage & make-ahead
- Fridge
- Refrigerate in an airtight container up to 5 days; bring to room temperature before serving for the fudgiest texture.
- Freezer
- Freeze cut squares wrapped well, up to 2 months. Thaw overnight in the refrigerator or 30 minutes on the counter.
- Reheat
- Warm a square in the microwave about 10 seconds; the brownie layer turns glossy and the chips soften again.
Keep the cut bars in an airtight container at room temperature for up to three days, layered between sheets of parchment so the crackly tops do not stick. In warm kitchens, refrigerate instead and bring squares to room temperature before serving for the best texture. Leftovers cool no more than two hours before going into the refrigerator.
Make ahead
The whole pan can be baked a day ahead: cool completely, cover the dish tightly and keep it at room temperature, then cut just before serving for the cleanest edges. The brownie batter can be made ahead and refrigerated in its own covered bowl; give it a brief stir and a few minutes on the counter before pouring. The cookie dough layer can also be pressed into the pan, covered and chilled overnight, with the cookies and batter added the next day.
Questions
Frequently asked questions
Can the bars be made ahead of time?
Yes. Bake the pan a day in advance, cool it completely and cover it tightly at room temperature. The flavors settle overnight and the layers firm up, which actually makes the bars easier to cut cleanly. Cut just before serving, or cut ahead and store the squares in an airtight container layered with parchment.
Why did the cookie base stay underbaked?
The most likely cause is a cookie dough layer pressed too thick, which insulates the bottom and slows baking. Keep the base at about a quarter inch, edge to edge. If the dough was very cold when it went into the oven, add a few extra minutes of bake time and check the center with a toothpick before pulling the pan.
Can homemade cookie dough be used instead of store-bought?
Absolutely. Any standard chocolate chip cookie dough works as long as it is chilled firm, roughly the amount from one pound of dough. Homemade dough is often softer, so chill it well before pressing it into the pan, and flatten it evenly so the base bakes through at the same rate as the brownie layer.
How do the sandwich cookies stay whole in the middle?
They rest on the cookie dough and get blanketed by thick brownie batter rather than being stirred into it, so they keep their shape. Leave a small gap between the rows so the dough can rise slightly around each cookie and anchor it. Folding cookies into batter instead would dissolve them and blur the layers.
How should the bars be cut cleanly?
Let the pan cool at least 30 minutes, then lift the slab out by the parchment onto a cutting board. For the sharpest edges, chill it another twenty minutes. Use a long, sharp knife pressed straight down rather than sawed, and wipe the blade with a damp cloth between cuts so the cookie and brownie layers stay distinct in every square.
Everything in one place: the recipe card below gathers the ingredients, steps and estimated nutrition, ready to print.
Recipe card
Triple Layer Cookie Brownie Bars in One Pan
Chocolate chip cookie dough, whole sandwich cookies and fudgy brownie batter stack into one showstopping pan of bars that bakes in about 40 minutes.
- Prep
- Cook
- Rest
- Total
- Servings
- 16 bars
Ingredients
- 1 lb chocolate chip cookie dough, store-bought or made ahead and chilled
- 12 chocolate sandwich cookies, whole
- 2 cups brownie batter, homemade or store-bought, made ahead
- 1/2 cup chocolate chips
Instructions
Press in the cookie base. Grease a 9x13-inch baking dish or line it with parchment, leaving overhang on the two long sides for lifting later. Press the chilled chocolate chip cookie dough across the bottom in one flat, even layer, going edge to edge. Keep it about a quarter inch thick so the base bakes through without turning doughy.
Arrange the sandwich cookies. Set the whole chocolate sandwich cookies on top of the cookie dough in neat rows, flat side down, until the surface is covered. Leave a small gap between the rows; the dough puffs slightly around them as it bakes and holds each cookie in place. Do not press them down hard.
Pour in the brownie batter. Spoon the prepared brownie batter over the cookies, working from the center outward so it flows into the gaps between the rows. Guide it with a spatula rather than stirring, since stirring would disturb the cookie layer underneath. The batter should be thick enough to blanket everything without running to the corners on its own.
Spread and settle the batter. Spread the batter with the spatula until every cookie is completely covered and the surface looks level from edge to edge. Tap the dish firmly on the counter two or three times to release trapped air pockets and settle the batter around the cookies. Check the corners once more before moving on.
Scatter the chocolate chips. Scatter the chocolate chips evenly across the batter, letting a few land close to the edges where they melt into the golden border. Aim for an even scatter rather than a pile in the middle, so every square picks up chips. Leave the chips on the surface; they sink slightly as the bars bake.
Bake until set. Bake in a 350°F (175°C) oven for 35 to 40 minutes, turning the dish once halfway through so the edges bake evenly. The bars are done when the top looks crackly and set, the edges are golden, and a toothpick in the center comes out with moist crumbs but no wet batter.
Cool the pan completely. Set the dish on a wire rack and let the bars cool for at least 30 minutes. The layers finish setting as they cool, and the crackly top firms up. Resist cutting early, since warm bars smear; this wait is what keeps the three layers distinct and clean in every slice.
Cut into squares. Lift the cooled slab out by the parchment, set it on a cutting board, and cut into 16 squares with a sharp knife, wiping the blade between cuts. Press the knife straight down rather than sawing so the cookie layer stays neat. Serve the squares warm or at room temperature.
Allergens: Gluten, Eggs, Milk, Soy
Nutrition (estimated, per serving)
- Calories
- 340 kcal
- Protein
- 4 g
- Carbs
- 44 g
- Fat
- 17 g
Estimates only: values vary with brands, substitutions and portion sizes.
Recipe by EasyCooks Kitchen · easycooksrecipes.com
Share this recipe
Send it to someone who’d love it, or save it for later.
Spotted a mistake in this recipe? Let us know.
Keep cooking


