Easy Christmas Saltine Toffee Bars
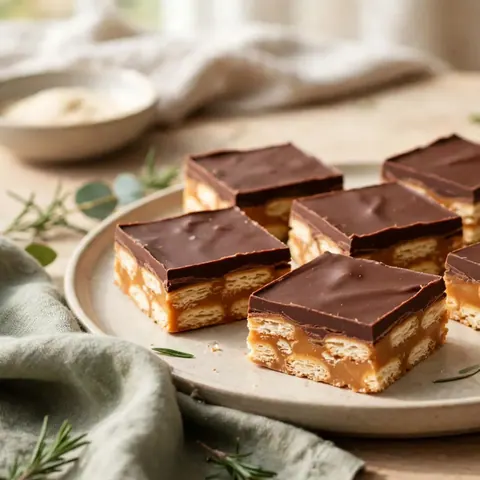
These classic Christmas saltine toffee bars offer a perfect balance of salty crunch and rich, buttery sweetness. This simple, one-pan dessert is an ideal treat for the holiday season that comes together quickly in your own kitchen using just a few pantry staples.
Published Updated 12 min read
- Total time
- Prep
- Cook
- Rest
- Serves
- 16
- Makes 16 squares
- Cuisine
- American
- Calories
- 240
- per serving, estimated

On this page15 sections
Discover the secret to making the ultimate Christmas saltine toffee bars in your own kitchen. This classic holiday confection combines a crisp, salty cracker base with a decadent, buttery toffee layer and a smooth, rich chocolate finish. It is a simple, reliable dessert that never fails to impress friends and family. With minimal ingredients and straightforward steps, you can create a professional-quality treat that perfectly captures the spirit of the season in every bite.
Christmas saltine toffee bars are a beloved holiday tradition for good reason. By layering simple, pantry-friendly ingredients, you create a complex interplay of textures and flavors that is difficult to resist. The saltine crackers provide a structural, salty crunch that cuts through the intense sweetness of the brown sugar toffee. Topped with a silky layer of dark chocolate, these bars offer a sophisticated taste that feels indulgent while remaining incredibly easy to prepare. Whether you are hosting a festive gathering, preparing gifts for neighbors, or simply craving a sweet snack, this recipe provides a consistent and delicious result. Follow these instructions to master the art of the perfect toffee bark, ensuring a treat that is crispy, buttery, and chocolatey every single time you bake it.
The appeal
Why you’ll love it
The method of boiling the butter and brown sugar together is essential for creating a stable toffee that sets properly. By reaching a consistent boil, you evaporate excess moisture, which allows the toffee to firm up into a classic, candy-like texture rather than remaining soft or greasy. This process ensures that the toffee adheres perfectly to the saltine crackers while providing a rich, deep flavor that balances the saltiness of the crackers.
Spreading the chocolate chips while they are still warm from the oven allows the residual heat from the toffee to melt the chocolate evenly without the need for a double boiler. This technique creates a smooth, glossy finish that seals the bars and provides a consistent chocolate layer across the top. Allowing the bars to cool undisturbed at room temperature helps the sugars and fats set, resulting in clean, satisfying squares.
What you need
Ingredients
Makes 16 squares.
Base
Toffee
Topping
Contains:
- Gluten
- Milk
Tools
Equipment
- 10x15 inch rimmed baking sheet
- Parchment paper
- Medium saucepan
- Silicone spatula
- Offset spatula
- Cooling rack
Swaps
Substitutions
Instead ofDark chocolate chips
UseSemi-sweet or milk chocolate chips can be used for a sweeter or milder flavor profile.
Instead ofLight brown sugar
UseDark brown sugar may be substituted for a slightly deeper molasses flavor in the toffee.
Instead ofSaltine crackers
UseClub crackers or butter crackers can work as a base, although the salt level will decrease.
Good to know
Notes
For the best results, use high-quality unsalted butter and pure light brown sugar. The quality of the butter significantly impacts the flavor of the toffee, so choose a brand that you enjoy. Ensure the brown sugar is packed firmly when measuring to maintain the correct ratio of sugar to fat. Dark chocolate chips with at least 60% cocoa content provide a nice contrast to the sweet toffee, though semi-sweet chips are a perfectly acceptable alternative if you prefer a milder flavor.
A sturdy rimmed baking sheet is necessary to prevent the toffee from overflowing during the baking process. Always use parchment paper rather than wax paper, as the parchment is heat-resistant and prevents the toffee from sticking to the pan. If you find the toffee is not spreading easily, warm your offset spatula under hot water and dry it quickly before use; the heat will help smooth the chocolate layer without pulling up the toffee base.
Prep
Before you start
Before you begin, ensure your workspace is clean and organized. Preheat your oven precisely to 350°F (175°C) to ensure the toffee bakes at the correct temperature. Gather all your ingredients, measuring them accurately before starting the stove. Line your baking sheet with high-quality parchment paper, making sure it extends slightly up the sides of the pan to help with easy removal later. Having your spatula, saucepan, and ingredients within arm's reach will help you maintain the necessary pace once the toffee process begins, as the sugar mixture moves quickly from a liquid to a set candy. Ensure your saltine crackers are fresh and crisp, as they form the foundation of the entire dessert.
Step by step
Method
Phase 1
Layering the crackers
Step 1: Prepare the base
Preheat your oven to 350°F (175°C). Line a 10x15 inch rimmed baking sheet completely with parchment paper, ensuring it covers the sides. Arrange the saltine crackers in a single, even layer across the bottom of the pan, fitting them snugly together to cover the entire surface without any large gaps between them.
You’ll need: saltine crackers
Look for: The crackers should form a tight, uniform layer across the entire base of the baking sheet.
Tip: Ensure the parchment paper is pressed into the corners of the pan to prevent the toffee from leaking underneath the crackers.
Checkpoint
The crackers should cover the entire bottom of the baking sheet in a uniform, flat layer. Check that no large gaps exist between the crackers, as this is where the toffee will pool and create a solid base. The layer should look organized and sturdy, ready to receive the hot butter and sugar mixture. If any crackers are broken, try to fit the pieces together like a puzzle to maintain a consistent density across the pan. This step is the most critical for ensuring your final squares are easy to handle and have a consistent thickness throughout, so take a moment to ensure the base is perfectly arranged before moving to the stove.
Phase 2
Boiling and baking the toffee
Step 2: Prepare the toffee
In a medium saucepan, combine the butter and brown sugar over medium heat. Bring the mixture to a gentle boil, stirring constantly with a silicone spatula. Allow the mixture to boil for three minutes without stirring, letting it transform into a thick, bubbling amber-colored toffee that coats the back of a spoon.
You’ll need: unsalted butter · packed light brown sugar
Look for: The mixture will become smooth, glossy, and turn a deep amber color while bubbling consistently.
Tip: Watch the saucepan closely while the mixture boils to prevent the sugar from burning or separating from the butter.
Step 3: Assemble the bars
Immediately pour the hot toffee mixture evenly over the saltine crackers, using an offset spatula to spread it to the very edges of the pan. Place the baking sheet into the preheated oven and bake for 10 to 12 minutes, until the toffee is bubbling across the entire surface of the crackers.
You’ll need: saltine crackers · unsalted butter · packed light brown sugar
Look for: The toffee will be bubbling vigorously across the surface and look unified with the crackers.
Tip: Work quickly once the toffee is poured, as it begins to set and harden as soon as it cools slightly.
Checkpoint
The toffee should be a rich, translucent amber color, bubbling steadily across the entire surface of the crackers. Ensure the toffee has been spread to the very edges of the baking sheet so that every cracker is fully coated. After baking, the toffee should look deep and concentrated, with no liquid pools remaining in the center of the pan. The bubbling appearance indicates that the sugar has reached the desired temperature to set correctly. If you notice any light patches, gently tilt the pan to ensure an even distribution. The smell will be warm, sweet, and caramelized, signaling that the base is perfectly prepared and ready for the final chocolate topping.
Phase 3
Adding the chocolate finish
Step 4: Add chocolate and set
Remove the pan from the oven and immediately scatter the dark chocolate chips across the hot toffee. Let them sit for two minutes until softened by the residual heat, then use an offset spatula to spread the chocolate into a smooth, even layer over the top. Allow the bars to cool completely at room temperature for at least one hour before breaking or cutting into squares.
You’ll need: dark chocolate chips
Look for: The chocolate will melt into a glossy, smooth surface that covers the toffee layer completely.
Tip: For cleaner edges, you can place the pan in the refrigerator for 20 minutes to firm up the chocolate before slicing.
Checkpoint
The chocolate should be spread into a perfectly smooth, glossy, and opaque layer that covers the entire surface of the toffee. There should be no visible streaks or gaps, and the chocolate should look uniform and polished. As it cools, the surface will transition from a high-gloss finish to a more matte, set appearance. Ensure the chocolate has reached the edges of the pan so that every piece will have a balanced ratio of cracker, toffee, and chocolate. Once the chocolate is set, the entire structure should feel firm and solid, with no movement when you gently nudge the pan. This final layer is what gives the bars their professional look and satisfying crunch.
Doneness
How to tell it’s done
The toffee is done when it has bubbled vigorously for three minutes and looks like a deep, uniform amber liquid that is consistent throughout the pan. When you add the chocolate, the chips should begin to lose their shape within two minutes of being placed on the hot surface. Once spread, the chocolate should look like a smooth, glossy, and opaque sheet. The entire bar is ready to be broken or sliced when it has cooled completely and feels firm to the touch, with no soft spots in the center. The toffee should be crisp and snap when broken, indicating that the sugar has reached the correct consistency for a perfect, professional-grade finish.
Avoid these
Common mistakes
A common mistake is failing to boil the butter and brown sugar mixture for the full three minutes, which can result in a toffee that stays tacky or soft rather than snapping cleanly. Another error is spreading the chocolate too aggressively while it is still too hot, which can cause it to mix with the toffee layer rather than resting on top. Ensure the crackers are arranged in a flat, single layer; overlapping crackers can create uneven spots that are difficult to slice. Finally, do not attempt to cut the bars before they have cooled entirely, as the toffee needs time to set its structure, or the layers may separate when you press down with a knife or spatula.
Better results
Tips
Tip 1
To achieve perfectly clean squares, you can use a sharp knife to score the chocolate layer lightly before it has completely hardened. This creates a guide for when you eventually break or cut the bars, preventing the chocolate from cracking irregularly. If you prefer a rustic look, allow the bars to set completely and then use your hands to snap them into organic, uneven pieces, which makes for a beautiful presentation on a serving platter during the holidays.
Tip 2
If you find that the toffee layer is slightly too thick or hard to cut, try running your knife under hot water and drying it between each slice. The warmth of the blade will glide through the chocolate and toffee layers without shattering them. Additionally, store your bars with sheets of parchment paper between layers if you are stacking them in a container; this prevents them from sticking together and keeps the chocolate surface looking pristine and free of any unwanted marks.
Make it yours
Variations
Nutty Toffee Bars
Before the chocolate layer sets, sprinkle half a cup of finely chopped toasted pecans or walnuts over the top. The nuts add a delightful earthy crunch that pairs wonderfully with the sweet, buttery toffee base and rich dark chocolate.
Sea Salt Toffee
Enhance the flavor profile by sprinkling a small amount of flaky sea salt over the melted chocolate immediately after spreading. The salt cuts through the sweetness and provides a sophisticated finish that elevates the overall taste of these classic bars.
White Chocolate Swirl
For a festive visual, melt a small amount of white chocolate and drizzle it over the dark chocolate layer using a fork. Create a marbled pattern by dragging a toothpick through the two chocolates before they set to achieve a professional, decorative look.
Holiday Sprinkle Bars
Add a festive touch by scattering red and green sprinkles or crushed peppermint candies over the melted chocolate before it hardens. This simple addition brings a vibrant holiday aesthetic to the bars, making them perfect for gift-giving during the Christmas season.
On the table
Serving suggestions
Serve these bars on a festive platter at room temperature for the best flavor and texture. The contrast between the cold, crisp chocolate and the buttery, slightly chewy toffee is most pronounced when the bars are not overly chilled. They make a fantastic addition to a dessert spread, holiday cookie box, or as a simple accompaniment to coffee or tea. Their elegant appearance and classic flavor profile make them a crowd-pleasing option for any occasion, from casual family dinners to more formal holiday celebrations.
For a festive touch, you can sprinkle a tiny pinch of sea salt over the chocolate layer while it is still soft and melted. The added salt enhances the depth of the dark chocolate and complements the sweet toffee base beautifully. When serving, offer them alongside other holiday favorites or on their own as a standalone treat. Because they are rich and satisfying, they pair perfectly with a warm beverage, which helps to balance the sweetness and highlights the complex, buttery notes of the toffee.
Leftovers
Storage & make-ahead
- Fridge
- Store in an airtight container in the refrigerator for up to two weeks. Allow them to come to room temperature for ten minutes before serving.
- Freezer
- Freeze in a single layer in an airtight, freezer-safe container for up to three months. Place parchment paper between layers to prevent sticking.
- Reheat
- These bars are intended to be eaten cold or at room temperature; they do not require reheating. Serve directly from the fridge or freezer as desired.
Store the saltine toffee bars in an airtight container at room temperature for up to one week. Keeping them in a cool, dry place away from direct sunlight is crucial, as heat can soften the chocolate and cause the toffee to lose its crisp texture. If your kitchen tends to be warm, you may prefer to store them in the refrigerator to maintain the best snap and texture. Ensure the container is properly sealed to prevent the crackers from absorbing any moisture, which would compromise the crunch that makes these bars so enjoyable.
Make ahead
These bars are an excellent make-ahead dessert because they actually improve as they sit for a day, allowing the flavors to meld and the toffee to fully set. You can prepare them up to three days before you intend to serve them. Simply follow the recipe, allow the bars to cool completely, and then store them in an airtight container as directed. This makes them a stress-free option for holiday entertaining, as you can have your dessert ready long before your guests arrive, leaving you more time for other preparations.
Questions
Frequently asked questions
Can these saltine toffee bars be made ahead of time?
Yes, these bars are perfect for making ahead. They can be prepared up to three days in advance and stored in an airtight container at room temperature. In fact, many find that the flavors develop and the texture improves slightly after sitting for a day, making them a stress-free option for holiday entertaining or gift-giving.
Why is the toffee layer soft instead of snapping?
If the toffee remains soft, it is likely because the butter and brown sugar mixture was not boiled for the full three minutes. The boiling process is necessary to evaporate excess moisture and reach the correct temperature for the sugar to set. Ensure you keep the mixture at a consistent boil for the entire duration to achieve that classic, crisp snap.
Can semi-sweet chocolate be used instead of dark chocolate?
Absolutely. Semi-sweet chocolate is a great alternative if you prefer a milder, sweeter flavor profile. The method remains exactly the same: simply scatter the chips over the hot toffee, allow them to soften, and spread them into an even layer. The result will be equally delicious, though slightly sweeter than the version made with dark chocolate.
How can clean squares be achieved when cutting?
For clean, professional-looking squares, use a sharp knife and run the blade under hot water before slicing. Wipe the knife clean and reheat it between each cut. This prevents the chocolate from cracking or pulling away from the toffee layer. Alternatively, you can score the chocolate lightly before it sets completely, which creates a guide for breaking the bars later.
Is it necessary to use parchment paper?
Yes, lining your baking sheet with parchment paper is essential. The toffee becomes extremely sticky as it cools, and without parchment paper, it will bond permanently to the pan. Parchment paper provides a non-stick surface that allows you to easily lift the entire sheet of toffee bars out of the pan once they have cooled, making slicing and serving much easier.
Everything in one place: the recipe card below gathers the ingredients, steps and estimated nutrition, ready to print.
Recipe card
Easy Christmas Saltine Toffee Bars
These classic Christmas saltine toffee bars offer a perfect balance of salty crunch and rich, buttery sweetness. This simple, one-pan dessert is an ideal treat for the holiday season that comes together quickly in your own kitchen using just a few pantry staples.
- Prep
- Cook
- Rest
- Total
- Servings
- 16 squares
Ingredients
Base
- 40 squares saltine crackers
Toffee
- 1 cup unsalted butter
- 1 cup packed light brown sugar
Topping
- 1 cup dark chocolate chips
Instructions
Prepare the base. Preheat your oven to 350°F (175°C). Line a 10x15 inch rimmed baking sheet completely with parchment paper, ensuring it covers the sides. Arrange the saltine crackers in a single, even layer across the bottom of the pan, fitting them snugly together to cover the entire surface without any large gaps between them.
Prepare the toffee. In a medium saucepan, combine the butter and brown sugar over medium heat. Bring the mixture to a gentle boil, stirring constantly with a silicone spatula. Allow the mixture to boil for three minutes without stirring, letting it transform into a thick, bubbling amber-colored toffee that coats the back of a spoon.
Assemble the bars. Immediately pour the hot toffee mixture evenly over the saltine crackers, using an offset spatula to spread it to the very edges of the pan. Place the baking sheet into the preheated oven and bake for 10 to 12 minutes, until the toffee is bubbling across the entire surface of the crackers.
Add chocolate and set. Remove the pan from the oven and immediately scatter the dark chocolate chips across the hot toffee. Let them sit for two minutes until softened by the residual heat, then use an offset spatula to spread the chocolate into a smooth, even layer over the top. Allow the bars to cool completely at room temperature for at least one hour before breaking or cutting into squares.
Allergens: Gluten, Milk
Nutrition (estimated, per serving)
- Calories
- 240 kcal
- Protein
- 2 g
- Carbs
- 28 g
- Fat
- 14 g
- Fiber
- 1 g
- Sugar
- 18 g
- Sodium
- 160 mg
Estimates only: values vary with brands, substitutions and portion sizes.
Recipe by EasyCooks Kitchen · easycooksrecipes.com
Share this recipe
Send it to someone who’d love it, or save it for later.
Spotted a mistake in this recipe? Let us know.
Keep cooking


