Easy Cookies and Cream Dump Cake
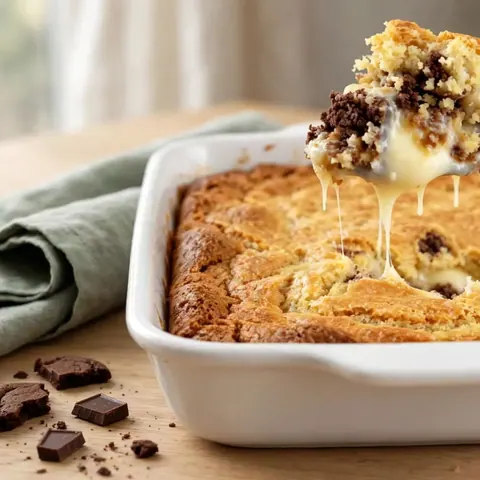
This simple cookies and cream dump cake creates a decadent, warm dessert with minimal effort. Using only a few pantry staples, this indulgent treat features a crisp golden crust over a rich, creamy cookie layer that is perfect for any occasion.
Published Updated 12 min read
- Total time
- Prep
- Cook
- Rest
- Serves
- 8
- Makes one 9x13 inch baking dish
- Cuisine
- American
- Calories
- 420
- per serving, estimated

On this page16 sections
Discover the effortless joy of a classic cookies and cream dump cake. This simple dessert relies on the magic of layering pantry staples to create a warm, indulgent treat that is perfect for any occasion. By combining crunchy chocolate sandwich cookies with smooth, sweet condensed milk and a buttery cake crust, you achieve a dessert that is as reliable as it is delicious. It is the ideal solution for when you need a crowd-pleasing sweet treat without spending hours in the kitchen.
The beauty of a dump cake lies in its simplicity and the way the ingredients transform in the oven. This recipe requires no mixing bowls or complicated techniques, making it one of the most accessible desserts for home cooks of all skill levels. The combination of textures—from the crisp, golden top layer to the softened, creamy cookies beneath—offers a sophisticated experience from basic components. Whether you are hosting a casual gathering or simply craving a homemade dessert, this recipe delivers consistent results every single time you bake it.
The appeal
Why you’ll love it
The dump cake method works by using the moisture from the sweetened condensed milk to hydrate the dry cake mix as it bakes. As the butter melts, it drips down through the cake mix, creating a rich, golden, and slightly crisp topping that serves as the perfect contrast to the softened cookies underneath. This process relies on gravity and consistent heat to meld the flavors together, resulting in a cohesive dessert that feels like it took much longer to prepare than it actually did.
This particular combination of ingredients ensures that the cake remains moist and flavorful without the need for additional eggs or oil. The sweetened condensed milk acts as both a sweetener and a binder, ensuring that the cookies maintain their structure while becoming tender and infused with a creamy richness. By carefully layering the ingredients, you create distinct strata that provide a complex eating experience, where the sweetness of the milk balances the bitterness of the chocolate cookies perfectly in every warm, comforting spoonful.
What you need
Ingredients
Makes one 9x13 inch baking dish.
Contains:
- Gluten
- Eggs
- Milk
- Soy
Tools
Equipment
- 9x13 inch baking dish
- Cutting board
- Knife
- Spatula
- Measuring cups
Swaps
Substitutions
Instead ofWhite cake mix
UseYellow cake mix can be used for a slightly richer, more buttery flavor profile in the crust.
Instead ofChocolate sandwich cookies
UseUse chocolate-filled sandwich cookies for an even more intense chocolate experience throughout the cake.
Instead ofUnsalted butter
UseSalted butter works well if you want to balance the extreme sweetness of the condensed milk.
Good to know
Notes
When selecting your chocolate sandwich cookies, ensure they are fresh and firm, as they will provide the structural base of the cake. Avoid using broken or crushed cookies, as these will turn into mush rather than providing the desired texture. The choice of white cake mix is deliberate, as its neutral flavor allows the deep cocoa notes of the sandwich cookies to take center stage, creating a balanced dessert that is neither too cloying nor too subtle in its overall flavor profile.
For the best results, use a high-quality unsalted butter to maintain control over the final salt levels in the dish. While the recipe calls for thin slices, you can also use a grater to distribute the butter even more evenly if you prefer a more uniform crust. Always ensure your baking dish is the correct size, as a dish that is too large or too small will significantly alter the baking time and the final texture of the cake’s crust.
Prep
Before you start
Before you begin, ensure that your oven is fully preheated to the correct temperature, as even heat is crucial for the cake mix to properly transform into a golden crust. Gather all your ingredients on the counter so they are ready for immediate assembly. Check that your baking dish is clean and dry, as any lingering moisture can affect the way the bottom layer of cookies sits. Having your butter already sliced and ready will save time during the layering process, ensuring that the cake goes into the oven as quickly as possible once assembled.
Step by step
Method
Phase 1
Layering the base
Step 1: Prepare the base
Preheat your oven to 350°F (175°C). Take your 9x13 inch baking dish and arrange the chocolate sandwich cookies in a single, even layer across the bottom of the dish, ensuring that the entire base is completely covered for a consistent texture in every bite.
You’ll need: chocolate sandwich cookies
Look for: The cookies should be arranged in a tight, uniform layer covering the bottom of the dish.
Tip: Ensure the cookies are placed flat to provide a stable foundation for the liquid and dry layers.
Step 2: Add the creamy layer
Slowly and evenly pour the sweetened condensed milk directly over the arranged chocolate sandwich cookies. Make sure to distribute the milk across the entire surface of the cookies so that each one is adequately moistened by the sweet, thick liquid before you move on to the next step.
You’ll need: sweetened condensed milk
Look for: The condensed milk should coat the cookies thoroughly without leaving any dry patches on top.
Tip: Use a spatula if needed to gently spread the milk into the corners of the baking dish.
Checkpoint
At the end of this phase, you should have a uniform layer of cookies covering the bottom of the dish. The cookies should be placed side by side, creating a solid base that will hold the liquid. Check that there are no significant gaps between the cookies, as these could allow the sweetened condensed milk to settle directly on the pan, potentially causing it to stick or burn during the baking process. Once the cookies are perfectly positioned, you are ready to pour the milk over them.
Phase 2
Adding the dry components
Step 3: Layer the dry ingredients
Open the box of white cake mix and pour the dry powder evenly over the condensed milk layer. Use a spoon or your hand to gently level the surface of the powder, ensuring that the cake mix is spread across the entire dish to avoid any uneven clumps of dry mix.
You’ll need: white cake mix
Look for: The cake mix should form an even, smooth layer covering all the cookies and the condensed milk.
Tip: Lightly shake the dish from side to side to help the dry powder settle into an even layer.
Step 4: Add the butter
Take your thinly sliced unsalted butter and arrange the pieces across the top of the cake mix. Distribute the butter slices evenly, particularly focusing on any corners or empty spaces to ensure that the cake mix hydrates properly while baking in the oven for a golden, delicious crust.
You’ll need: unsalted butter, thinly sliced
Look for: The butter slices should be distributed across the entire surface of the cake mix for even melting.
Tip: Slice the butter thin enough so it melts rapidly and covers the surface area of the cake mix.
Checkpoint
By the end of this phase, the dish should be fully assembled with the cake mix and butter slices distributed evenly. The cake mix should completely obscure the cookies and milk beneath, providing a smooth, flat surface. The butter slices should be spaced out across the top to ensure that as they melt, they cover the entire surface area of the cake mix. Check that no large piles of dry mix remain, as these will not bake properly and will leave an unpleasant texture in the final result.
Phase 3
Final baking and cooling
Step 5: Bake the cake
Place the baking dish into the preheated oven and bake until the top is golden brown and the edges are bubbling. Monitor the cake closely as the butter and cake mix combine to form a firm, crusty top that protects the creamy, softened cookies underneath during the cooking process.
Internal temperature 160°F (71°C)
Look for: The top should be golden brown and the edges should show active bubbling of the filling.
Tip: Rotate the dish halfway through the baking time to ensure the crust browns evenly in your oven.
Step 6: Cool and serve
Remove the cake from the oven once it is fully baked and golden. Allow the dish to rest on a wire rack for at least ten minutes before serving. This rest period is essential to let the filling settle and the crust firm up, resulting in a perfectly textured warm dessert.
Look for: The cake should be firm enough to hold its shape when lifted with a large serving spoon.
Tip: Serve while still warm to enjoy the contrast between the crisp crust and the soft, creamy center.
Checkpoint
When the cake is finished, the top will be a beautiful golden brown and the edges will be bubbling with a rich, caramelized aroma. The cake should feel solid when gently pressed with the back of a spoon. Before serving, ensure the dish has cooled for at least ten minutes on a rack. This resting period allows the filling to thicken and the crust to become crisp. Check that the center is no longer soft or jiggly before you begin to portion the cake into servings.
Doneness
How to tell it’s done
The cake is done when the top has achieved a uniform golden-brown color and feels firm to the touch. You should also observe the edges of the dish, where the condensed milk and butter mixture should be actively bubbling. This indicates that the sugars have caramelized and the cake mix has fully hydrated. If the center still looks pale or powdery, give it a few more minutes in the oven. Once removed, the internal temperature should reach 160°F (71°C) to ensure the ingredients have properly set.
Avoid these
Common mistakes
A common mistake is failing to cover the entire bottom of the dish with cookies, which can lead to the condensed milk burning directly against the ceramic. Another error is clumping the cake mix in one spot, which prevents the butter from melting through evenly and results in dry, powdery patches on the finished cake. Avoid using too much butter, as this can make the crust greasy, or too little, which will leave the cake mix dry and crumbly. Patience during the cooling stage is also vital for the perfect texture.
Cook safely
Food safety
Safe internal temperatures
Cook to at least these temperatures, measured with an instant-read thermometer in the thickest part.
| Food | Minimum internal temperature |
|---|---|
| Egg dishes | 160°F (71°C) |
Better results
Tips
Tip 1
For a more sophisticated flavor, you can add a pinch of sea salt over the top of the butter slices before baking to cut through the intense sweetness of the condensed milk. This small addition provides a professional contrast that enhances the cocoa notes in the sandwich cookies. Always be sure to use a high-quality, fine-grain sea salt to ensure it distributes evenly across the top, and avoid large flakes that might create overly salty pockets in the final, warm, golden, and crisp cake crust.
Tip 2
If you find that the edges of your cake are browning too quickly before the center has set, you can loosely tent a piece of aluminum foil over the top of the baking dish for the final few minutes of baking. This technique helps to regulate the heat and ensures that the cake cooks through completely without burning the delicate crust. Always remove the foil for the last two minutes of the baking time to allow the top to achieve that final, perfect golden brown color.
Make it yours
Variations
Peanut Butter Twist
Add a layer of creamy peanut butter between the cookies and the condensed milk. The saltiness of the peanut butter pairs exceptionally well with the chocolate cookies, creating a classic flavor combination that adds depth to the richness of the cake.
Mocha Infusion
Stir a teaspoon of instant espresso powder into the condensed milk before pouring it over the cookies. This subtle addition of coffee enhances the chocolate flavor of the cookies and provides a sophisticated, slightly bitter edge to the final dessert.
Coconut Crunch
Sprinkle a half-cup of shredded, unsweetened coconut over the cake mix before adding the butter slices. The coconut will toast beautifully in the oven, adding a nutty, tropical flavor and an extra layer of texture to the crisp, golden crust.
Spiced Caramel
Dust the cookie layer with a teaspoon of ground cinnamon before pouring the condensed milk. The warming spices of the cinnamon complement the sweetness of the condensed milk and the chocolate, resulting in a cozy, aromatic cake that is perfect for cooler weather.
On the table
Serving suggestions
Serve this cake warm, ideally with a dollop of unsweetened whipped cream or a scoop of plain vanilla bean ice cream to balance the intensity of the dessert. The temperature contrast between the warm cake and the cold cream creates a delightful sensory experience. When plating, use a large spoon to scoop through the layers, ensuring that every portion includes a good amount of the crisp crust and the creamy, cookie-filled center. This presentation highlights the distinct layers of the cake and makes for an inviting finish to any meal.
For a cleaner presentation, you can use a sharp knife to cut the cake into neat squares once it has fully cooled to room temperature, though this may slightly compromise the crispness of the top crust. If you prefer to serve it warm, the scoop method is recommended as it keeps the texture intact. Regardless of how you choose to portion the cake, ensure you provide small dessert plates and spoons so that guests can enjoy every bit of the rich, indulgent filling and the buttery, golden topping without any difficulty.
Leftovers
Storage & make-ahead
- Fridge
- Keep leftovers in an airtight container in the refrigerator for up to five days. The cake will firm up significantly when chilled.
- Freezer
- Wrap individual portions tightly in plastic wrap and store in a freezer-safe bag for up to one month. Thaw in the refrigerator overnight.
- Reheat
- Warm individual servings in the oven at 300°F (150°C) for about ten minutes, or until the crust is crisp and the center is warm again.
Store any leftovers in an airtight container to keep the crust from losing its crisp texture. The cake can be kept at room temperature for up to two days, but for longer storage, it is best to place it in the refrigerator. When ready to eat, you can enjoy it cold or warm it slightly to restore the pleasant contrast between the soft center and the crust. Always ensure the cake has cooled completely before covering it to prevent condensation from making the crust soggy.
Make ahead
You can assemble the cake in the baking dish ahead of time, but wait to add the butter until right before you are ready to bake. If you need to prepare it more than an hour in advance, cover the dish tightly with plastic wrap and keep it in the refrigerator. Remove it from the fridge about thirty minutes before you plan to bake it to allow the dish to come closer to room temperature, which helps ensure that the cake bakes evenly throughout the entire dish.
Questions
Frequently asked questions
Can this cake be made with a different type of cookie?
Yes, you can experiment with various sandwich cookies, such as those with vanilla or mint fillings. However, ensure that the cookies are firm and not too soft, as the texture of the base depends on the structural integrity of the cookies themselves. Avoid using soft-baked or chewy cookies, as they will not provide the necessary contrast to the creamy condensed milk and the crisp crust that develops during the baking process.
What happens if the cake mix is not fully incorporated?
If you notice dry patches of cake mix on the surface, it is usually because the butter did not melt and spread evenly across the top. To fix this, you can gently dab the dry areas with a little extra melted butter or press them down lightly with a spoon so they hydrate during the final minutes of baking. Ensuring the butter is distributed evenly from the start is the best way to prevent this issue entirely.
Is it possible to reduce the amount of condensed milk?
Reducing the amount of condensed milk will significantly alter the final texture and sweetness of the dessert. The condensed milk is essential for creating the creamy, binding layer that keeps the cookies moist and prevents the cake from becoming too dry. If you are concerned about the sweetness, it is better to serve the cake with a side of unsweetened whipped cream or fresh berries to balance the flavor profile rather than changing the recipe ratios.
Why does the crust become soggy after storage?
The crust may become soggy if the cake is covered before it has cooled completely, as the trapped steam will soften the crisp top. Always allow the cake to cool on a wire rack for at least thirty minutes before covering it for storage. Additionally, storing the cake in an airtight container helps maintain the texture, though it will naturally lose some of its initial crispness over time compared to when it is served fresh from the oven.
Can this recipe be prepared in a smaller baking dish?
Using a smaller baking dish will result in a much thicker cake that will take longer to bake through. If you choose to use a smaller pan, you may need to adjust the baking time and monitor the cake closely to ensure the center sets properly without burning the edges. For the most consistent results, it is recommended to stick to the standard 9x13 inch baking dish size, which provides the ideal surface area for the ingredients to interact and bake evenly.
Everything in one place: the recipe card below gathers the ingredients, steps and estimated nutrition, ready to print.
Recipe card
Easy Cookies and Cream Dump Cake
This simple cookies and cream dump cake creates a decadent, warm dessert with minimal effort. Using only a few pantry staples, this indulgent treat features a crisp golden crust over a rich, creamy cookie layer that is perfect for any occasion.
- Prep
- Cook
- Rest
- Total
- Servings
- one 9x13 inch baking dish
Ingredients
- 24 chocolate sandwich cookies
- 14 oz sweetened condensed milk
- 1 box white cake mix
- 1/2 cup unsalted butter, thinly sliced
Instructions
Prepare the base. Preheat your oven to 350°F (175°C). Take your 9x13 inch baking dish and arrange the chocolate sandwich cookies in a single, even layer across the bottom of the dish, ensuring that the entire base is completely covered for a consistent texture in every bite.
Add the creamy layer. Slowly and evenly pour the sweetened condensed milk directly over the arranged chocolate sandwich cookies. Make sure to distribute the milk across the entire surface of the cookies so that each one is adequately moistened by the sweet, thick liquid before you move on to the next step.
Layer the dry ingredients. Open the box of white cake mix and pour the dry powder evenly over the condensed milk layer. Use a spoon or your hand to gently level the surface of the powder, ensuring that the cake mix is spread across the entire dish to avoid any uneven clumps of dry mix.
Add the butter. Take your thinly sliced unsalted butter and arrange the pieces across the top of the cake mix. Distribute the butter slices evenly, particularly focusing on any corners or empty spaces to ensure that the cake mix hydrates properly while baking in the oven for a golden, delicious crust.
Bake the cake. Place the baking dish into the preheated oven and bake until the top is golden brown and the edges are bubbling. Monitor the cake closely as the butter and cake mix combine to form a firm, crusty top that protects the creamy, softened cookies underneath during the cooking process.
Cool and serve. Remove the cake from the oven once it is fully baked and golden. Allow the dish to rest on a wire rack for at least ten minutes before serving. This rest period is essential to let the filling settle and the crust firm up, resulting in a perfectly textured warm dessert.
Allergens: Gluten, Eggs, Milk, Soy
Nutrition (estimated, per serving)
- Calories
- 420 kcal
- Protein
- 4.5 g
- Carbs
- 65 g
- Fat
- 16 g
- Fiber
- 1.2 g
- Sugar
- 45 g
- Sodium
- 280 mg
Estimates only: values vary with brands, substitutions and portion sizes.
Recipe by EasyCooks Kitchen · easycooksrecipes.com
Share this recipe
Send it to someone who’d love it, or save it for later.
Spotted a mistake in this recipe? Let us know.
Keep cooking


