No-Bake Condensed Milk Cheesecake (Foolproof, Creamy)
A velvety no-bake cheesecake built on a pressed cookie base, sweetened with condensed milk and finished with crumbled cookies. No oven, no water bath, no cracks.
Published 12 min read
- Total time
- Prep
- Cook
- Rest
- Serves
- 8
- Makes one 9-inch cheesecake
- Cuisine
- American
- Calories
- 500
- per serving, estimated

On this page15 sections
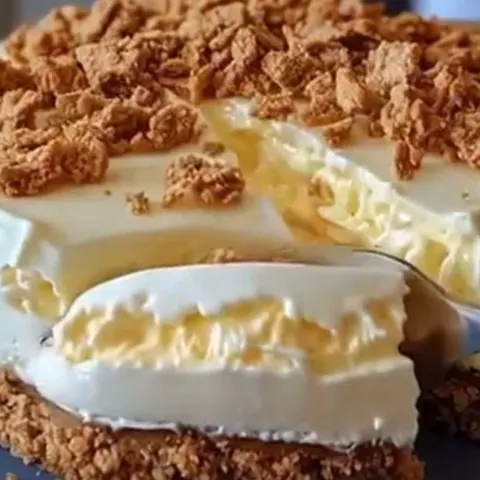
No oven, no water bath, no cracks — just a spoon gliding through the creamiest filling on a crunchy cookie base. Sweetened condensed milk does the heavy lifting in this cheesecake, turning cream cheese into something impossibly velvety while the refrigerator does the setting. Crumbled cookies on top add the crunch that makes every bite worth slowing down for.
Most cheesecakes demand precision: room-temperature eggs, gentle baking, a water bath and a nervous hour watching for cracks. This one skips all of it. Crushed cookies are pressed into a pan, a simple cream is whipped together, and the whole thing sets in the refrigerator while the rest of the day carries on. Sweetened condensed milk replaces both the sugar and the eggs, which is why the texture comes out so dense and silky — closer to a spoonable custard than a baked cake. From start to fridge, the active work takes barely twenty-five minutes, and the result tastes like far more effort than that.
The appeal
Why you’ll love it
Condensed milk is already sugar-suspended and thick, so it sweetens the filling while adding body, unlike granulated sugar that dissolves and thins. Beaten into cream cheese, it creates a base that is stable at refrigerator temperature — no eggs to cook, no curd to worry about. A long, cold chill is what lets the filling firm up enough to slice cleanly instead of slumping on the plate.
The texture comes from the whipped cream folded in at the end. Whipping traps air in the fat, and folding — not stirring — keeps that air where it belongs. The result is a filling that is rich yet light, with the velvety scoop of the video rather than the rubbery firmness of baked cheesecake. The pressed crumb base supplies the contrast: crumbs compressed into a dense layer set firm in the cold, giving each bite a crisp foundation under the soft cream.
What you need
Ingredients
Makes one 9-inch cheesecake.
Cookie base
Condensed milk filling
Topping
Contains:
- Gluten
- Milk
Tools
Equipment
- 9-inch springform pan
- Food processor or zip-top bag and rolling pin
- Electric hand mixer
- Large mixing bowls
- Rubber spatula
- Measuring cups and spoons
Swaps
Substitutions
Instead ofGraham cracker crumbs
UseDigestive biscuits, vanilla wafer crumbs or shortbread crumbs all work; keep the total at 1 1/2 cups so the base still holds together.
Instead ofHeavy cream
UseWhipped topping can replace the heavy cream; skip the whipping step and fold it straight into the condensed milk mixture.
Instead ofCream cheese
UseNeufchâtel cheese blends the same way and gives a slightly softer, tangier filling; keep it at room temperature and beat it until completely smooth.
Instead ofCrushed cookies
UseChocolate wafer crumbs make a dramatic dark topping against the pale cream, or pulse a few extra graham crackers for a cohesive look.
Good to know
Notes
Full-fat block cream cheese is the right choice here; the spreadable tub style contains extra moisture and can leave the filling loose. Chill the cream and the mixing bowl before whipping — cold cream reaches firm peaks faster and holds them longer. Graham crackers are classic, but digestive biscuits, vanilla wafers or shortbread all make an excellent base; just keep the total at 1 1/2 cups of crumbs.
A 9-inch springform pan makes unmolding effortless, but a square 8-inch pan lined with two overlapping strips of parchment works too — lift the whole slab out and cut it into bars. For the topping, use the same cookies as the base for a cohesive look, or a contrast like chocolate wafer crumbs if the plate deserves a little drama. Leftovers keep beautifully, which makes this a reliable make-ahead dessert.
Prep
Before you start
Set out the cream cheese an hour ahead so it softens properly — cold cream cheese is the only realistic way to end up with a lumpy filling. Chill the bowl and beaters for the whipped cream in the freezer. Line or grease nothing if using a springform; the crust releases on its own. Measure everything before starting, because the filling comes together quickly once the cream cheese is smooth, and the whipped cream should be folded in while it is still at its peak.
Step by step
Method
Phase 1
Build the cookie base
Step 1: Crush the cookies
Pulse the graham crackers in a food processor until they turn into fine, even crumbs with no large pieces left. If using a zip-top bag, crush them with a rolling pin, pressing firmly and working from the center outward. Aim for a sandy texture that holds together lightly when pinched.
You’ll need: graham cracker crumbs
Look for: Every crumb should look the same size, like coarse sand, with no chunks bigger than a pea anywhere in the bag.
Tip: Fine crumbs pack tighter than chunky ones, so the base slices cleanly instead of crumbling on the plate.
Step 2: Press and chill the base
Tip the crumbs into a 9-inch springform pan and press them firmly into an even layer with the bottom of a measuring cup, bringing them slightly up the sides. Press hard — the denser the layer, the cleaner the slices. Set the pan in the refrigerator while you make the filling.
You’ll need: graham cracker crumbs
Look for: The base should feel solid under light pressure, not sandy or loose at the edges.
Tip: A flat-bottomed measuring cup presses more evenly than fingers and keeps the layer level.
Checkpoint
At the end of this phase the base should look like a smooth, even sand-colored disk filling the bottom of the pan, solid at the edges and slightly up the sides. Press a fingertip into it: it should resist firmly with no give and no loose crumbs shifting. If it feels sandy or shifts under pressure, it needs more pressing before the filling goes on. The chilling time in the refrigerator is short — just enough to firm the compressed crumbs while the filling is made.
Phase 2
Whip the condensed milk filling
Step 3: Beat the cream cheese
Place the softened cream cheese in a large bowl and beat it with an electric mixer on medium speed for about 2 minutes, scraping the bowl once halfway through. Keep going until it is completely smooth and glossy, with no lumps left anywhere. Lumps now will never disappear later, so be thorough.
You’ll need: cream cheese
Look for: The cream cheese should look like thick, shiny pudding and slide off the beaters in smooth ribbons.
Tip: Cold cream cheese is the number one cause of lumpy filling; leave it out for an hour before starting.
Step 4: Add the condensed milk
Pour in the sweetened condensed milk in a slow, steady stream while mixing on low speed. Scrape the sides and bottom of the bowl, then beat another 30 seconds until the mixture is uniform, thick and satiny. The condensed milk brings all the sweetness and body this filling needs.
You’ll need: cream cheese · sweetened condensed milk
Look for: The mixture should be noticeably thicker than plain beaten cream cheese and fall in a heavy ribbon.
Tip: Pour slowly along the side of the bowl so the milk incorporates instead of pooling at the bottom.
Step 5: Whip the cream
In a separate chilled bowl, whip the cold heavy cream on medium-high speed until it forms firm, defined peaks that stand upright when the beaters lift. Watch closely near the end; overwhipped cream turns grainy. This whipped cream is what makes the finished cheesecake light instead of dense.
You’ll need: heavy cream
Look for: The peaks should hold their shape and bend just slightly at the tips, not flop over.
Tip: Chill the bowl and beaters in the freezer for 10 minutes first — the cream whips faster and stiffer.
Step 6: Fold the two together
Add the whipped cream to the condensed milk mixture in two additions, folding gently with a rubber spatula after each one. Scoop from the bottom up and turn the bowl as you go, stopping as soon as no white streaks remain. Overfolding deflates the cream and costs the filling its airy, velvety texture.
You’ll need: heavy cream · sweetened condensed milk · cream cheese
Look for: A uniform, pillowy cream that holds soft peaks when the spatula lifts away.
Tip: Fold with the spatula flat rather than stirring in circles; it keeps far more air in the mixture.
Checkpoint
The filling should now be a pale, uniform, pillowy cream that holds soft peaks when the spatula lifts, with no lumps, no streaks of white cream and no liquid pooling at the bottom of the bowl. Taste it: sweet, rich, unmistakably condensed milk. If it looks grainy anywhere, the whipped cream went too far — fold in a spoonful of unwhipped cream to smooth it. Move promptly to assembly while the air is still in the cream.
Phase 3
Assemble, chill and slice
Step 7: Fill the pan
Pour the filling over the chilled crust and spread it gently to the edges with an offset spatula or the back of a spoon. Smooth the top, then tap the pan lightly on the counter twice to release any large air pockets. Work calmly — the filling is thick and moves easily.
You’ll need: sweetened condensed milk · heavy cream · graham cracker crumbs
Look for: An even, glossy surface with the crust fully hidden and no gaps at the pan edges.
Tip: Spread toward the edges first, then finish in the center to avoid dragging crust crumbs into the filling.
Step 8: Add the cookie topping
Sprinkle the crushed cookies evenly over the surface, letting some crumbs sit on top and others sink slightly into the cream. Cover the pan with plastic wrap without letting it touch the surface. A generous, uneven sprinkle looks better than a perfectly even one, so do not fuss over it.
You’ll need: crushed cookies
Look for: The whole surface should be dusted with crumbs, with a few bare cream patches for contrast.
Tip: Reserve a spoonful of crumbs and add them just before serving so some pieces stay crisp.
Step 9: Chill and slice
Refrigerate the cheesecake for at least 4 hours, ideally overnight, until the filling is completely set and firm to a light touch in the center. To serve, run a thin knife around the edge, release the springform ring and slice with a hot, dry knife, wiping it between cuts.
You’ll need: cream cheese · sweetened condensed milk · heavy cream
Look for: The center should feel set with a very slight give, and the slices should stand tall on the plate.
Tip: Dip the knife in hot water and dry it before each cut for bakery-clean edges every time.
Checkpoint
The finished cheesecake should have a level, glossy surface dusted with cookie crumbs, and after at least 4 hours — ideally overnight — the center should feel set with only a slight give. A knife run around the edge should release the sides cleanly, and the first slice should stand tall with a visible, intact crust line at the bottom. If the filling still feels soft in the middle, give it another hour or two; a longer chill only improves both the texture and the flavor.
Doneness
How to tell it’s done
There is no oven temperature to chase — doneness is all about feel and chill. The crust is done when it resists a firm press and no loose crumbs shift at the edges. The filling is done when it is smooth and glossy with no cream cheese lumps, and when the whipped cream holds firm peaks. The finished cheesecake is ready when the center feels set under a light fingertip after at least 4 hours of chilling, ideally overnight, and the slices lift away from the knife with clean edges.
Avoid these
Common mistakes
Three things go wrong most often, and all are easy to avoid. First, cold cream cheese: it never beats smooth, and the lumps stay in the finished filling, so give it a full hour at room temperature. Second, overwhipping the cream, which turns it grainy and makes folding difficult — stop at firm peaks. Third, stirring instead of folding, which knocks the air out and leaves a dense filling rather than a velvety one. Finally, cutting too early: a cheesecake chilled only two hours will hold its shape loosely but not slice cleanly.
Better results
Tips
Tip 1
An overnight chill does more for this cheesecake than any technique. The crumbs hydrate slightly at the surface, the filling tightens, and the flavors meld into something rounder than a quick chill can give. When slicing, a knife dipped in hot water and dried between cuts gives mirror-smooth edges — worth the small extra effort when the cake is on display.
Tip 2
Read the whipped cream, not the clock. Cream whips at different speeds depending on its temperature and the fat content, so watch for the moment the beaters leave defined tracks and the peaks stand with a slight bend. If the kitchen is warm, work with the bowl resting over a little ice water. And when folding, keep the spatula flat and slow: every aggressive stroke costs air that cannot be put back.
Make it yours
Variations
Chocolate wafer base
Replace the graham crackers with chocolate wafer crumbs for a dark, cocoa-rich crust against the pale filling. Keep the same quantity; the visual contrast between the dark base and white cream makes for striking slices.
Citrus bright
Add a teaspoon of grated lime zest to the filling along with the condensed milk. The zest perfumes the cream without thinning it, and the whole cheesecake reads brighter and more summery.
Mini cheesecakes
Press the crust into a lined 12-cup muffin tin, divide the filling on top and chill the same length of time. They unmold with the parchment liner and need no slicing — ideal for parties and lunchboxes.
Salted caramel drizzle
Warm a few tablespoons of thick caramel sauce until pourable and drizzle thin lines over each slice just before serving. The salted bitterness plays directly against the sweet condensed milk cream.
On the table
Serving suggestions
Serve each slice cold, straight from the refrigerator, on a chilled plate if possible — the filling holds its shape best in the first twenty minutes out of the fridge. A blue ceramic plate sets off the pale cream and crumb topping nicely, and a thin extra dusting of cookie crumbs at the table finishes the look without hiding the clean edges of the slice.
For a dessert table, cut the cheesecake into 12 smaller slices or into bars from a square pan; the dense filling holds up well to smaller cuts. Coffee, espresso or a glass of cold milk are the natural pairings, since their bitterness plays against the sweet condensed milk. Fresh berries on the side add color, though the cake needs nothing more than its own crumb topping.
Leftovers
Storage & make-ahead
- Fridge
- Up to 4 days, covered, in the refrigerator. Add fresh cookie crumbs just before serving to keep the crunch.
- Freezer
- Freeze whole or in slices, wrapped well, for up to 1 month. Thaw overnight in the refrigerator before serving.
- Reheat
- Do not reheat — this cheesecake is served cold, straight from the refrigerator.
Cover the pan or transfer the slices to an airtight container and refrigerate within two hours of serving. The cheesecake keeps its texture for up to 4 days; the topping softens slightly as the crumbs absorb moisture, so a fresh sprinkle before serving revives the crunch.
Make ahead
This is an ideal make-ahead dessert. The base can be pressed and refrigerated up to 2 days ahead, covered tightly. The full cheesecake is at its best made the day before serving, which frees the oven — and the counter — on the day itself. Add the final sprinkle of crumbs just before bringing it to the table.
Questions
Frequently asked questions
What cookies work best for the base and topping?
Graham crackers are the classic American choice, but digestive biscuits, vanilla wafers and shortbread all press into a firm, sandy base. Whatever is chosen, crush them fine — coarse chunks make a weak crust. For the topping, the same cookies keep the look cohesive, while chocolate wafer crumbs give a striking dark contrast against the pale cream.
Can this cheesecake be made ahead for a party?
Yes, and it is better that way. The whole cheesecake can be made the day before and kept covered in the refrigerator; an overnight chill improves both the texture and the slicing. The base alone can be pressed up to two days ahead. Hold back a spoonful of cookie crumbs and add them just before serving so the topping stays crisp.
How long does it really need to chill before slicing?
Four hours is the minimum for a filling that is set enough to slice, but overnight is genuinely better. After a full night the crumbs at the surface hydrate slightly, the filling firms to a clean-cutting consistency and the flavors meld. If the center still feels soft after four hours, give it another hour or two — a longer chill never hurts this dessert.
Can the cheesecake be frozen?
It freezes well. Wrap the whole cheesecake or individual slices tightly in plastic wrap and then foil, and freeze for up to one month. Thaw overnight in the refrigerator rather than at room temperature so the texture stays creamy. The crumb topping absorbs a little moisture in the freezer, so a fresh sprinkle after thawing restores the crunch.
Why did the whipped cream turn grainy during whipping?
The cream was whipped past the firm-peak stage and began to turn to butter. Once grainy, it cannot be fully rescued, though gently folding in a spoonful of fresh, unwhipped cold cream often smooths it enough to use. To prevent it, chill the bowl and beaters first, whip on medium-high rather than high, and stop the mixer to check the peaks frequently near the end.
Everything in one place: the recipe card below gathers the ingredients, steps and estimated nutrition, ready to print.
Recipe card
No-Bake Condensed Milk Cheesecake (Foolproof, Creamy)
A velvety no-bake cheesecake built on a pressed cookie base, sweetened with condensed milk and finished with crumbled cookies. No oven, no water bath, no cracks.
- Prep
- Cook
- Rest
- Total
- Servings
- one 9-inch cheesecake
Ingredients
Cookie base
- 1 1/2 cups graham cracker crumbs (about 12 full sheets)
Condensed milk filling
- 16 oz cream cheese, softened to room temperature
- 14 oz sweetened condensed milk (one can)
- 1 cup heavy cream, cold
Topping
- 1/2 cup crushed cookies, for sprinkling
Instructions
Crush the cookies. Pulse the graham crackers in a food processor until they turn into fine, even crumbs with no large pieces left. If using a zip-top bag, crush them with a rolling pin, pressing firmly and working from the center outward. Aim for a sandy texture that holds together lightly when pinched.
Press and chill the base. Tip the crumbs into a 9-inch springform pan and press them firmly into an even layer with the bottom of a measuring cup, bringing them slightly up the sides. Press hard — the denser the layer, the cleaner the slices. Set the pan in the refrigerator while you make the filling.
Beat the cream cheese. Place the softened cream cheese in a large bowl and beat it with an electric mixer on medium speed for about 2 minutes, scraping the bowl once halfway through. Keep going until it is completely smooth and glossy, with no lumps left anywhere. Lumps now will never disappear later, so be thorough.
Add the condensed milk. Pour in the sweetened condensed milk in a slow, steady stream while mixing on low speed. Scrape the sides and bottom of the bowl, then beat another 30 seconds until the mixture is uniform, thick and satiny. The condensed milk brings all the sweetness and body this filling needs.
Whip the cream. In a separate chilled bowl, whip the cold heavy cream on medium-high speed until it forms firm, defined peaks that stand upright when the beaters lift. Watch closely near the end; overwhipped cream turns grainy. This whipped cream is what makes the finished cheesecake light instead of dense.
Fold the two together. Add the whipped cream to the condensed milk mixture in two additions, folding gently with a rubber spatula after each one. Scoop from the bottom up and turn the bowl as you go, stopping as soon as no white streaks remain. Overfolding deflates the cream and costs the filling its airy, velvety texture.
Fill the pan. Pour the filling over the chilled crust and spread it gently to the edges with an offset spatula or the back of a spoon. Smooth the top, then tap the pan lightly on the counter twice to release any large air pockets. Work calmly — the filling is thick and moves easily.
Add the cookie topping. Sprinkle the crushed cookies evenly over the surface, letting some crumbs sit on top and others sink slightly into the cream. Cover the pan with plastic wrap without letting it touch the surface. A generous, uneven sprinkle looks better than a perfectly even one, so do not fuss over it.
Chill and slice. Refrigerate the cheesecake for at least 4 hours, ideally overnight, until the filling is completely set and firm to a light touch in the center. To serve, run a thin knife around the edge, release the springform ring and slice with a hot, dry knife, wiping it between cuts.
Allergens: Gluten, Milk
Nutrition (estimated, per serving)
- Calories
- 500 kcal
- Protein
- 8 g
- Carbs
- 50 g
- Fat
- 31 g
- Fiber
- 1 g
- Sugar
- 37 g
- Sodium
- 300 mg
Estimates only: values vary with brands, substitutions and portion sizes.
Recipe by EasyCooks Kitchen · easycooksrecipes.com
Share this recipe
Send it to someone who’d love it, or save it for later.
Spotted a mistake in this recipe? Let us know.
Keep cooking


