Wacky Cake with Creamy Vanilla Frosting (One Bowl, No Eggs)
Ultra-moist chocolate wacky cake made in one pan with no eggs or butter in the batter, then topped with fluffy, creamy vanilla frosting. A true pantry classic.
Published 12 min read
- Total time
- Prep
- Cook
- Rest
- Serves
- 9
- Makes one 8-inch square cake
- Cuisine
- American
- Calories
- 410
- per serving, estimated

On this page15 sections
A chocolate cake with no eggs, no butter and no mixer in the batter — yet it bakes up so moist it needs a fork and a slow minute to appreciate. Wacky cake, the great pantry-era classic, mixes right up in minutes, bakes in one square pan and gets crowned with a thick, creamy vanilla frosting worth swiping clean.
Wacky cake — sometimes called crazy cake or depression cake — dates back to lean kitchens that baked chocolate cake without eggs or butter, relying instead on the simple reaction between baking soda and vinegar. The result is a crumb that stays remarkably moist for days, with a deep, almost fudgy chocolate flavor. This version follows the classic method exactly: dry ingredients whisked together, three wells filled with oil, vinegar and vanilla, water poured over and a quick stir. No stand mixer, no creaming, no waiting for butter to soften. The frosting is a small batch of American-style vanilla buttercream — butter, confectioners' sugar, a splash of heavy cream and vanilla — whipped until it holds tall, glossy swirls over the dark cake. From pantry to finished cake in about an hour, most of it hands-off.
The appeal
Why you’ll love it
The magic of wacky cake is chemistry doing the work of eggs. Baking soda meets white vinegar in the thin batter and releases a burst of carbon dioxide bubbles that lift the crumb as the cake bakes. Because the batter contains no eggs to set, it stays tender and moist even after full baking — the oil coats the flour proteins and keeps the crumb soft, while the water keeps the sugar fully dissolved for that fudgy, almost brownie-like texture. Mixing everything in one bowl, and stirring only until smooth, preserves those bubbles instead of knocking them out.
The frosting balances the cake rather than burying it. Whipping the butter alone first, before any sugar goes in, builds an airy base so the finished buttercream is fluffy instead of dense. Confectioners' sugar, which contains a little cornstarch, thickens and stabilizes it, and a pinch of kosher salt keeps the sweetness in check against the dark cocoa. Heavy cream loosens the frosting to a spreadable, glossy consistency that holds a swirl on the surface without sliding off.
What you need
Ingredients
Makes one 8-inch square cake.
Creamy Vanilla Frosting
Contains:
- Gluten
- Milk
Tools
Equipment
- 8x8-inch square baking pan
- Whisk
- Large mixing bowl
- Spatula
- Electric hand mixer
- Offset spatula or butter knife
- Toothpick
- Measuring cups and spoons
Swaps
Substitutions
Instead ofWhite vinegar
UseAn equal amount of fresh lemon juice or apple cider vinegar reacts the same way with the baking soda and leaves no flavor behind.
Instead ofVegetable oil
UseAny neutral oil works: canola, sunflower or melted coconut oil. Coconut oil gives the crumb a slightly firmer bite once chilled.
Instead ofHeavy cream
UseWhole milk thins the frosting just as well; start with 2 tbsp and add more a spoonful at a time until the texture is spreadable.
Instead ofUnsweetened cocoa powder
UseDutch-processed cocoa deepens the color and gives a smoother, darker chocolate flavor; use it cup for cup with no other changes.
Good to know
Notes
Use natural unsweetened cocoa powder for a sharper, classic chocolate flavor, or Dutch-processed for a darker, smoother taste — both work here because the baking soda provides the lift. All-purpose flour is standard; there is no need for cake flour. White vinegar is the traditional choice, but lemon juice substitutes cleanly. For the frosting, butter should be softened but still cool to the touch, around 65°F, so it whips light without turning greasy.
An 8x8-inch square glass or metal pan both work; glass bakes slightly slower, so lean toward the longer bake time. A hand mixer makes quick work of the frosting, but a sturdy whisk and some patience can do it too. If the kitchen is warm, chill the frosted cake briefly so the swirls set before serving. Nine generous squares come from one pan.
Prep
Before you start
Before mixing anything, set out every ingredient and tool so the batter comes together in one continuous, five-minute stretch. Take the butter for the frosting out of the refrigerator first — it needs 30 to 45 minutes on the counter to reach the right softness. Measure the flour, sugar, cocoa, baking soda and salt into a bowl, and have the oil, vinegar, vanilla and water within reach.
Step by step
Method
Phase 1
Mix the batter in minutes
Step 1: Heat the oven and prep the pan
Set a rack in the center of the oven and heat it to 350°F (175°C). Grease an 8x8-inch square baking pan with butter or a thin coat of oil, then line the bottom with a strip of parchment, leaving overhang on two sides to lift the cake out later.
Look for: The oven should be fully preheated and the parchment flat against the pan bottom before the batter is mixed.
Tip: The parchment sling makes frosting and cutting easier, since the whole cake lifts out in one piece and the pan stays clean.
Step 2: Whisk the dry ingredients in the pan or bowl
Combine the flour, granulated sugar, cocoa powder, baking soda and kosher salt in a large mixing bowl. Whisk for a good 30 seconds so the cocoa and baking soda are evenly distributed — this is what gives the cake an even rise and a deep color with no pale streaks.
You’ll need: all-purpose flour · granulated sugar · unsweetened cocoa powder · baking soda · kosher salt
Look for: The mixture should look uniformly dark brown, with no white flecks of sugar or flour visible anywhere.
Tip: Cocoa powder clumps easily, so press any lumps against the side of the bowl with the whisk before adding the wet ingredients.
Step 3: Add the oil, vinegar and vanilla
Make three small wells in the dry mixture with the back of a spoon. Pour the vegetable oil into one well, the white vinegar into the second and the vanilla extract into the third. Keeping them separate at this stage is the fun old trick behind the wacky cake name.
You’ll need: vegetable oil · white vinegar · vanilla extract
Look for: Each well should hold its liquid without seeping into the dry mixture for a few seconds.
Tip: No need to be precious about the wells; an inch or so across each is plenty. They simply keep the liquids from pooling in one spot.
Step 4: Pour in the water and stir until smooth
Pour the cool water over everything and stir with a spatula or whisk until the batter is completely smooth and glossy, 45 seconds to a minute. Scrape the corners of the bowl so no dry pockets survive. The batter will be thin, more like brownie batter than fluffy cake batter — that is exactly right.
You’ll need: water
Look for: Look for a satiny, pourable batter with no streaks of flour; a few tiny cocoa lumps are fine.
Tip: Stop stirring as soon as it comes together. Overmixing once the vinegar meets the baking soda lets the bubbles escape and tightens the crumb.
Checkpoint
At the end of this phase the batter should be thin, glossy and chocolate-dark, pouring off the spatula in a slow ribbon. No flour streaks should remain, and the color should be even from edge to edge of the bowl — pale swirls mean the cocoa was not fully incorporated. The surface may show a few tiny bubbles from the vinegar and baking soda reaction; that is exactly what the rise depends on.
Phase 2
Bake and cool the cake
Step 5: Bake until set
Scrape the batter into the prepared pan and smooth the top. Bake at 350°F (175°C) for 30 to 35 minutes, rotating the pan once halfway through if the oven bakes unevenly. The cake is done when a toothpick in the center comes out with moist crumbs attached and no wet batter.
Look for: The top should look matte and slightly crackled at the edges, and the center should spring back when pressed gently.
Tip: Start checking at 30 minutes. An extra five minutes can take this cake from fudgy to dry, so trust the toothpick over the clock.
Step 6: Cool the cake completely
Set the pan on a wire rack and let the cake cool to room temperature, about an hour. Warm cake melts frosting into a slick mess, so patience here is the difference between fluffy swirls and a puddle. Once cool, lift the cake out with the parchment sling onto a serving plate or board.
Look for: The bottom of the pan should feel cool to the touch, not just the top of the cake.
Tip: Short on time? Chill the pan in the refrigerator for 30 minutes after 20 minutes at room temperature to speed the cooling along.
Checkpoint
The baked cake should have a matte, gently domed top with slightly crackled edges, and it should smell deeply of chocolate. A toothpick in the center must come out with moist crumbs but no wet batter; a second test near a corner confirms even baking. The crumb will feel delicate and springy under a light press.
Phase 3
Frost, swirl and serve
Step 7: Beat the butter until creamy
Place the softened unsalted butter in a medium bowl and beat with an electric hand mixer on medium speed for 2 to 3 minutes, until it looks pale, smooth and noticeably fluffy. Scrape down the sides and the beaters once halfway through so no streak of unwhipped butter hides at the bottom.
You’ll need: unsalted butter
Look for: The butter should lighten in color and hold a soft peak when the beaters are lifted.
Tip: Butter that gives slightly when pressed but still holds its shape whips best; greasy, too-soft butter makes a dense, greasy frosting.
Step 8: Build the frosting
Add the sifted confectioners' sugar one cup at a time, mixing on low speed until each addition disappears. Pour in the heavy cream, vanilla extract and kosher salt, then beat on medium-high for 2 minutes until the frosting is thick, glossy and billowy. Add a spoonful more cream if it resists spreading.
You’ll need: confectioners' sugar · heavy cream · vanilla extract · kosher salt
Look for: The frosting should hold firm peaks, look silky rather than grainy, and spread without tearing the surface.
Tip: Sifting the sugar is not optional if the frosting is to be silky — unsifted sugar leaves tiny gritty specks that no amount of beating fixes.
Step 9: Frost and swirl
Pile the frosting onto the cooled cake and spread it from the center outward with an offset spatula, nudging it to the edges. For the swirls seen in the video, press the back of a spoon or the tip of the spatula into the frosting and lift upward in short, curved strokes across the whole top.
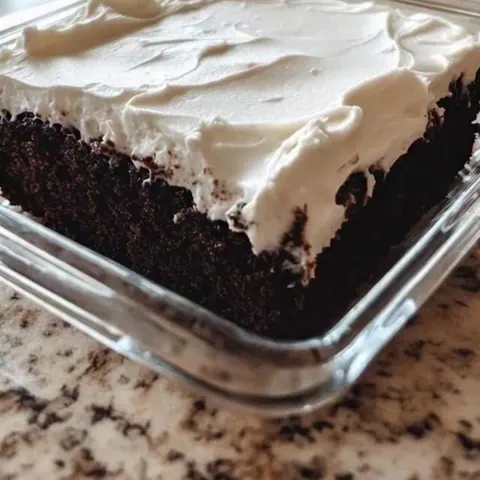
Look for: An even, thick layer with tall, soft swirls that hold their shape and no bare chocolate showing through.
Tip: Work quickly and confidently; the frosting sets up as it sits, and hesitant second passes can drag crumbs up into the white layer.
Step 10: Slice and serve
Cut the frosted cake into nine squares with a sharp knife, wiping the blade between cuts for clean edges. Serve at room temperature so the crumb is at its most tender and the frosting is creamy rather than firm. Any leftovers go into an airtight container in the refrigerator within 2 hours.
Look for: Clean-sided squares showing a moist, dark crumb under a thick white layer of frosting.
Tip: For picture-perfect squares, chill the frosted cake for 15 minutes first, then slice; the frosting cuts cleanly when slightly firm.
Checkpoint
The finished frosting should be thick, glossy and billowy, holding tall peaks that do not slump, and spreading smoothly with no graininess. Spread over the cool cake, it should sit in an even, generous white layer with soft swirls that keep their shape. Cut squares should show clean sides: dark, moist crumb beneath a bright white top.
Doneness
How to tell it’s done
The cake is done when the top looks matte and slightly puffed, the edges have pulled just barely from the sides of the pan, and a toothpick inserted in the center comes out with a few moist crumbs attached but no wet batter. The surface should spring back slowly when pressed with a fingertip.
Avoid these
Common mistakes
The most common missteps are all easy to avoid. Overmixing the batter once the water goes in knocks out the carbon dioxide bubbles the vinegar and baking soda create, giving a dense, flat cake — stir only until smooth. Overbaking turns a naturally moist crumb dry; begin checking at 30 minutes.
Better results
Tips
Tip 1
Room-temperature ingredients matter more for the frosting than for the cake. Butter at 65°F whips into a light, airy base; colder butter leaves lumps that never break down, and warmer butter turns the frosting loose and greasy. If it ever looks slightly melted, chill the bowl for 10 minutes and re-whip. Sifting the confectioners' sugar directly over the bowl keeps the frosting glossy and smooth.
Tip 2
For the tallest, most defined swirls, load the offset spatula generously and make each curved stroke in one confident pass, lifting at the end to pull a peak. Wipe the spatula between strokes. If the kitchen is above 72°F, refrigerate the frosted cake for 15 minutes before serving so the swirls hold. And always start the toothpick test at 30 minutes — this cake goes from fudgy to dry quickly.
Make it yours
Variations
Mocha Swirl
Dissolve 1 tsp instant espresso powder in the cup of water before adding it to the batter. The coffee deepens the chocolate flavor without tasting of coffee, and pairs especially well with the sweet vanilla frosting.
Cinnamon Spice
Whisk 1 tsp ground cinnamon and 1/4 tsp nutmeg into the dry ingredients. The warm spice turns the cake toward Mexican hot chocolate territory; a pinch of chili powder takes it one step further.
Vanilla Bean Frosting
Replace the vanilla extract in the frosting with the seeds of half a vanilla bean, or a full tsp of vanilla bean paste, for a speckled, more aromatic buttercream over the dark crumb.
Chocolate Fudge Frosting
Beat 1/3 cup unsweetened cocoa powder into the finished vanilla buttercream along with an extra tbsp of cream for a chocolate-on-chocolate version with a deeper, less sweet finish.
On the table
Serving suggestions
Serve the cake at room temperature, cut into nine squares, with the frosting still holding its swirls. It needs nothing alongside — the contrast of dark, fudgy crumb and creamy white frosting is the whole point — though a glass of cold milk is the natural companion for a slice this rich.
For a neater presentation, chill the frosted cake briefly before slicing so each square has sharp edges and a clean white top. If serving after a meal, slice just before guests sit down so the swirls look freshly made. Individual squares also travel well in a covered container for potlucks and bake sales.
Leftovers
Storage & make-ahead
- Fridge
- Refrigerate leftovers in an airtight container up to 5 days; bring squares to room temperature 20 minutes before serving for the creamiest frosting.
- Freezer
- Freeze unfrosted cake, wrapped tightly in plastic and foil, up to 2 months; thaw overnight in the refrigerator, then frost fresh.
- Reheat
- No reheating needed. A few seconds in the microwave softens a chilled square nicely, but keep it under 10 seconds or the frosting will melt.
Cover the frosted cake loosely or keep it in an airtight container. It stays moist at room temperature for 2 days thanks to the oil in the crumb, and up to 5 days in the refrigerator. Let refrigerated squares sit at room temperature for 20 minutes before serving so the frosting turns creamy again.
Make ahead
Bake the cake a day ahead, cool it completely, then wrap the whole pan tightly in plastic and keep it at room temperature. Frost within 24 hours. The frosting itself can be made up to 3 days ahead and refrigerated in a sealed container; let it soften for an hour and re-whip for a minute before spreading.
Questions
Frequently asked questions
Why does this cake have no eggs in the batter?
Wacky cake comes from an era when eggs and butter were scarce, so bakers relied on the reaction between baking soda and vinegar for lift, and on oil and water for moisture. The result is a crumb that stays tender and moist for days — many bakers find it stays fresher than a standard butter cake.
Can the cake be made without vinegar?
An acid is needed to activate the baking soda, so it cannot simply be left out. White vinegar, fresh lemon juice or apple cider vinegar all work in the same 1 tbsp amount, and none of them leaves a noticeable taste once the cake is baked.
Why is the frosting grainy?
Graininess almost always comes from unsifted confectioners' sugar, which contains tiny lumps that beating alone cannot dissolve. Always sift the sugar before adding it. If the frosting is already made, beat it longer on medium-high; a minute or two more often smooths it out.
Can this be made ahead for a party?
Yes. Bake the cake up to a day in advance and keep it wrapped at room temperature, or make the frosting up to 3 days ahead and refrigerate it. Re-whip the chilled frosting for a minute before spreading, and assemble on the day of serving for the best look.
Can this be frozen?
The cake freezes beautifully, unfrosted. Wrap the cooled cake tightly in plastic and then foil, and freeze up to 2 months. Thaw overnight in the refrigerator, bring to room temperature and frost fresh — freezing frosted cake risks dulling the swirls and firming the buttercream.
Everything in one place: the recipe card below gathers the ingredients, steps and estimated nutrition, ready to print.
Recipe card
Wacky Cake with Creamy Vanilla Frosting (One Bowl, No Eggs)
Ultra-moist chocolate wacky cake made in one pan with no eggs or butter in the batter, then topped with fluffy, creamy vanilla frosting. A true pantry classic.
- Prep
- Cook
- Rest
- Total
- Servings
- one 8-inch square cake
Ingredients
- 1 1/2 cups all-purpose flour
- 1 cup granulated sugar
- 1/3 cup unsweetened cocoa powder
- 1 tsp baking soda
- 1/2 tsp kosher salt
- 1/3 cup vegetable oil
- 1 tbsp white vinegar
- 1 tsp vanilla extract
- 1 cup cool water
Creamy Vanilla Frosting
- 1/2 cup unsalted butter, softened
- 2 1/2 cups confectioners' sugar, sifted
- 3 tbsp heavy cream, plus more as needed
- 1 tsp vanilla extract
- 1/4 tsp kosher salt
Instructions
Heat the oven and prep the pan. Set a rack in the center of the oven and heat it to 350°F (175°C). Grease an 8x8-inch square baking pan with butter or a thin coat of oil, then line the bottom with a strip of parchment, leaving overhang on two sides to lift the cake out later.
Whisk the dry ingredients in the pan or bowl. Combine the flour, granulated sugar, cocoa powder, baking soda and kosher salt in a large mixing bowl. Whisk for a good 30 seconds so the cocoa and baking soda are evenly distributed — this is what gives the cake an even rise and a deep color with no pale streaks.
Add the oil, vinegar and vanilla. Make three small wells in the dry mixture with the back of a spoon. Pour the vegetable oil into one well, the white vinegar into the second and the vanilla extract into the third. Keeping them separate at this stage is the fun old trick behind the wacky cake name.
Pour in the water and stir until smooth. Pour the cool water over everything and stir with a spatula or whisk until the batter is completely smooth and glossy, 45 seconds to a minute. Scrape the corners of the bowl so no dry pockets survive. The batter will be thin, more like brownie batter than fluffy cake batter — that is exactly right.
Bake until set. Scrape the batter into the prepared pan and smooth the top. Bake at 350°F (175°C) for 30 to 35 minutes, rotating the pan once halfway through if the oven bakes unevenly. The cake is done when a toothpick in the center comes out with moist crumbs attached and no wet batter.
Cool the cake completely. Set the pan on a wire rack and let the cake cool to room temperature, about an hour. Warm cake melts frosting into a slick mess, so patience here is the difference between fluffy swirls and a puddle. Once cool, lift the cake out with the parchment sling onto a serving plate or board.
Beat the butter until creamy. Place the softened unsalted butter in a medium bowl and beat with an electric hand mixer on medium speed for 2 to 3 minutes, until it looks pale, smooth and noticeably fluffy. Scrape down the sides and the beaters once halfway through so no streak of unwhipped butter hides at the bottom.
Build the frosting. Add the sifted confectioners' sugar one cup at a time, mixing on low speed until each addition disappears. Pour in the heavy cream, vanilla extract and kosher salt, then beat on medium-high for 2 minutes until the frosting is thick, glossy and billowy. Add a spoonful more cream if it resists spreading.
Frost and swirl. Pile the frosting onto the cooled cake and spread it from the center outward with an offset spatula, nudging it to the edges. For the swirls seen in the video, press the back of a spoon or the tip of the spatula into the frosting and lift upward in short, curved strokes across the whole top.
Slice and serve. Cut the frosted cake into nine squares with a sharp knife, wiping the blade between cuts for clean edges. Serve at room temperature so the crumb is at its most tender and the frosting is creamy rather than firm. Any leftovers go into an airtight container in the refrigerator within 2 hours.
Allergens: Gluten, Milk
Nutrition (estimated, per serving)
- Calories
- 410 kcal
- Protein
- 3 g
- Carbs
- 56 g
- Fat
- 19 g
Estimates only: values vary with brands, substitutions and portion sizes.
Recipe by EasyCooks Kitchen · easycooksrecipes.com
Share this recipe
Send it to someone who’d love it, or save it for later.
Spotted a mistake in this recipe? Let us know.
Keep cooking


