Crispy Cinnamon Apple Cider Pancake Rings
Transform fresh Honeycrisp apples into a nostalgic autumn treat. These apple rings are dipped in a spiced cider batter and pan-fried until golden, creating a warm, comforting dessert with a satisfying crunch in every single bite.
Published 12 min read
- Total time
- Prep
- Cook
- Serves
- 4
- Makes 8 apple rings
- Cuisine
- American
- Calories
- 280
- per serving, estimated

On this page15 sections
Elevate your dessert game with these cinnamon-spiced apple cider pancake rings. This simple recipe takes fresh Honeycrisp apples and coats them in a flavorful cider batter, resulting in a treat that captures the essence of a warm apple pie in every bite. With a satisfying golden crust and a tender, juicy center, these rings are perfect for any occasion when you want a cozy, impressive, and quick homemade dessert that everyone will enjoy throughout the autumn season.
There is something truly magical about the combination of crisp apples, aromatic cinnamon, and the deep, rich flavor of apple cider. This recipe reimagines the classic pancake by using apple rings as the base, providing a structural crunch that pairs perfectly with a light, airy batter. By pan-frying them in salted butter, you achieve a professional-quality golden crust that seals in the natural sweetness of the fruit. Whether you are hosting a brunch or simply craving a comforting evening treat, these apple rings offer a sophisticated yet approachable way to enjoy seasonal flavors in a brand new format.
The appeal
Why you’ll love it
The method of using apple rings creates a natural, fruit-forward core that remains firm yet tender during the cooking process. By dredging the apples in cinnamon sugar before dipping them into the batter, you create a dual layer of flavor that permeates the fruit and the crust. This technique ensures that every bite is seasoned perfectly, preventing the apple from tasting bland against the batter. The use of boiled apple cider in the batter adds a concentrated depth that standard milk or water cannot provide, elevating the overall profile of the dish.
Pan-frying in a cast-iron griddle is essential for achieving the signature texture of these rings. Cast iron distributes heat evenly, which allows the batter to set rapidly upon contact, creating a crispy exterior while the apple softens slowly within. This controlled environment prevents the rings from becoming greasy, as the heat helps the crust crisp up before the apple releases too much moisture. The result is a clean, professional finish that makes the dish look as good as it tastes, providing a reliable outcome every time you prepare it.
What you need
Ingredients
Makes 8 apple rings.
Apple Rings
Cider Batter
Frying
Toppings
Contains:
- Milk
- Tree nuts
Tools
Equipment
- Apple corer
- Chef's knife
- Mixing bowl
- Cast-iron griddle
- Whisk
- Tongs
Swaps
Substitutions
Instead ofHoneycrisp apples
UseUse Granny Smith or Fuji apples for a different texture and sweetness profile.
Instead ofApple cider
UseUnfiltered apple juice can be used if apple cider is unavailable in your market.
Instead ofToasted walnuts
UseSubstitute with toasted pecans or slivered almonds for a similar crunch and flavor.
Good to know
Notes
Choosing the right apple is crucial for this recipe. Honeycrisp is recommended due to its balance of sweetness and tartness, and its ability to maintain structure when subjected to heat. If you prefer a different profile, Granny Smith apples provide a sharper tang that cuts through the sweetness of the caramel, while Fuji or Gala apples offer a softer, sweeter experience. Regardless of the variety, ensure your apples are firm and free of bruises to maintain the structural integrity of the rings during the coring and slicing process.
Equipment choice plays a significant role in the success of this recipe. A quality cast-iron griddle is the gold standard, as it maintains a consistent temperature throughout the cooking phase. If you do not have a cast-iron griddle, a heavy-bottomed non-stick skillet can be used as a suitable alternative. When it comes to the caramel drizzle, using a high-quality salted variety enhances the flavor of the toasted walnuts. Feel free to toast your own walnuts in a dry pan until fragrant to ensure maximum freshness and depth of flavor in the final presentation.
Prep
Before you start
Before you begin cooking, ensure all your ingredients are measured and ready to go. The process moves quickly once the griddle is hot, so having your apple rings sliced, dredged, and the batter mixed beforehand is essential. Prepare a clean workspace and have your spatula and tongs within easy reach. If the apples are sliced too far in advance, toss them in a small amount of lemon juice to prevent oxidation, although for the best texture, slicing just before the battering phase is highly recommended to keep the fruit crisp and fresh.
Step by step
Method
Phase 1
Batter and Apple Prep
Step 1: Prepare the Apple Rings
Using an apple corer, remove the center of each apple to create a clean hole. Carefully slice the apples into uniform 1-centimeter thick rings. Once sliced, dredge each apple ring thoroughly in the cinnamon sugar mixture, ensuring the surface is evenly coated to enhance the flavor profile during the frying process.
You’ll need: Honeycrisp apples · cinnamon sugar
Look for: The apple rings should be uniform in thickness to ensure even cooking across all pieces.
Tip: Ensure the apple rings are thoroughly dry before dredging to help the cinnamon sugar adhere properly to the fruit surface.
Step 2: Mix the Cider Batter
In a medium mixing bowl, whisk together the boiled apple cider with your preferred pancake batter mix base until a smooth, consistent texture is achieved. The batter should be thick enough to coat the back of a spoon, providing a stable structure that will transform into a light and crispy crust once it hits the hot griddle.
You’ll need: apple cider
Look for: The batter should be thick enough to coat the apple rings without sliding off immediately upon lifting.
Tip: If the batter appears too thin, add a small amount of extra flour to reach the desired consistency for perfect coating.
Checkpoint
At this stage, you should have perfectly uniform apple rings coated in a light layer of cinnamon sugar. The batter should look smooth, thick, and consistent, without any large lumps. Check that your apple rings are completely dry before they meet the cinnamon sugar to ensure the coating adheres perfectly. Everything should look organized and ready for the heat. If the batter seems too thin, adjust with a small amount of flour until it reaches a consistency that clings well to the fruit surface without sliding off immediately.
Phase 2
Sizzling and Frying
Step 3: Heat the Griddle
Place your cast-iron griddle over medium heat and add the salted butter. Allow the butter to melt completely until it begins to foam. This foaming action is the perfect indicator that the surface is ready for the apple rings, ensuring the exterior crust develops a beautiful golden hue while the apple softens inside.
You’ll need: salted butter
Look for: The butter should be foaming and bubbling across the surface of the cast-iron griddle without browning too quickly.
Tip: Watch the butter closely; if it starts to turn brown, reduce the heat slightly to prevent the crust from developing an acrid flavor.
Step 4: Fry the Apple Rings
Dip each cinnamon-coated apple ring into the prepared cider batter, letting the excess drip off before placing it onto the hot griddle. Cook for exactly three minutes on each side at 175°C (347°F). The crust should turn a deep golden brown while the internal apple structure softens to a tender, juicy consistency that holds its shape.
You’ll need: Honeycrisp apples · cinnamon sugar · apple cider · salted butter
Look for: The edges of the batter should look set and golden brown, indicating it is time to flip the rings carefully.
Tip: Use a wide spatula to flip the rings gently, ensuring the delicate batter coating remains intact during the transition to the second side.
Checkpoint
The apple rings should be sizzling as they hit the hot butter, which is a great sign that your griddle is at the right temperature. As they fry, the batter should puff slightly and turn a rich, golden brown color. You should hear a steady, gentle bubbling sound. Check the edges of each ring to ensure they are crisping up evenly. If you notice any spots that are cooking too fast, adjust the heat accordingly. The aroma of caramelized sugar and spices should be prominent in your kitchen during this phase.
Phase 3
Final Assembly
Step 5: Finish and Serve
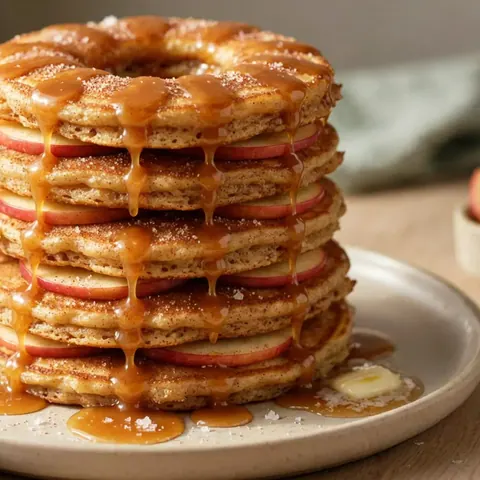
Remove the golden-brown apple rings from the griddle and arrange them on a serving platter. While still warm, drizzle the salted caramel sauce generously over the top of the stack. Finish the dish by sprinkling the crushed toasted walnuts over the caramel, adding a final layer of texture and depth to the warm apple pie-inspired dessert.
You’ll need: salted caramel sauce · toasted walnuts
Look for: The caramel should be warm and glossy, cascading over the rings, while the walnuts should add a distinct, crunchy contrast.
Tip: Serve immediately while the rings are still hot to enjoy the contrast between the crispy exterior and the tender, warm apple center.
Checkpoint
The finished apple rings should look glossy and inviting, with the caramel drizzle pooling beautifully over the crisp, golden exterior. The crushed walnuts should look toasted and be evenly distributed to add a nice contrast in texture. Ensure the rings are served immediately while they are still warm and crisp. Take a moment to admire the color and the way the caramel interacts with the crust. Everything should look clean, professional, and ready to enjoy as a perfect, warm dessert for any autumn gathering.
Doneness
How to tell it’s done
The apple rings are finished when the batter is golden brown and firm to the touch. The internal apple should be tender and soft, which you can test by gently pressing the ring with your spatula; it should yield slightly without collapsing. The coating should be crisp and uniform, with no signs of raw batter remaining. Because this dish does not contain raw meat, there is no internal temperature requirement for safety, but ensure the center of the apple is heated through to guarantee the best texture and flavor for serving.
Avoid these
Common mistakes
A common mistake is slicing the apple rings too thinly, which causes them to lose their shape and become mushy during the frying process. Aim for a consistent 1-centimeter thickness to ensure they hold up well. Another error is overcrowding the griddle, which lowers the cooking temperature and results in a soggy crust rather than a crispy one. Work in batches to maintain proper heat. Finally, ensure the butter is fully foaming before adding the rings; if the pan is not hot enough, the batter will absorb the butter instead of frying, leading to a greasy result.
Better results
Tips
Tip 1
For the most consistent results, keep your apple cider cold until you are ready to mix the batter. Cold liquid mixed into the batter base helps create a lighter, more delicate crust that is less likely to absorb excess fat. When dredging the apples, shake off any excess cinnamon sugar before dipping them into the batter to ensure the batter sticks directly to the fruit rather than just the sugar layer. This creates a stronger bond between the apple and the crust, preventing the coating from peeling away during the frying process.
Tip 2
If you are serving these for a larger group, you can keep the finished rings warm on a wire rack set over a baking sheet in a low-temperature oven, set to approximately 200°F (95°C). This keeps the crust crispy while you finish frying the remaining batches. Avoid stacking the rings on top of each other on a plate, as the steam trapped between them will soften the crisp exterior. A single layer on a warm platter is the best way to maintain that signature crunch until the very last bite is enjoyed by your guests.
Make it yours
Variations
Maple Pecan Variation
Replace the salted caramel drizzle with pure maple syrup and swap the toasted walnuts for chopped toasted pecans. This variation offers a traditional autumnal flavor profile that pairs exceptionally well with the cinnamon-spiced batter and the natural sweetness of the Honeycrisp apples.
Chocolate Drizzle Twist
For a richer dessert, drizzle the finished apple rings with melted dark chocolate instead of caramel. The slight bitterness of the dark chocolate provides a sophisticated contrast to the sweet apples, while the walnuts add a necessary crunch to complete the flavor profile of this decadent treat.
Spiced Ginger Variation
Add a half-teaspoon of ground ginger to the cinnamon sugar mixture for a subtle, spicy kick. This addition enhances the warmth of the dish and pairs beautifully with the apple cider in the batter, creating a more complex and aromatic dessert that stands out at any gathering.
Whipped Cream Topping
Serve each apple ring with a generous dollop of freshly whipped cream instead of caramel. The light, airy texture of the cream complements the crispy batter perfectly, making the dish feel lighter while still providing that classic combination of warm fruit and creamy, cool sweetness.
On the table
Serving suggestions
Serve these apple rings warm, ideally on individual plates or a communal platter, immediately after the caramel drizzle and walnut garnish. The contrast between the warm, tender apple and the cool, creamy caramel is best experienced as soon as they come off the griddle. Because the rings are quite indulgent, they pair beautifully with a simple side of lightly sweetened whipped cream or a small scoop of vanilla bean ice cream. The temperature difference between the warm rings and the cold accompaniment adds another dimension to the dessert that guests will certainly appreciate.
The presentation is key to making this dish feel special, so arrange the rings in a slightly overlapping stack to showcase the golden crust and the caramel. If you are serving them as a brunch dish, they work wonderfully alongside a cup of hot coffee or a spiced tea, which complements the cinnamon notes in the batter. Remind your guests to eat them while they are fresh to enjoy the full textural experience. Providing small forks and knives makes it easier for guests to manage the rings, ensuring they can enjoy every bit of the delicious, caramelized fruit.
Leftovers
Storage & make-ahead
- Fridge
- Keep in an airtight container for up to 2 days.
- Reheat
- Reheat in a preheated oven at 350°F (175°C) for 5-8 minutes until crisp.
Store any leftovers in an airtight container in the refrigerator for up to two days. To maintain the best possible texture, place a piece of parchment paper between the layers to prevent them from sticking together. While they will lose some of their initial crispness when chilled, they remain delicious and can be easily refreshed. Avoid storing them at room temperature, as the fruit and batter components can spoil quickly. Always ensure they are completely cooled to room temperature before sealing the container to prevent condensation from making the crust soggy.
Make ahead
You can prepare the apple rings and the batter separately a few hours in advance. Keep the apple rings in a bowl with a damp paper towel to prevent them from drying out, and keep the batter in the refrigerator. When you are ready to serve, simply slice the apples, dredge them, and proceed with the frying process. This ensures that the batter stays fresh and the apples remain crisp, providing a high-quality dessert experience without the stress of performing all the preparation steps at the very last minute.
Questions
Frequently asked questions
Can these apple rings be made ahead of time?
While you can prepare the components ahead, it is best to fry the rings just before serving. The texture relies on the contrast between the crispy exterior and the tender apple, which is at its peak immediately after cooking. You can keep the prepared batter in the refrigerator and the sliced apples ready to go, but the actual frying should be the final step to ensure the highest quality and the most satisfying crunch in every single bite.
What is the best way to keep them warm while frying in batches?
To keep the rings warm without sacrificing their texture, place them in a single layer on a wire rack set over a baking sheet. Put this in an oven preheated to 200°F (95°C). The wire rack is essential because it allows air to circulate around the rings, which prevents the bottoms from becoming soggy due to trapped steam. Avoid stacking them, as this will lead to a loss of the signature crispness that makes this dessert so enjoyable.
Why is the batter not sticking to the apple rings?
The most common reason for the batter sliding off is moisture on the surface of the apple rings. Before dredging them in the cinnamon sugar, ensure the apple slices are thoroughly patted dry with a paper towel. Additionally, if the batter itself is too thin, it will not coat the rings properly. Whisk in a small amount of extra flour until the batter is thick enough to coat the back of a spoon, which will ensure a sturdy, consistent crust.
Can a different type of apple be used for this recipe?
Yes, other firm apple varieties work well. Granny Smith is an excellent choice if you prefer a tart flavor, while Fuji or Gala work if you prefer a sweeter result. The key is to select an apple that is firm and fresh, as softer varieties may break down too quickly during the three-minute frying time. Always ensure the apple rings are uniform in thickness to guarantee they all cook at the same rate on the griddle.
Is it necessary to use a cast-iron griddle?
A cast-iron griddle is recommended because it provides superior heat retention and distribution, which is ideal for achieving a perfectly golden and crispy crust. However, if you do not have one, a heavy-bottomed non-stick skillet is a suitable alternative. The most important factor is maintaining a steady medium heat so the batter cooks through without the exterior burning. Monitor the heat carefully throughout the process to ensure the rings are cooked to a beautiful, uniform golden brown color.
Everything in one place: the recipe card below gathers the ingredients, steps and estimated nutrition, ready to print.
Recipe card
Crispy Cinnamon Apple Cider Pancake Rings
Transform fresh Honeycrisp apples into a nostalgic autumn treat. These apple rings are dipped in a spiced cider batter and pan-fried until golden, creating a warm, comforting dessert with a satisfying crunch in every single bite.
- Prep
- Cook
- Total
- Servings
- 8 apple rings
Ingredients
Apple Rings
- 2 Honeycrisp apples, cored and sliced into 1-centimeter rings
- 2 tbsp cinnamon sugar, for dredging
Cider Batter
- 3/4 cup (180 ml) boiled apple cider
Frying
- 25 g salted butter
Toppings
- 2 tbsp salted caramel sauce, for drizzling
- 1/4 cup toasted walnuts, crushed
Instructions
Prepare the Apple Rings. Using an apple corer, remove the center of each apple to create a clean hole. Carefully slice the apples into uniform 1-centimeter thick rings. Once sliced, dredge each apple ring thoroughly in the cinnamon sugar mixture, ensuring the surface is evenly coated to enhance the flavor profile during the frying process.
Mix the Cider Batter. In a medium mixing bowl, whisk together the boiled apple cider with your preferred pancake batter mix base until a smooth, consistent texture is achieved. The batter should be thick enough to coat the back of a spoon, providing a stable structure that will transform into a light and crispy crust once it hits the hot griddle.
Heat the Griddle. Place your cast-iron griddle over medium heat and add the salted butter. Allow the butter to melt completely until it begins to foam. This foaming action is the perfect indicator that the surface is ready for the apple rings, ensuring the exterior crust develops a beautiful golden hue while the apple softens inside.
Fry the Apple Rings. Dip each cinnamon-coated apple ring into the prepared cider batter, letting the excess drip off before placing it onto the hot griddle. Cook for exactly three minutes on each side at 175°C (347°F). The crust should turn a deep golden brown while the internal apple structure softens to a tender, juicy consistency that holds its shape.
Finish and Serve. Remove the golden-brown apple rings from the griddle and arrange them on a serving platter. While still warm, drizzle the salted caramel sauce generously over the top of the stack. Finish the dish by sprinkling the crushed toasted walnuts over the caramel, adding a final layer of texture and depth to the warm apple pie-inspired dessert.
Allergens: Milk, Tree nuts
Nutrition (estimated, per serving)
- Calories
- 280 kcal
- Protein
- 3.5 g
- Carbs
- 42 g
- Fat
- 11 g
- Fiber
- 3 g
- Sugar
- 28 g
- Sodium
- 180 mg
Estimates only: values vary with brands, substitutions and portion sizes.
Recipe by EasyCooks Kitchen · easycooksrecipes.com
Share this recipe
Send it to someone who’d love it, or save it for later.
Spotted a mistake in this recipe? Let us know.
Keep cooking


