Crispy Korean Mozzarella Coin Bread with Gooey Cheese Pull
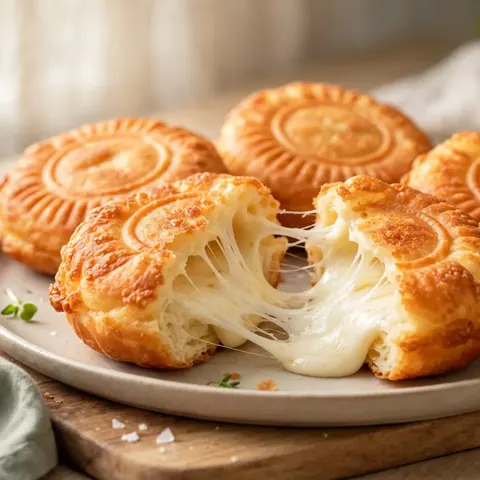
Discover how to recreate the viral street food sensation of golden, coin-shaped pancakes stuffed with an incredible, endless stretch of molten mozzarella cheese.
Published 12 min read
- Total time
- Prep
- Cook
- Serves
- 4
- Makes 4 coin breads
- Cuisine
- Korean-inspired
- Calories
- 380
- per serving, estimated

On this page16 sections
Transform your kitchen into a bustling Gyeongju street market with the famous ten-won coin bread. This viral sensation combines a sweet, crispy outer pancake with a decadent, endless stretch of melted mozzarella cheese. It is the ultimate snack for those who love the perfect harmony of sweet and salty flavors. With just a few simple ingredients and a specialty iron, you can recreate this iconic Korean treat at home, impressing family and friends with every delicious, cheesy bite.
The ten-won coin bread is more than just a snack; it is a culinary experience. Originating from the vibrant street food stalls of Korea, this treat is defined by its unique coin shape and its surprising, generous mozzarella core. The batter is subtly sweet, reminiscent of a classic waffle or pancake, which provides the perfect canvas for the savory, gooey cheese center. Whether you are hosting a party or looking for a fun weekend snack, these coins are sure to be the highlight of the table, offering a satisfying texture and flavor profile that keeps everyone coming back for more.
The appeal
Why you’ll love it
The method of using a specialized coin-shaped waffle iron is critical to the success of this dish. By preheating the iron to a precise 365°F, you ensure that the batter crisps up instantly upon contact, creating that signature golden-brown shell. The iron also provides the pressure needed to emboss the intricate coin design, which is essential for the authentic look and feel of the snack. This rapid, high-heat method ensures the exterior is perfectly crunchy while the interior remains tender and moist.
The ratio of batter to cheese is carefully balanced to maximize the experience of the cheese pull. By placing the mozzarella in the center and covering it with just enough batter, you create a self-contained pocket. As the pancake bakes, the cheese melts into a cohesive, stretchy core that stays hot and gooey, protected by the structural integrity of the cooked cake batter. This balance ensures that every bite provides a consistent ratio of crispy, sweet crust to savory, molten cheese.
What you need
Ingredients
Makes 4 coin breads.
Batter
Filling
Contains:
- Gluten
- Milk
Tools
Equipment
- Whisk
- Mixing bowl
- Measuring scale
- Measuring cups
- Coin-shaped waffle iron
- Silicone spatula
Swaps
Substitutions
Instead ofCake flour
UseAll-purpose flour mixed with a small amount of cornstarch for a similar tender texture
Instead ofLow-moisture mozzarella
UseProvolone or monterey jack cheese for a different flavor profile while maintaining a good stretch
Instead ofMelted butter
UseNeutral vegetable oil if you prefer a lighter, less buttery flavor in the crisp pancake crust
Good to know
Notes
Choosing the right mozzarella is paramount for achieving the perfect stretch. Always opt for a low-moisture mozzarella block rather than pre-shredded varieties, which contain anti-caking agents that can interfere with the melt. The low-moisture variety provides a cleaner, more elastic pull that is essential for the visual appeal and texture of the coin bread. If you cannot find a block, look for high-quality fresh mozzarella that has been thoroughly patted dry with paper towels to remove any excess surface water.
The equipment used in this recipe is straightforward but specific. A coin-shaped waffle iron is the only tool that will give you the authentic aesthetic of this street food. If you find that your batter is sticking, ensure the iron is well-seasoned or lightly greased with a neutral cooking spray before each batch. Always use a silicone spatula to remove the finished coins, as metal utensils can scratch the non-stick surface of the iron and ruin the detailed embossing of the design.
Prep
Before you start
Before you begin, ensure all your ingredients are measured and ready to go. Having the batter mixed and the cheese portioned ahead of time allows for a seamless cooking process, which is vital when working with a hot waffle iron. Make sure your workspace is clean and organized, with a wire rack nearby for cooling the finished coins. Check that your waffle iron is positioned on a flat, stable surface and that it has reached the required 365°F temperature before pouring in the first batch of batter.
Step by step
Method
Phase 1
Batter and Filling Preparation
Step 1: Prepare the Batter
In a large mixing bowl, combine the cake flour, milk, melted butter, and vanilla extract. Whisk the mixture thoroughly until the batter is completely smooth and free of any large lumps. Ensure the butter is fully incorporated into the liquid to create a uniform consistency that will crisp up perfectly in the hot iron.
You’ll need: cake flour · milk · melted butter · vanilla extract
Look for: The batter should be smooth, velvety, and pourable, with no visible dry spots or flour pockets remaining in the bowl after whisking.
Tip: Let the mixed batter rest for five minutes before cooking to allow the flour to hydrate fully, which results in a more tender and uniform pancake texture.
Step 2: Prepare the Mozzarella
Cut the low-moisture mozzarella into four equal portions. Ensure the pieces are shaped to fit comfortably within the central area of your coin-shaped waffle iron mold. Using low-moisture cheese is essential for achieving that iconic, long-stretching pull without excess water leaking out during the baking process.
You’ll need: low-moisture mozzarella
Look for: The cheese portions should be firm and dry to the touch, making them easy to handle and place precisely into the center of the preheated mold.
Tip: Keep the mozzarella refrigerated until the very last moment before placing it into the batter to ensure it holds its shape during the initial baking phase.
Checkpoint
The batter should be completely smooth, with a consistency similar to thin pancake batter. The mozzarella should be cut into uniform, dry blocks that are ready for immediate insertion. Ensure that no flour lumps remain in the batter, as these can create unpleasant pockets of raw flour in the final product. Everything should be within arm's reach of the stove to maintain the rhythm of the cooking process once the iron is heated and the first coin is ready to be assembled.
Phase 2
Molding and Baking
Step 3: Fill the Mold
Preheat your coin-shaped waffle iron to 365°F. Carefully pour the prepared batter into the bottom of the coin mold, filling it about halfway to the top. Immediately place one portion of the mozzarella in the center of the batter, then pour just enough additional batter over the cheese to cover it completely and reach the edges of the mold.
You’ll need: cake flour · milk · melted butter · vanilla extract · low-moisture mozzarella
Look for: The batter should sizzle slightly upon hitting the iron, and the cheese should be fully encased to prevent it from leaking during the cooking process.
Tip: Use a small ladle or a squeeze bottle to control the flow of the batter, ensuring you get a clean edge on the coin-shaped design.
Step 4: Bake the Coin Bread
Close the lid of the coin press and bake the pancake for four minutes. Flip the press halfway through the cooking time to ensure that both sides of the coin are embossed with the golden-brown design and reach a perfectly crispy texture. Monitor the steam escaping from the iron to gauge the internal cooking progress of the batter.
You’ll need: cake flour · milk · melted butter · vanilla extract · low-moisture mozzarella
Internal temperature 160°F (71°C)
Look for: The bread is ready when the surface is deep golden-brown, the edges are crisp, and the interior is fully set to a soft, warm consistency.
Tip: Do not open the iron too early, as this can tear the delicate crust and release steam that is necessary for the proper cooking of the internal batter.
Checkpoint
The batter should sizzle instantly when poured into the hot mold, and the cheese should be centered perfectly to avoid leaks. During the baking phase, the steam escaping from the iron should smell like toasted vanilla and warm, savory cheese. Once the four minutes have elapsed, the coin should be golden and firm, with the embossed design clearly visible on the surface. If you see any batter weeping from the sides, simply wipe it away with a damp cloth to keep the iron clean for subsequent batches.
Phase 3
Serving and Presentation
Step 5: Final Presentation
Carefully remove the finished coin bread from the iron using a silicone spatula to avoid damaging the intricate embossing. Serve the bread immediately while it is still hot to ensure the mozzarella center remains molten and stretchy. The contrast between the crispy, sweet exterior and the savory, gooey cheese interior is the hallmark of this classic street food snack.
You’ll need: low-moisture mozzarella
Look for: The coin bread should be firm, golden, and emit a pleasant aroma of sweet vanilla and toasted batter, with the cheese visibly soft and pliable inside.
Tip: Place the finished coin bread on a wire cooling rack for thirty seconds before serving to allow the crust to set, making it easier to handle.
Checkpoint
The finished coin bread should be golden-brown, crispy on the outside, and piping hot. When you pull the coin apart, the mozzarella should stretch in a long, continuous strand, indicating that the cheese is at the perfect temperature. The bread should be served immediately while the crust is still crisp and the cheese is at its peak meltiness. If the bread is left to sit for too long, the crust may soften due to residual steam, so prompt serving is key to the best experience.
Doneness
How to tell it’s done
To determine if your coin bread is done, observe the color and texture of the exterior. The pancake should be a deep, uniform golden-brown, and the edges should appear crisp and firm to the touch. When you carefully lift the bread with a spatula, it should hold its shape without bending or breaking. Internally, the cheese must be fully melted and hot, reaching a safe internal temperature of 160°F. If the bread is golden but the cheese feels firm, continue baking for another thirty seconds to ensure the center is perfectly molten.
Avoid these
Common mistakes
One common mistake is using too much batter, which can cause the iron to overflow and result in messy, uneven coins. Start with a conservative amount and adjust as needed. Another error is failing to properly preheat the iron; a cold iron will lead to a pale, soggy pancake that lacks the necessary crispness. Finally, do not use pre-shredded cheese, as the starch coating prevents the cheese from melting into the smooth, stretchy consistency required for the authentic pull. Always use fresh block cheese for the best results.
Cook safely
Food safety
Safe internal temperatures
Cook to at least these temperatures, measured with an instant-read thermometer in the thickest part.
| Food | Minimum internal temperature |
|---|---|
| Egg dishes | 160°F (71°C) |
Better results
Tips
Tip 1
For an extra layer of flavor, you can lightly brush the hot iron with a small amount of melted salted butter before pouring in the batter. This adds a subtle richness to the crust and helps achieve a deeper, more even golden color. If you prefer a slightly sweeter pancake, you can add a teaspoon of granulated sugar to the batter mixture, but be mindful that higher sugar content can cause the crust to brown more quickly, so monitor the baking time closely to avoid burning.
Tip 2
If you are planning to serve these at a gathering, you can keep the finished coins warm in a low-temperature oven set to 200°F. Place them on a wire rack over a baking sheet to ensure air circulation, which helps maintain the crispness of the exterior. Avoid stacking the coins, as the weight and heat can cause them to lose their shape and become soft. Serving them within twenty minutes of baking will ensure that your guests enjoy the ideal contrast between the crispy shell and the molten center.
Make it yours
Variations
Spicy Kimchi Coin
Add a tablespoon of finely chopped, well-drained kimchi to the mozzarella filling before closing the iron. The spicy and tangy notes of the kimchi provide a wonderful contrast to the rich, molten cheese and the sweet pancake batter.
Sweet Chocolate Coin
Replace the mozzarella with a piece of high-quality dark chocolate. The result is a decadent dessert coin with a rich, molten chocolate center that pairs beautifully with the vanilla-scented pancake crust for a truly indulgent treat.
Pizza Style Coin
Mix a pinch of dried oregano and a hint of garlic powder into the batter. Serve with a small side of warm marinara sauce for dipping to transform the snack into a fun, pizza-inspired experience that kids and adults alike will love.
Sweet Red Bean Coin
Substitute the mozzarella with a dollop of sweetened red bean paste. This classic Korean filling creates a traditional flavor profile that perfectly complements the crispy, sweet pancake shell, offering a more authentic street food experience at home.
On the table
Serving suggestions
Serve the coin bread on its own as a handheld snack, perhaps with a side of your favorite dipping sauce if desired. A light dusting of powdered sugar can enhance the sweetness of the pancake, or a drizzle of honey can add a lovely floral note. For a more savory approach, consider serving with a small dish of warm marinara or a spicy chili-based sauce. The simplicity of the snack is its greatest strength, so feel free to experiment with minimal toppings that complement the rich, cheesy flavor.
Presentation is key for this viral treat, so serve the coins on a clean, minimalist plate to let the coin design shine. If serving multiple guests, provide small napkins, as the molten cheese can be quite messy to handle. Encourage your guests to pull the bread apart slowly to appreciate the impressive cheese pull, which is the signature feature of this snack. A warm cup of tea or a cold glass of milk makes an excellent accompaniment, balancing the richness of the cheese with a clean, refreshing palate cleanser.
Leftovers
Storage & make-ahead
- Fridge
- Keep in an airtight container for up to 3 days. Ensure they are completely cool before storing to prevent excess condensation inside the container.
- Freezer
- Wrap each coin individually in plastic wrap and store in a freezer-safe bag for up to one month. Thaw in the refrigerator before reheating.
- Reheat
- Reheat in a preheated 350°F oven or toaster oven for 5 to 7 minutes until the exterior is crisp and the cheese center is hot and molten throughout.
Store any leftover coin bread in an airtight container in the refrigerator for up to three days. Place a sheet of parchment paper between each coin to prevent them from sticking together. While the texture will change slightly after refrigeration, they remain a delicious snack. To bring back some of the original crispness, avoid the microwave and instead reheat them using the method described below, which helps revive the crust and melt the cheese once more.
Make ahead
You can prepare the batter up to twenty-four hours in advance and keep it in the refrigerator in a sealed container. Give the batter a quick whisk before using, as the flour may settle at the bottom. You can also cut the mozzarella into portions ahead of time and keep them chilled. Having these components ready allows you to assemble and bake the coins in minutes when you are ready to serve, making this an excellent option for entertaining or quick snacks.
Questions
Frequently asked questions
Can this recipe be made ahead of time?
Yes, the batter can be prepared and kept in the refrigerator for up to twenty-four hours. Simply whisk it well before pouring into the hot iron. While the coins are best enjoyed fresh, they can be reheated in the oven if you need to prepare them in advance for a gathering. This flexibility makes them an excellent choice for parties or quick snacks.
Why is low-moisture mozzarella recommended?
Low-moisture mozzarella is essential because it has a higher fat and lower water content, which allows it to melt into a stretchy, cohesive mass without releasing excessive liquid into the pancake batter. Pre-shredded cheese often contains starches that prevent a smooth melt, so using a block of high-quality low-moisture mozzarella ensures the best possible cheese pull and consistency for your coin bread.
How is sticking to the iron prevented?
Ensure the waffle iron is well-seasoned and properly preheated before adding the batter. A light coating of neutral oil or non-stick spray applied before each batch can significantly help with release. Additionally, let the pancake bake for the full four minutes without opening the lid, as this allows the crust to set properly and pull away from the iron naturally when you are ready to remove it.
What should be done if the cheese leaks out of the coin?
Leaking usually happens if the cheese is placed too close to the edge or if too much batter is used. Ensure the cheese is placed firmly in the center and cover it completely with a thin layer of batter to create a protective seal. If a small amount leaks, simply wipe the iron clean with a damp cloth between batches to prevent burning and ensure the next coin comes out perfectly.
Can a regular waffle iron be used for this recipe?
While the batter can technically be cooked in a regular waffle iron, the iconic coin shape and the characteristic embossed design that defines this viral snack will be lost. The coin-shaped iron provides the necessary depth and surface area to create the distinct pocket for the mozzarella. For the most authentic experience and the best results, a dedicated coin-shaped waffle iron is highly recommended for this specific recipe.
Everything in one place: the recipe card below gathers the ingredients, steps and estimated nutrition, ready to print.
Recipe card
Crispy Korean Mozzarella Coin Bread with Gooey Cheese Pull
Discover how to recreate the viral street food sensation of golden, coin-shaped pancakes stuffed with an incredible, endless stretch of molten mozzarella cheese.
- Prep
- Cook
- Total
- Servings
- 4 coin breads
Ingredients
Batter
- 150 g cake flour
- 120 ml milk
- 2 tbsp melted butter
- 1 tsp vanilla extract
Filling
- 14 oz low-moisture mozzarella
Instructions
Prepare the Batter. In a large mixing bowl, combine the cake flour, milk, melted butter, and vanilla extract. Whisk the mixture thoroughly until the batter is completely smooth and free of any large lumps. Ensure the butter is fully incorporated into the liquid to create a uniform consistency that will crisp up perfectly in the hot iron.
Prepare the Mozzarella. Cut the low-moisture mozzarella into four equal portions. Ensure the pieces are shaped to fit comfortably within the central area of your coin-shaped waffle iron mold. Using low-moisture cheese is essential for achieving that iconic, long-stretching pull without excess water leaking out during the baking process.
Fill the Mold. Preheat your coin-shaped waffle iron to 365°F. Carefully pour the prepared batter into the bottom of the coin mold, filling it about halfway to the top. Immediately place one portion of the mozzarella in the center of the batter, then pour just enough additional batter over the cheese to cover it completely and reach the edges of the mold.
Bake the Coin Bread. Close the lid of the coin press and bake the pancake for four minutes. Flip the press halfway through the cooking time to ensure that both sides of the coin are embossed with the golden-brown design and reach a perfectly crispy texture. Monitor the steam escaping from the iron to gauge the internal cooking progress of the batter.
Final Presentation. Carefully remove the finished coin bread from the iron using a silicone spatula to avoid damaging the intricate embossing. Serve the bread immediately while it is still hot to ensure the mozzarella center remains molten and stretchy. The contrast between the crispy, sweet exterior and the savory, gooey cheese interior is the hallmark of this classic street food snack.
Allergens: Gluten, Milk
Nutrition (estimated, per serving)
- Calories
- 380 kcal
- Protein
- 14.5 g
- Carbs
- 32 g
- Fat
- 22 g
- Fiber
- 0.5 g
- Sugar
- 4 g
- Sodium
- 350 mg
Estimates only: values vary with brands, substitutions and portion sizes.
Recipe by EasyCooks Kitchen · easycooksrecipes.com
Share this recipe
Send it to someone who’d love it, or save it for later.
Spotted a mistake in this recipe? Let us know.
Keep cooking


