Crispy Pan-Seared Rice Paper Sushi Rolls
Ditch the bamboo mat and discover the secret to perfectly crispy, golden-brown sushi rolls. This simple pan-seared technique delivers a satisfying crunch with every bite.
Published 8 min read
- Total time
- Prep
- Cook
- Serves
- 2
- Makes 4 sushi rolls
- Cuisine
- Fusion
- Calories
- 280
- per serving, estimated

On this page16 sections
Master the art of crispy, pan-seared sushi rolls without the need for a bamboo mat. This innovative technique transforms simple ingredients into a texturally complex appetizer that is perfect for any occasion. By searing the rice paper, you achieve a delightful crunch that contrasts perfectly with the creamy avocado and sweet mango inside. This method is incredibly approachable, making it a fantastic way to elevate your home sushi game without requiring specialized equipment or years of professional training.
These crispy rice paper sushi rolls offer a modern twist on traditional sushi. By replacing nori with rice paper and adding a quick sear in aromatic sesame oil, you gain an incredible textural experience. Each roll is packed with succulent shrimp tempura, vibrant mango, and creamy avocado, creating a harmonious balance of flavors. This recipe is designed for those who appreciate efficiency and bold results. Whether you are hosting a casual dinner or simply craving a unique snack, these rolls deliver a satisfying crunch that will leave everyone wanting more. Follow this guide to achieve golden, blistered perfection every time.
The appeal
Why you’ll love it
The rice paper provides a neutral, crisp exterior that holds its shape well when pan-seared. Unlike traditional seaweed, which can soften quickly, rice paper develops a distinct crackle when exposed to high heat in oil. This creates a superior mouthfeel that enhances the experience of the fresh fillings inside.
Searing in sesame oil infuses the exterior of the roll with a nutty, aromatic profile that complements the delicate sweetness of the mango and shrimp. This cooking method also ensures that the internal ingredients remain warm and cohesive, providing a comforting contrast to the cold, raw components typically found in standard sushi rolls.
What you need
Ingredients
Makes 4 sushi rolls.
Main
Sauce
Contains:
- Crustaceans
- Eggs
- Soy
- Sesame
Tools
Equipment
- Skillet
- Cutting board
- Knife
- Shallow dish for water
Swaps
Substitutions
Instead ofShrimp tempura
UseCrispy tofu strips or cooked crab sticks
Instead ofMango
UsePapaya or pineapple
Good to know
Notes
Use high-quality shrimp tempura, either homemade or store-bought, to ensure the best results. The crispiness of the shrimp is essential for the overall texture of the dish. If using frozen tempura, ensure it is fully thawed and drained before assembly to prevent the rice paper from becoming soggy during the final sear.
A heavy-bottomed skillet or a non-stick pan is ideal for this recipe to ensure even heat distribution. Ensure the oil is hot before adding the rolls to prevent them from sticking or absorbing excessive grease. If you prefer a different flavor profile, feel free to swap the sesame oil for a neutral vegetable oil.
Prep
Before you start
Before beginning, ensure all your ingredients are prepped and within reach. Slice the mango, avocado, and cucumber into consistent strips that fit well within the rice paper. Have your shrimp tempura ready to go. A clean, spacious workstation is crucial for rolling the sushi efficiently. Keep a shallow dish of warm water ready for the rice paper, and have your skillet preheated on the stove to ensure a smooth transition from assembly to cooking. Proper organization is the secret to success with this recipe.
Step by step
Method
Phase 1
Assembly of the rolls
Step 1: Prepare the fillings
Arrange the prepared sushi rice, shrimp tempura tails, mango strips, sliced avocado, and julienned cucumber on a clean workspace. Ensure all ingredients are sliced evenly to make rolling easier and to ensure the rolls maintain a consistent diameter throughout the process.
You’ll need: sushi rice · shrimp tempura · mango · avocado · cucumber
Look for: Ingredients should be ready for assembly.
Tip: Keep the ingredients organized to speed up the assembly process.
Step 2: Assemble the rolls
Briefly dampen a sheet of rice paper in a shallow dish of water until pliable. Place the rice paper on a flat surface, layer the sushi rice, shrimp tempura, mango, avocado, and cucumber in the center, and roll tightly into a log shape.
You’ll need: rice paper · sushi rice · shrimp tempura · mango · avocado · cucumber
Look for: The roll should be tight and secure.
Tip: Do not soak the rice paper too long or it will become too sticky to handle.
Checkpoint
At the end of this phase, you should have four tightly wrapped, uniform logs. The rice paper should feel pliable and sturdy, not overly sticky or tearing at the seams. All ingredients should be neatly enclosed within the roll. If any rolls feel loose, gently tuck the ends and re-roll to ensure they stay secure during the high-heat searing process.
Phase 2
Searing to perfection
Step 3: Sear the rolls
Heat the sesame oil in a skillet over medium-high heat until it shimmers. Place the sushi rolls into the pan, ensuring they are not overcrowded. Sear them for two minutes per side until the rice paper reaches an internal temperature of 145°F (63°C) for the shrimp, appearing blistered, golden, and crackly.
You’ll need: sesame oil
Internal temperature 145°F (63°C)
Look for: The exterior must be blistered and golden.
Tip: Use a splatter screen if the oil begins to pop during the searing process.
Checkpoint
The rolls should now be golden-brown, blistered, and visually appealing. The exterior must feel firm and crisp to the touch. The sesame oil should have imparted a subtle, nutty aroma to the kitchen. Check that the rolls have achieved a consistent color all around. If you notice any soft spots, rotate the rolls in the skillet for a few extra seconds to ensure even crisping.
Phase 3
Final plating and serving
Step 4: Serve the sushi
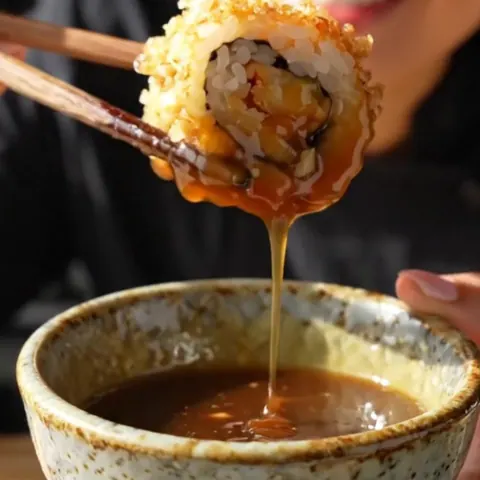
Remove the rolls from the skillet and let them sit for a moment. Slice each roll carefully in half using a sharp knife. Arrange the pieces on a plate and serve immediately with spicy mayo and unagi sauce for dipping.
You’ll need: spicy mayo · unagi sauce
Look for: The crust should be audible when sliced.
Tip: Wipe the knife blade between cuts to keep the presentation clean.
Checkpoint
Once sliced, the cross-section of the sushi should reveal vibrant layers of shrimp, mango, avocado, and cucumber. The rolls should hold their shape without falling apart. The aroma should be fresh and savory, with the scent of toasted sesame. Ensure the dipping sauces are ready to go, as the rolls are best served while the exterior remains hot and crunchy.
Doneness
How to tell it’s done
The rolls are done when the rice paper exterior is uniformly golden, blistered, and crackly. Because the shrimp tempura is the primary protein, ensure the center of the roll reaches an internal temperature of 145°F (63°C). A sharp knife should cut through the roll with a distinct crunch without crushing the delicate interior ingredients. If the rice paper looks pale or feels soft, continue searing for an additional thirty seconds per side to achieve the desired texture.
Avoid these
Common mistakes
Avoid over-soaking the rice paper, as it will become too fragile to roll tightly. A quick dip is sufficient to make it pliable. Do not overcrowd the skillet, as this lowers the temperature and leads to soggy rolls rather than a crisp exterior. Finally, ensure the oil is hot before adding the rolls; if the oil is too cold, the rice paper will absorb it, resulting in a greasy finish instead of a light, crunchy bite.
Cook safely
Food safety
Safe internal temperatures
Cook to at least these temperatures, measured with an instant-read thermometer in the thickest part.
| Food | Minimum internal temperature |
|---|---|
| Shellfish | 145°F (63°C) |
Better results
Tips
Tip 1
For an even crunchier experience, ensure the rolls are as dry as possible before placing them in the hot oil. A light dusting of cornstarch on the outside of the rice paper can also enhance the blistered effect, though it is optional. If you find the rice paper sticking to the pan, ensure your pan is well-seasoned or use a high-quality non-stick surface.
Tip 2
Experiment with different dipping sauces to change the flavor profile of the dish. A mixture of soy sauce and lime juice or a sweet chili sauce can work beautifully alongside the spicy mayo and unagi sauce. The goal is to provide a balanced dip that complements the sweetness of the mango and the richness of the fried shrimp without overpowering them.
Make it yours
Variations
Spicy Tuna Crunch
Replace the shrimp tempura with spicy tuna tartare. Ensure the tuna is sushi-grade. Sear the roll quickly to keep the fish cool in the center while creating a hot, crispy exterior.
Vegetarian Delight
Substitute the shrimp tempura with crispy fried tofu or tempura-battered sweet potato. This version remains just as crunchy and satisfying, offering a delicious plant-based alternative for your guests.
On the table
Serving suggestions
Serve these rolls as a sophisticated appetizer for your next gathering or as a light and crunchy dinner. Arrange the sliced pieces on a platter, alternating the colors of the fillings to make the presentation pop. Providing small individual bowls of spicy mayo and unagi sauce allows your guests to customize their dipping experience according to their personal preferences.
Consider pairing these rolls with a refreshing cucumber salad or a light miso soup to balance the richness of the fried shrimp. The contrast between the hot, crispy sushi and a cold, crisp side dish creates a memorable dining experience. Remember to keep the sauces accessible and serve the rolls while they are still warm for the best possible texture and flavor.
Leftovers
Storage & make-ahead
- Fridge
- Store in an airtight container for up to 1 day. Note that the texture will soften significantly.
- Reheat
- Reheat in a toaster oven or air fryer at 350°F (175°C) for 3-5 minutes to restore some crispness.
If you have leftovers, store them in an airtight container in the refrigerator for up to twenty-four hours. Note that the rice paper will lose its crispness over time, so it is best to consume these rolls immediately after cooking. If you must store them, place them on a paper towel to absorb any excess moisture before closing the container.
Make ahead
You can prep the fillings up to four hours in advance and keep them refrigerated in separate containers. However, the assembly and searing should be done immediately before serving to maintain the signature crunch of the rice paper. Do not assemble the rolls ahead of time, as the rice paper will soften and become gummy when in contact with the moist fillings.
Questions
Frequently asked questions
Can these rolls be made without a bamboo mat?
Yes, this recipe is specifically designed to be prepared without a bamboo mat. The rice paper is flexible enough to be rolled by hand, and the subsequent searing process helps to seal the rolls and maintain their shape, making the traditional mat unnecessary for this preparation.
Why does the rice paper stick to the pan?
Sticking usually occurs if the pan is not hot enough when the rolls are added or if there is not enough oil. Ensure the skillet is properly heated and the oil is shimmering before adding the rolls. A high-quality non-stick pan is highly recommended to prevent any issues with the delicate rice paper.
Are there specific filling restrictions for these rolls?
Any sushi-grade ingredients can be used, provided they are thoroughly patted dry before assembly. Excess moisture causes the rice paper to tear or become gummy during the searing process. Always ensure wet components like cucumber or mango are well-drained to maintain the structural integrity of the roll.
Everything in one place: the recipe card below gathers the ingredients, steps and estimated nutrition, ready to print.
Recipe card
Crispy Pan-Seared Rice Paper Sushi Rolls
Ditch the bamboo mat and discover the secret to perfectly crispy, golden-brown sushi rolls. This simple pan-seared technique delivers a satisfying crunch with every bite.
- Prep
- Cook
- Total
- Servings
- 4 sushi rolls
Ingredients
Main
- 4 sheets rice paper
- 80 g sushi rice, cooked
- 8 tails shrimp tempura
- 1 cup mango, cut into strips
- 1/2 cup avocado, sliced
- 1/2 cup cucumber, julienned
- 15 ml sesame oil
Sauce
- spicy mayo for serving
- unagi sauce for serving
Instructions
Prepare the fillings. Arrange the prepared sushi rice, shrimp tempura tails, mango strips, sliced avocado, and julienned cucumber on a clean workspace. Ensure all ingredients are sliced evenly to make rolling easier and to ensure the rolls maintain a consistent diameter throughout the process.
Assemble the rolls. Briefly dampen a sheet of rice paper in a shallow dish of water until pliable. Place the rice paper on a flat surface, layer the sushi rice, shrimp tempura, mango, avocado, and cucumber in the center, and roll tightly into a log shape.
Sear the rolls. Heat the sesame oil in a skillet over medium-high heat until it shimmers. Place the sushi rolls into the pan, ensuring they are not overcrowded. Sear them for two minutes per side until the rice paper reaches an internal temperature of 145°F (63°C) for the shrimp, appearing blistered, golden, and crackly.
Serve the sushi. Remove the rolls from the skillet and let them sit for a moment. Slice each roll carefully in half using a sharp knife. Arrange the pieces on a plate and serve immediately with spicy mayo and unagi sauce for dipping.
Allergens: Crustaceans, Eggs, Soy, Sesame
Nutrition (estimated, per serving)
- Calories
- 280 kcal
- Protein
- 8.5 g
- Carbs
- 32 g
- Fat
- 14 g
- Fiber
- 2.5 g
- Sugar
- 4 g
- Sodium
- 450 mg
Estimates only: values vary with brands, substitutions and portion sizes.
Recipe by EasyCooks Kitchen · easycooksrecipes.com
Share this recipe
Send it to someone who’d love it, or save it for later.
Spotted a mistake in this recipe? Let us know.
Keep cooking


