Crispy Peking Duck Spring Rolls with Tangy Plum Sauce
Experience the ultimate crunch with these authentic Cantonese-style spring rolls. Stuffed with savory roast duck, earthy mushrooms, and crisp vegetables, they fry to perfection in minutes.
Published 8 min read
- Total time
- Prep
- Cook
- Serves
- 4
- Makes 8 spring rolls
- Cuisine
- Cantonese
- Calories
- 280
- per serving, estimated

On this page16 sections
Discover the secret to professional-level spring rolls that deliver an unmistakable, glass-like crunch with every bite. By combining succulent roast duck with fresh aromatics and a perfectly balanced glaze, these rolls bring the sophisticated flavors of Cantonese dim sum directly into your home kitchen with ease.
These crispy duck spring rolls are a masterclass in texture and flavor balance. Featuring a delicate, shatteringly crisp exterior that gives way to a savory, umami-rich filling, they provide a restaurant-quality experience. The combination of tender roast duck, crunchy cabbage, and earthy mushrooms is elevated by a sweet and tangy plum-ginger dipping sauce, making them an ideal appetizer for dinner parties or special family meals. The process focuses on precise rolling and controlled frying temperatures to ensure a light, non-greasy finish that highlights the quality of the ingredients.
The appeal
Why you’ll love it
The method of using a precise frying temperature of 360°F (182°C) is critical for achieving a glassy, blistered exterior without burning the delicate wheat wrappers. By maintaining this heat, the moisture in the dough evaporates quickly, creating the characteristic shatter-crisp texture that defines a perfect spring roll.
Tightly rolling the ingredients ensures that the filling stays contained while allowing the interior to steam gently within the wrapper. This technique prevents the filling from becoming mushy, keeping the cabbage and mushrooms crisp-tender and full of flavor, while the hoisin-oyster sauce glaze binds the components together into a cohesive, savory bite.
What you need
Ingredients
Makes 8 spring rolls.
Filling
Assembly
Cooking
Serving
Contains:
- Gluten
- Soy
- Peanuts
- Mollusks
Tools
Equipment
- Wok or deep fryer
- Slotted spoon
- Wire cooling rack
- Mixing bowl
- Kitchen towels
Swaps
Substitutions
Instead ofPeanut oil
UseAny high-smoke point vegetable oil such as canola or grapeseed oil
Instead ofWood-ear mushrooms
UseShiitake mushrooms or oyster mushrooms, thinly sliced
Good to know
Notes
For the best results, use high-quality roast duck that has been shredded evenly. The choice of wrapper is also vital; thin wheat wrappers are essential for achieving that signature light, crispy finish. Avoid thicker wrappers, as they will result in a chewy rather than a crunchy texture after deep frying in the hot oil.
Peanut oil is recommended for its high smoke point and neutral flavor, which allows the taste of the duck and the glaze to stand out. If you prefer, canola or refined grapeseed oil are excellent alternatives. Ensure you use a reliable thermometer to monitor the oil temperature, as fluctuating heat is the most common cause of soggy or unevenly cooked spring rolls.
Prep
Before you start
Start by preparing all your ingredients before you begin the assembly. Shred the roast duck into bite-sized pieces and ensure the cabbage and mushrooms are sliced into uniform, thin strips. This uniformity is crucial for even cooking and a consistent texture in every roll. Have your workspace cleared and your wrappers ready, along with a small bowl of water for sealing. Keeping everything organized allows you to maintain a steady rhythm, which is key to successful frying.
Step by step
Method
Phase 1
Filling Preparation
Step 1: Prepare the Filling
Combine the shredded roast duck, julienned cabbage, wood-ear mushrooms, and the hoisin-oyster sauce glaze in a large mixing bowl. Toss the ingredients together thoroughly until the mixture is evenly coated with the savory glaze. Ensure the cabbage and mushrooms are well distributed among the duck for a consistent flavor in every bite.
You’ll need: shredded roast duck · julienned cabbage · wood-ear mushrooms · hoisin-oyster sauce glaze
Look for: The mixture should look glossy and well-combined with the glaze coating every ingredient evenly.
Tip: Keep the filling mixture relatively dry by squeezing excess moisture from the vegetables before mixing.
Checkpoint
The filling should be thoroughly mixed, with the glaze evenly distributed across the duck and vegetables. The mixture should feel moist but not overly wet, which ensures the rolls remain crisp during the frying process. Check that the cabbage and mushrooms are finely julienned, as large chunks will make the rolls difficult to roll tightly and may tear the delicate wheat wrappers.
Phase 2
Assembly and Rolling
Step 2: Assemble the Rolls
Lay a thin wheat wrapper flat on a clean surface. Place a portion of the duck and vegetable filling near the bottom edge of the wrapper. Fold the sides inward and roll tightly upward to form a secure cylinder. Repeat this process until all filling is used, ensuring the seals are tight to prevent oil absorption.
You’ll need: thin wheat wrappers
Look for: The rolls must be wrapped tightly and sealed completely so they do not open during the frying process.
Tip: Use a tiny amount of water on the edge of the wrapper to act as a glue for a secure seal.
Checkpoint
Each roll should be tightly packed into a neat cylinder with no air pockets inside. Ensure the edges are folded firmly and the final seal is secure using a touch of water. The rolls should be uniform in size, which helps them cook at the same rate. Before moving to the frying phase, verify that all rolls are sealed well to prevent the filling from leaking into the hot oil.
Phase 3
Frying to Perfection
Step 3: Deep Fry the Rolls
Heat the peanut oil in a wok or deep fryer to 360°F (182°C). Carefully lower the spring rolls into the hot oil in batches to avoid crowding. Fry for 4 minutes until the wrappers are blistered, glassy, and deep golden brown. Ensure the internal temperature of the duck reaches 165°F (74°C). Remove with a slotted spoon and drain on a wire rack. Serve with the plum-ginger sauce.
You’ll need: peanut oil · plum-ginger sauce
Internal temperature 165°F (74°C)
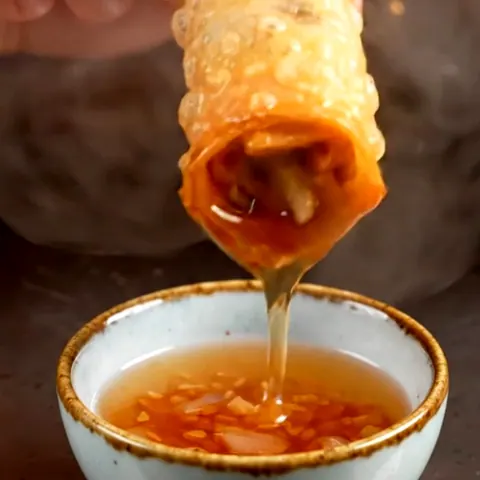
Look for: The wrappers will become golden, blistered, and glassy, creating a distinct shattering sound when tapped.
Tip: Maintain the oil temperature consistently; if the oil is too cold, the rolls will become greasy instead of crispy.
Checkpoint
The oil must be maintained at a steady 360°F (182°C). Watch for the wrappers to turn a uniform, glassy golden brown. The rolls will float to the surface once they are nearing completion. Use a slotted spoon to transfer them to a wire rack, allowing excess oil to drip away. Listen for a crisp, echoing sound when they are tapped, confirming the texture is achieved.
Doneness
How to tell it’s done
The spring rolls are perfectly done when the wrapper has turned a deep, golden brown and exhibits a glassy, blistered appearance. When lifted from the oil, they should feel firm and crisp. The internal filling must reach an internal temperature of 165°F (74°C) to ensure the roast duck is heated through safely. They should sound hollow and crunchy when tapped with a utensil, indicating the moisture has been effectively removed from the outer layer.
Avoid these
Common mistakes
A common mistake is overcrowding the fryer, which causes the oil temperature to drop rapidly and leads to greasy, heavy rolls. Always fry in small batches to maintain a steady temperature. Another error is not sealing the rolls tightly; any loose edges will allow oil to seep into the filling, ruining the crispy texture. Finally, failing to drain the rolls on a wire rack can cause them to sit in their own steam, resulting in a loss of crunch within minutes.
Cook safely
Food safety
Safe internal temperatures
Cook to at least these temperatures, measured with an instant-read thermometer in the thickest part.
| Food | Minimum internal temperature |
|---|---|
| Poultry | 165°F (74°C) |
Better results
Tips
Tip 1
To achieve the most professional result, let the rolls rest on a wire rack for at least one minute after frying. This allows the heat to redistribute and the excess surface oil to drain completely, which is essential for maintaining that signature crispness. Do not place them directly on a paper towel if possible, as the steam trapped underneath can soften the bottom side of the roll.
Tip 2
If you are serving these for a gathering, keep the fried rolls in a warm oven set to 200°F (95°C) on a rack placed over a baking sheet. This keeps them hot and crispy until you are ready to serve. Avoid covering them with foil, as the trapped moisture will cause the wrappers to lose their crunch and become soft. Serve with a variety of dipping sauces for variety.
Make it yours
Variations
Spicy Duck Rolls
Add a tablespoon of chili garlic sauce or finely minced fresh bird's eye chili into the filling mixture for an added layer of heat that complements the savory roast duck perfectly.
Vegetarian Option
Substitute the roast duck with shredded smoked tofu or seitan. Ensure the seasoning is adjusted to maintain the umami profile, using a vegetarian-friendly mushroom-based sauce glaze.
On the table
Serving suggestions
Serve these spring rolls immediately while they are hot and at their crispiest. Arrange them on a platter with a small bowl of tangy plum-ginger sauce in the center for dipping. The contrast between the hot, crunchy roll and the cool, sweet-tart sauce is what makes this appetizer a standout choice for any dining occasion.
Consider serving these alongside other dim sum favorites or a light Asian-inspired side dish to provide a complete experience. The presentation should be simple, allowing the golden, blistered appearance of the rolls to take center stage. Ensure that each guest has a small individual dipping dish so they can enjoy the sauce without the rolls becoming soggy on the plate.
Leftovers
Storage & make-ahead
- Fridge
- Store in an airtight container in the refrigerator for up to 2 days.
- Reheat
- Reheat in a preheated oven at 375°F (190°C) for 5-8 minutes until hot and crispy.
Store any leftovers in an airtight container. Cool the rolls for no more than 2 hours at room temperature, then place them immediately into the refrigerator to ensure safety and maintain the best quality.
Make ahead
You can prepare the filling and assemble the rolls up to four hours before you plan to fry them. Keep the assembled, unfried rolls on a tray in the refrigerator, covered with a slightly damp cloth to prevent the wrappers from drying out or cracking. Fry them fresh just before you are ready to serve to ensure the best possible texture and flavor.
Questions
Frequently asked questions
Can these spring rolls be made ahead of time?
Yes, the rolls can be assembled several hours in advance. Keep them covered in the refrigerator to prevent the wrappers from drying out. Fry them fresh just before serving to ensure the maximum level of crispness and the best possible texture for your guests.
Why do the spring rolls become greasy after frying?
Greasiness is usually caused by frying at a temperature that is too low. If the oil is not hot enough, the wrapper absorbs the oil instead of crisping up. Always maintain the oil at 360°F (182°C) and avoid adding too many rolls at once, which causes the temperature to drop.
What is the best way to keep the rolls crispy after frying?
The key is to drain them on a wire rack rather than on paper towels. Paper towels can trap steam and cause the underside of the roll to soften. Keeping them in a warm oven on a rack helps maintain their heat and crispness until you are ready to plate and serve.
Everything in one place: the recipe card below gathers the ingredients, steps and estimated nutrition, ready to print.
Recipe card
Crispy Peking Duck Spring Rolls with Tangy Plum Sauce
Experience the ultimate crunch with these authentic Cantonese-style spring rolls. Stuffed with savory roast duck, earthy mushrooms, and crisp vegetables, they fry to perfection in minutes.
- Prep
- Cook
- Total
- Servings
- 8 spring rolls
Ingredients
Filling
- 9 oz shredded roast duck (store-bought or made ahead)
- 3.5 oz julienned cabbage
- 1.75 oz wood-ear mushrooms
- 2 tbsp hoisin-oyster sauce glaze
Assembly
- 8 thin wheat wrappers
Cooking
- 1 quart peanut oil
Serving
- plum-ginger sauce for serving
Instructions
Prepare the Filling. Combine the shredded roast duck, julienned cabbage, wood-ear mushrooms, and the hoisin-oyster sauce glaze in a large mixing bowl. Toss the ingredients together thoroughly until the mixture is evenly coated with the savory glaze. Ensure the cabbage and mushrooms are well distributed among the duck for a consistent flavor in every bite.
Assemble the Rolls. Lay a thin wheat wrapper flat on a clean surface. Place a portion of the duck and vegetable filling near the bottom edge of the wrapper. Fold the sides inward and roll tightly upward to form a secure cylinder. Repeat this process until all filling is used, ensuring the seals are tight to prevent oil absorption.
Deep Fry the Rolls. Heat the peanut oil in a wok or deep fryer to 360°F (182°C). Carefully lower the spring rolls into the hot oil in batches to avoid crowding. Fry for 4 minutes until the wrappers are blistered, glassy, and deep golden brown. Ensure the internal temperature of the duck reaches 165°F (74°C). Remove with a slotted spoon and drain on a wire rack. Serve with the plum-ginger sauce.
Allergens: Gluten, Soy, Peanuts, Mollusks
Nutrition (estimated, per serving)
- Calories
- 280 kcal
- Protein
- 12 g
- Carbs
- 22 g
- Fat
- 16 g
- Fiber
- 1.5 g
- Sugar
- 4 g
- Sodium
- 450 mg
Estimates only: values vary with brands, substitutions and portion sizes.
Recipe by EasyCooks Kitchen · easycooksrecipes.com
Share this recipe
Send it to someone who’d love it, or save it for later.
Spotted a mistake in this recipe? Let us know.
Keep cooking


