Easy Apple Danish Crescent Bake with Cream Cheese Filling
Transform simple pantry staples into a warm, inviting treat with this apple danish crescent bake. A buttery, flaky base meets a smooth cream cheese layer and tender spiced apples, creating the perfect balance of textures for any gathering.
Published Updated 12 min read
- Total time
- Prep
- Cook
- Rest
- Serves
- 8
- Makes one 9x13-inch baking dish
- Cuisine
- American
- Calories
- 320
- per serving, estimated

On this page15 sections
Creating a professional-grade dessert does not always require hours in the kitchen or complicated techniques. This apple danish crescent bake relies on simple, high-quality convenience items to deliver a result that tastes like it came straight from a local bakery. With a buttery, flaky crust as the foundation, this dish balances creamy richness with the sweetness of spiced apples, providing a reliable and comforting treat that is perfect for breakfast gatherings, afternoon tea, or a simple weekend dessert.
This apple danish recipe is designed for ease and consistency. By utilizing pre-made crescent roll dough, the need for time-consuming pastry lamination is eliminated, allowing for a quick assembly that fits into any busy schedule. The combination of softened cream cheese and a classic apple pie filling ensures that every bite is balanced and satisfying. Whether you are hosting a brunch or simply need a quick sweet fix, this bake provides a reliable, elegant solution that consistently delivers warmth and comfort to the table.
The appeal
Why you’ll love it
The method works by utilizing the pre-leavened properties of crescent roll dough, which rises and becomes beautifully flaky in a hot oven without additional effort. By layering the cream cheese directly onto the raw dough, the two components fuse slightly during baking, creating a rich, custard-like texture that supports the weight of the apple filling. This layering technique ensures that the bottom crust remains stable and provides a sturdy base for the fruit, preventing the finished dessert from becoming soggy or unstable when sliced.
Furthermore, the use of a ceramic baking dish allows for even heat distribution, which is essential for achieving a golden-brown crust without burning the top layer. The thermal mass of the ceramic helps maintain a consistent temperature throughout the cooking process, ensuring the cream cheese is heated through and the apple filling becomes tender and syrupy. This approach creates a harmonious dessert where the contrasting textures of the crispy edges and the soft, creamy center are perfectly preserved from the first slice to the last.
What you need
Ingredients
Makes one 9x13-inch baking dish.
Contains:
- Gluten
- Milk
Tools
Equipment
- 9x13-inch rectangular ceramic baking dish
- Mixing bowl
- Rubber spatula
- Spoon
- Offset spatula
Swaps
Substitutions
Instead ofApple pie filling
UseFreshly sliced apples tossed with 1/4 cup sugar and 1 teaspoon cinnamon.
Instead ofCream cheese
UseMascarpone cheese for a slightly lighter, more delicate flavor profile.
Instead ofCrescent roll dough
UseStore-bought puff pastry sheets rolled out to fit the baking dish.
Good to know
Notes
When selecting ingredients for this bake, ensure the cream cheese is fully softened to room temperature before beginning, as this is critical for a smooth, lump-free spread. Regarding the crescent roll dough, choose a standard variety without added flavors. If the dough seems overly cold, allow it to sit at room temperature for a few minutes to make it more pliable and easier to work with, which prevents tearing when spreading the cream cheese over the delicate surface.
For the equipment, a 9x13-inch ceramic baking dish is ideal, but a glass dish of the same size will also function effectively. If a different size dish is used, the baking time may need to be adjusted slightly. Always use an offset spatula for the smoothest application of the cream cheese, as this tool provides the necessary leverage to spread the mixture evenly without disturbing the dough base. If necessary, a clean, dry spoon may serve as an adequate substitute if an offset spatula is unavailable.
Prep
Before you start
Before beginning the assembly, ensure that your oven is fully preheated to 350°F (175°C) to guarantee a consistent rise for the crescent dough. Take the cream cheese out of the refrigerator at least 30 to 60 minutes ahead of time so it reaches a soft, spreadable consistency. Prepare your workspace by clearing enough room for the baking dish and having all ingredients within arm's reach. Having the apple filling opened and the spoon ready will ensure the assembly process remains efficient and prevents the dough from becoming too warm while waiting to be filled.
Step by step
Method
Phase 1
Base and Filling Preparation
Step 1: Prepare the base
Preheat your oven to 350°F (175°C). Take one can of the refrigerated crescent roll dough and unroll it carefully to cover the bottom of your 9x13-inch ceramic baking dish. Use your fingers to press the dough seams together firmly, ensuring the bottom is completely sealed and flat so the filling remains contained during the baking process.
You’ll need: refrigerated crescent roll dough
Look for: The dough should cover the entire bottom of the dish without any large gaps or holes.
Tip: If the dough is sticky, lightly dust your fingertips with a tiny amount of flour to prevent sticking.
Step 2: Add the creamy layer
Place the softened cream cheese into a medium mixing bowl and stir it until smooth and spreadable. Transfer the cream cheese mixture onto the layer of crescent dough in the baking dish. Use an offset spatula or the back of a large spoon to spread the cream cheese evenly over the entire surface of the dough, leaving a small margin at the edges if preferred.
You’ll need: cream cheese
Look for: The cream cheese layer should be smooth, uniform, and cover the dough base entirely.
Tip: Ensure the cream cheese is truly at room temperature so it spreads without tearing the delicate dough underneath.
Checkpoint
At the conclusion of this phase, the crescent dough should be perfectly flush with the bottom of the dish, forming an airtight seal. The cream cheese layer should appear smooth, glossy, and evenly distributed across the dough. Before proceeding to the fruit layer, inspect the dough for any holes or gaps, as these could allow the cream cheese to seep through during the bake. The overall assembly should look tidy, with the cream cheese providing a stable, level canvas for the subsequent addition of the apple filling.
Phase 2
Fruit Layering
Step 3: Layer the fruit
Open your can of apple pie filling and spoon the contents directly over the cream cheese layer. Carefully distribute the apple slices and syrup across the dish, using the back of your spoon to gently level them out. Ensure the fruit is spread into an even layer so that every portion of the finished bake contains a generous amount of filling.
You’ll need: apple pie filling
Look for: The fruit should be distributed evenly across the surface, creating a consistent layer.
Tip: If the apple slices are very large, you can chop them into smaller pieces before adding them to the dish.
Checkpoint
Once the apple filling has been added, the dish should look vibrant and well-proportioned. The fruit should be spread into a consistent layer, with the syrup providing a light glaze over the cream cheese. Check that the fruit is distributed into the corners of the dish to ensure every portion is filled. The assembly should now be ready for the oven, with the layers distinct yet cohesive. Ensure that the edges of the dough remain clean and free of apple syrup to prevent them from burning prematurely.
Phase 3
Baking and Finishing
Step 4: Bake to perfection
Place the baking dish into the preheated oven and bake for approximately 25 minutes. Watch for the edges of the dough to turn a deep golden brown and for the fruit filling to become bubbly and fragrant. Once finished, remove the dish from the oven and allow it to cool on a wire rack for at least 5 minutes before slicing and serving.
Look for: The edges of the crescent crust should be golden brown and the fruit filling should be bubbling.
Tip: Using a sharp knife or a clean metal spatula makes slicing the warm pastry much easier and prevents sticking.
Checkpoint
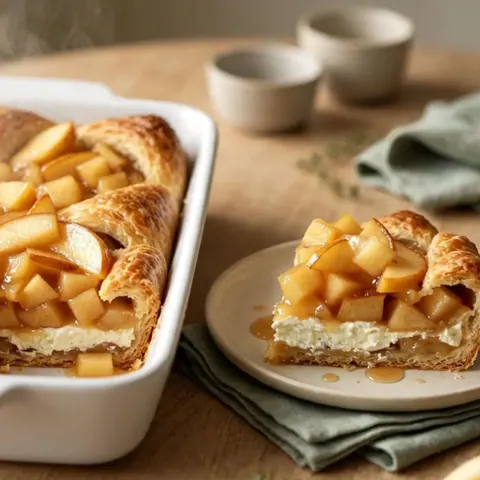
When the bake is finished, the dish will be characterized by a rich, golden-brown crust that has puffed up slightly at the edges. The fruit filling will be bubbling, indicating a perfect level of warmth throughout. The entire kitchen should be filled with the aroma of baked pastry and apples. Before serving, verify that the center of the bake feels set and not overly soft. The transition from the oven to the cooling rack is crucial; allow the dish to stabilize for 5 minutes to ensure a beautiful presentation.
Doneness
How to tell it’s done
The apple danish is done when the crescent dough edges have achieved a deep, uniform golden-brown color and feel firm to the touch. The fruit filling should be visibly bubbling across the surface, indicating that the sugars have caramelized and the apples are thoroughly warmed. If you insert a small knife into the center, it should encounter no resistance from the dough. Allow the dish to rest for 5 minutes after removing it from the oven to let the filling set, which ensures neater, cleaner slices when serving.
Avoid these
Common mistakes
A common error is failing to seal the edges of the crescent dough properly, which can lead to leaks during baking. Ensure the dough is pressed firmly against the sides of the dish and that all seams are tightly pinched. Another mistake is using cold cream cheese, which is difficult to spread and may tear the dough. Always allow the cream cheese to soften completely. Additionally, avoid overcrowding the dish with too much fruit, as this can prevent the center from baking through properly and result in an overly moist, unstable pastry.
Better results
Tips
Tip 1
For a slightly more polished presentation, you can lightly brush the edges of the crescent dough with a small amount of melted butter or an egg wash before baking. This simple addition helps achieve a deeper, more uniform color and a slightly crunchier texture on the crust. Ensure the wash is applied sparingly to avoid pooling, which can make the dough soggy. This small step enhances the aesthetic appeal of the final dish, making it look as though it was prepared by a professional pastry chef.
Tip 2
If you prefer a more intense flavor profile, consider adding a light dusting of ground cinnamon or nutmeg over the apple filling before placing the dish into the oven. This small addition complements the natural sweetness of the apples and adds a warming, aromatic quality to the finished dessert. Be careful not to over-season, as the pie filling is already sweetened and spiced. A light sprinkle is all that is required to elevate the complexity of the dish without overpowering the delicate balance of the cream cheese.
Make it yours
Variations
Berry Swirl Danish
Replace the apple pie filling with a mixed berry pie filling for a tart and vibrant variation. The acidity of the berries contrasts beautifully with the rich, dense cream cheese layer, offering a refreshing alternative to the traditional apple-based version.
Almond Crunch Danish
Sprinkle a generous amount of sliced almonds over the apple filling before baking. The nuts provide a pleasant, toasted crunch that complements the softness of the fruit and the flaky crust, adding another layer of texture to every bite.
Cinnamon Sugar Glazed
After baking, drizzle a simple glaze made from powdered sugar and a splash of milk over the top. This adds a sweet, decorative finish that makes the danish look even more inviting and creates a lovely contrast with the spiced apples.
Spiced Pumpkin Danish
Swap the apple filling for canned pumpkin pie mix. The earthiness of the pumpkin pairs excellently with the cream cheese, making this an ideal variation for autumn gatherings when warm, spiced flavors are most appreciated by guests and family.
On the table
Serving suggestions
Serve the apple danish warm, either directly from the baking dish or plated individually. The contrast between the warm, spiced apples and the smooth, cool cream cheese is most pronounced when the dish is freshly prepared. For an elegant touch, you can serve it alongside a dollop of unsweetened whipped cream or a small scoop of vanilla bean ice cream. The temperature contrast between the warm pastry and the cold cream or ice cream adds a sophisticated element to the dessert that guests will appreciate.
When plating, use an offset spatula to lift the squares cleanly from the baking dish, ensuring the crust remains intact. If you are serving a crowd, consider cutting the danish into smaller, bite-sized squares, which makes it easier to handle for casual gatherings. Regardless of how you choose to serve it, ensure the squares are placed on individual dessert plates with a small fork. This simple, classic presentation highlights the layers of the pastry and makes the dessert feel special, whether served for a family breakfast or a dinner party.
Leftovers
Storage & make-ahead
- Fridge
- Store in an airtight container in the refrigerator for up to 3 days. Ensure the dish is completely cool before covering to prevent excess condensation.
- Freezer
- Freezing is not recommended as the texture of the crescent dough and the cream cheese layer will be significantly compromised upon thawing.
- Reheat
- Reheat individual portions in a 300°F (150°C) oven for 10 minutes until warmed through, or use a microwave for 30 seconds at a time until just warm.
To store any leftovers, allow the apple danish to cool completely to room temperature before covering the dish tightly with plastic wrap or transferring the portions to an airtight container. Keep the dish in the refrigerator to maintain freshness. Because of the cream cheese content, it is important not to leave the dessert at room temperature for more than two hours. When stored properly, it will remain fresh for up to three days, though the texture of the crust may soften slightly over time due to the moisture in the fruit.
Make ahead
This dish is best enjoyed fresh, but it can be assembled up to two hours in advance if kept in the refrigerator. If you need to prepare it earlier, it is recommended to keep the components separate until just before baking to prevent the crescent dough from becoming soggy. If you choose to assemble it ahead of time, place the dish directly from the refrigerator into the preheated oven, adding a few extra minutes to the total baking time to account for the cold starting temperature of the ingredients.
Questions
Frequently asked questions
Can this be made ahead of time?
While this dish is best served fresh from the oven, it can be assembled up to two hours in advance and kept in the refrigerator until you are ready to bake. If you prefer to prepare it earlier, keep the components separate until just before assembly to ensure the crescent dough does not lose its texture. If baking from cold, add approximately five minutes to the total baking time to ensure the center is thoroughly warmed and the crust is perfectly golden.
Why does the crust get soggy?
A soggy crust often results from the fruit filling having too much liquid or not baking long enough for the bottom layer to crisp. To avoid this, ensure the oven is fully preheated before placing the dish inside. Using a ceramic dish can also help by distributing heat more evenly, which encourages the dough to crisp rather than steam. If you find the crust is still too soft, try baking it on the lower rack of your oven to provide more direct heat to the base.
Is it possible to use fresh apples instead of canned filling?
Yes, fresh apples can be used, but they require preparation first. Peel, core, and thinly slice the apples, then toss them with sugar and cinnamon in a bowl. Sauté them briefly in a pan until they are just tender before spreading them over the cream cheese. This step is essential because fresh apples release a significant amount of liquid as they bake, which can make the crescent dough soggy if they are added raw. Cooking them first ensures the best texture for your finished danish.
What is the best way to slice this without making a mess?
The key to clean slices is allowing the danish to rest for at least five minutes after removing it from the oven. This brief cooling period allows the cream cheese and fruit filling to stabilize and set, preventing them from running when cut. Use a sharp, serrated knife to gently saw through the flaky crust, then press down firmly to cut through the soft center. Cleaning the knife with a damp cloth between cuts will also help keep the edges of each square looking sharp and professional.
Can different types of cheese be used for the filling?
Standard full-fat cream cheese is recommended for the most reliable and satisfying texture in this dessert. While other soft cheeses might be substituted, they often contain different moisture levels or fat contents that can affect how the filling sets during the baking process. Full-fat cream cheese provides the necessary richness and stability to hold the apple layer effectively without becoming overly runny or separating. Using a consistent, high-quality cream cheese ensures the best results for the final structure and flavor of the danish.
Everything in one place: the recipe card below gathers the ingredients, steps and estimated nutrition, ready to print.
Recipe card
Easy Apple Danish Crescent Bake with Cream Cheese Filling
Transform simple pantry staples into a warm, inviting treat with this apple danish crescent bake. A buttery, flaky base meets a smooth cream cheese layer and tender spiced apples, creating the perfect balance of textures for any gathering.
- Prep
- Cook
- Rest
- Total
- Servings
- one 9x13-inch baking dish
Ingredients
- 2 cans refrigerated crescent roll dough, store-bought or made ahead
- 2 blocks (8 oz each) cream cheese, softened
- 1 can (21 oz) apple pie filling
Instructions
Prepare the base. Preheat your oven to 350°F (175°C). Take one can of the refrigerated crescent roll dough and unroll it carefully to cover the bottom of your 9x13-inch ceramic baking dish. Use your fingers to press the dough seams together firmly, ensuring the bottom is completely sealed and flat so the filling remains contained during the baking process.
Add the creamy layer. Place the softened cream cheese into a medium mixing bowl and stir it until smooth and spreadable. Transfer the cream cheese mixture onto the layer of crescent dough in the baking dish. Use an offset spatula or the back of a large spoon to spread the cream cheese evenly over the entire surface of the dough, leaving a small margin at the edges if preferred.
Layer the fruit. Open your can of apple pie filling and spoon the contents directly over the cream cheese layer. Carefully distribute the apple slices and syrup across the dish, using the back of your spoon to gently level them out. Ensure the fruit is spread into an even layer so that every portion of the finished bake contains a generous amount of filling.
Bake to perfection. Place the baking dish into the preheated oven and bake for approximately 25 minutes. Watch for the edges of the dough to turn a deep golden brown and for the fruit filling to become bubbly and fragrant. Once finished, remove the dish from the oven and allow it to cool on a wire rack for at least 5 minutes before slicing and serving.
Allergens: Gluten, Milk
Nutrition (estimated, per serving)
- Calories
- 320 kcal
- Protein
- 5 g
- Carbs
- 38 g
- Fat
- 17 g
- Fiber
- 1 g
- Sugar
- 18 g
- Sodium
- 450 mg
Estimates only: values vary with brands, substitutions and portion sizes.
Recipe by EasyCooks Kitchen · easycooksrecipes.com
Share this recipe
Send it to someone who’d love it, or save it for later.
Spotted a mistake in this recipe? Let us know.
Keep cooking


