Apple Fritter Biscuit Bake — One Pan, No Frying
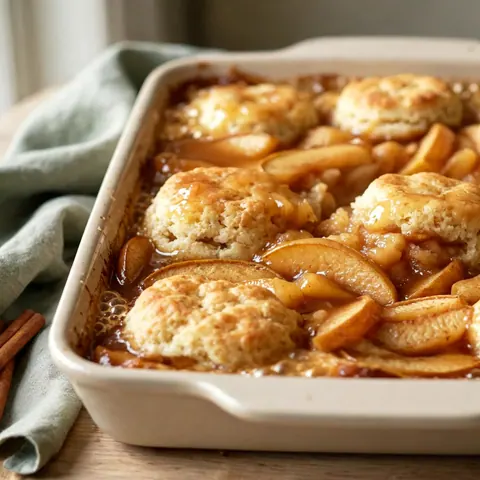
Refrigerated biscuit dough bakes into cinnamon apple pie filling with a brown sugar butter drizzle, turning out golden, fritter-style squares in about forty minutes.
Published Updated 13 min read
- Total time
- Prep
- Cook
- Rest
- Serves
- 12
- Makes one 9x13-inch baking dish
- Cuisine
- American
- Calories
- 340
- per serving, estimated

On this page15 sections
Golden biscuit pieces bake right into a spiced apple filling until the edges bubble and the tops puff like fritters. Two cans of refrigerated dough, one can of apple pie filling, and a quick brown sugar butter do all the work. There is no frying, no yeast, and no fuss — just layer, drizzle, and bake. In about forty minutes, a warm spoonful of apple fritter comfort lands on the table.
Apple fritters are a weekend treat that most home cooks only get from a doughnut counter, mostly because frying dough in a pot of oil is a project. This bake takes the same idea — tender, cinnamon-dusted dough folded through cooked apples — and moves it to a single baking dish. Refrigerated biscuit dough is snipped into bite-size pieces, blanketed with cinnamon apple pie filling, and drizzled with melted brown sugar butter. In the oven, the pieces puff and brown while the filling settles into a thick, syrupy layer between them. The result tastes remarkably close to a fritter: crisp-edged, apple-studded, and glossy with caramel. It comes together in ten minutes of hands-on work, feeds a table of twelve, and asks for nothing more than a spoon and a warm dish straight from the oven.
The appeal
Why you’ll love it
The method works because biscuit dough and a wet fruit filling need exactly the same oven conditions. Refrigerated biscuit dough is engineered to puff quickly in a moderate oven, and 350°F gives it enough time to rise and brown before the bottom dries out. Nestled in the dish instead of spread apart, the pieces steam a little from the apples below while their tops dry out enough to color, so each piece lands somewhere between a fritter's crisp exterior and its tender middle. The apple filling bakes down into that space, thickening as its moisture evaporates and its natural pectin sets.
The brown sugar butter is the second half of the trick. Butter carries the sugar and cinnamon into every gap between the dough pieces, so instead of a dry topping the dish bakes with a caramel layer running through it. Brown sugar brings molasses, which deepens the flavor the way a long-cooked fritter glaze does, in a fraction of the time. As it bakes, the butter keeps the syrup from setting into a hard candy and instead leaves it glossy and spoonable, bubbling at the edges exactly where the biscuit pieces have browned most.
What you need
Ingredients
Makes one 9x13-inch baking dish.
Brown sugar butter
Contains:
- Gluten
- Milk
- Soy
Tools
Equipment
- 9x13-inch ceramic or glass baking dish
- Small saucepan
- Spoon
- Small pitcher or measuring cup
- Sharp knife
- Cutting board
Swaps
Substitutions
Instead ofRefrigerated biscuit dough
UseHomemade buttermilk biscuit dough works the same way; cut it into bite-size pieces and use about 2 lb for the same dish.
Instead ofApple pie filling
UseSimmer 5 cups peeled, sliced apples with 1/3 cup sugar, 1 tsp cinnamon and a splash of water until thickened, then cool slightly before layering.
Instead ofBrown sugar
UseUse 1/2 cup granulated sugar with 1 tbsp molasses stirred in for the same deep caramel flavor.
Instead ofGround cinnamon
UseApple pie spice swaps in perfectly and adds a gentle note of nutmeg and allspice.
Good to know
Notes
Choose the flaky-layer style of refrigerated biscuit dough if there is a choice; its layers split apart in the oven and give more of the shaggy, fritter-like texture. Buttermilk-style rounds work perfectly well too. For the filling, a standard 21-ounce can of cinnamon-spiced apple pie filling is the whole point of the shortcut — the slices are already tender and the gel already thickened. If the filling available is very chunky, give it a few quick chops with a knife so the slices distribute evenly through the dish.
A ceramic or glass 9x13-inch dish is ideal because it heats gently and shows the bubbling edges; a dark metal pan browns faster, so check five minutes early. The brown sugar butter is easiest to drizzle from a small pitcher or a liquid measuring cup with a spout. As for swaps, homemade biscuit dough, cooked fresh apples, and apple pie spice all work — the full substitutions list covers each one. Keep the butter drizzle even, because it is what turns plain dough into something that tastes fried.
Prep
Before you start
Pull everything onto the counter before starting: both cans of biscuit dough, the can of apple pie filling, the butter, brown sugar, and cinnamon, plus the baking dish, a small saucepan, a sharp knife, and a small pitcher for drizzling. Butter the dish thoroughly, including the corners, since the syrup caramelizes along the edges and sticks hardest there. Heat the oven to 350°F (175°C) with the rack centered so air circulates around the dish. Open the biscuit cans just before cutting — cold dough snips cleanly, so work quickly once they are open. Give the apple filling a quick stir in the can or a bowl so the slices and gel are evenly mixed before spooning.
Step by step
Method
Phase 1
Layer the dough and apples
Step 1: Heat the oven and grease the dish
Heat the oven to 350°F (175°C). Butter a 9x13-inch ceramic or glass baking dish, getting into the corners where the syrup tends to catch. A light, even coating keeps every piece of biscuit from sticking and makes cleanup far easier once the sugar has baked on.
Look for: The oven reads 350°F on the dial or thermometer before anything goes in.
Tip: Set the rack in the center position so the bottom browns without the top catching first.
Step 2: Cut the biscuits into bite-size pieces
Open the cans of refrigerated biscuit dough and separate the rounds. Cut each biscuit into four to six bite-size pieces with a sharp knife. Scatter the pieces in an even layer over the bottom of the prepared dish, filling it edge to edge but leaving a little breathing room between pieces.
You’ll need: refrigerated biscuit dough
Look for: Every biscuit piece sits flat on the dish bottom in a single, even layer.
Tip: Kitchen shears snip the cold dough even faster than a knife and keep the pieces tidy.
Step 3: Spoon the apple filling over the dough
Spoon the apple pie filling evenly over the biscuit pieces, nudging the apple slices around so they distribute across the whole dish rather than pooling in one spot. A few slices in every bite is the goal; the filling will settle and spread as it bakes.
You’ll need: apple pie filling
Look for: Cinnamon apple slices dot the entire surface with no bare patches of dough.
Tip: Scrape the thick, spiced gel from the can in as well — it thickens into the syrupy base.
Checkpoint
At the end of this phase, the dish is buttered, the biscuit pieces are snipped small and spread in one even layer, and the apple filling covers them without bare patches of dough showing through. The dish should look generously full but not crowded, since the dough expands as it bakes. Give the surface a final check for evenness — a thick cluster of apples in one corner bakes differently from a bare spot elsewhere. The kitchen should already smell faintly of cinnamon from the filling. Nothing goes into the oven until the filling is spread, because the drizzle follows quickly and the dish needs to go in promptly.
Phase 2
Brown sugar butter and assembly
Step 4: Make the brown sugar butter
Melt the butter in a small saucepan over medium heat. Whisk in the brown sugar and ground cinnamon and stir for about a minute, just until the sugar dissolves into the butter and the mixture turns glossy and smooth. Pull it off the heat as soon as it comes together.
You’ll need: unsalted butter · brown sugar · ground cinnamon
Look for: The butter mixture looks uniform and glossy with no grainy sugar at the bottom.
Tip: Do not let it boil hard; overheated brown sugar butter can turn grainy as it cools.
Step 5: Drizzle and get the dish into the oven
Pour the warm brown sugar butter into a small pitcher and drizzle it evenly over the apples and biscuit pieces, sweeping side to side so every corner gets some. Transfer the dish straight to the center rack of the oven and close the door promptly.
You’ll need: unsalted butter · brown sugar · ground cinnamon
Look for: A thin amber ribbon of butter coats the whole surface of the dish.
Tip: Drizzle while the butter is warm; it flows into the layers instead of sitting on top.
Checkpoint
The butter mixture should be completely smooth and glossy, with the brown sugar fully dissolved and no grainy sediment in the pan — if it looks separated, stir off the heat for another thirty seconds. Drizzled over the dish, it should leave a thin amber sheen across the entire surface, running into the gaps between the dough pieces. The assembled dish goes into the oven immediately, which is why the butter is made last. Before closing the door, confirm the rack is centered and the dish sits level; an off-center dish browns unevenly, and a tilted one pools all the syrup on one side.
Phase 3
Bake, rest, and serve
Step 6: Bake until puffed and golden
Bake for 30 to 35 minutes, rotating the dish once halfway through. The biscuit pieces puff and turn golden brown, the apple slices soften into the dough, and the syrup thickens and begins to bubble gently at the edges of the dish.
You’ll need: refrigerated biscuit dough · apple pie filling
Look for: Deep golden tops, thick syrup bubbling at the edges, and a cinnamon-butter smell filling the kitchen.
Tip: If the tops color early, lay a sheet of foil loosely over the dish for the last few minutes.
Step 7: Rest the bake briefly
Set the dish on a wire rack and let it rest for 5 minutes. This short wait lets the bubbling syrup settle back through the layers and thicken slightly, so every spoonful lifts cleanly instead of sliding off the serving utensil.
Look for: The surface stops actively bubbling and the syrup clings to the biscuit pieces.
Tip: Rest longer, up to 10 minutes, for cleaner squares that hold together when cut.
Step 8: Scoop and serve warm
Spoon the bake straight from the dish while it is still warm, making sure each serving gets biscuit pieces, apple slices, and a little of the syrup from the bottom. It is at its best in the first half hour, when the tops are still crisp at the edges.
Look for: Steam rises from the first spoonful and the edges still glisten with syrup.
Tip: Warm the serving spoon under hot water first so it glides through without dragging.
Checkpoint
Out of the oven, the biscuit pieces should be puffed to roughly double their raw size, golden brown on top, and crisp at the edges where the syrup pooled. The filling should be bubbling thickly at the sides, not thin or watery, and the whole dish should glisten. After the 5-minute rest, the surface stops bubbling and the syrup clings to the dough instead of running. Scoop a test spoonful from the center: the dough should be tender all the way through with no dense, raw-tasting core. If the center still seems underbaked, return the dish to the oven for 5 more minutes before serving.
Doneness
How to tell it’s done
The bake is done when the biscuit pieces have puffed noticeably and turned a deep, even golden brown on top, with no pale, doughy-looking patches on the surface. The syrup should be thick and actively bubbling in a slow, glossy way around the edges of the dish — thin, watery juice means it needs more time. The apple slices should look soft and collapsed into the layers rather than sitting on top. A knife slipped into the center of the dish should meet tender dough with no wet resistance, and the whole pan should smell of caramelized cinnamon and butter. Total bake time is typically 30 to 35 minutes at 350°F (175°C), with the dish rotated once.
Avoid these
Common mistakes
The most common slip is cutting the biscuit pieces too large; chunks bigger than bite-size stay doughy in the middle by the time the top browns. Keep every piece to four to six cuts per biscuit. Second, do not skip buttering the dish — the sugar syrup welds itself to dry ceramic and makes serving a chore. Third, resist overbaking in pursuit of extra-crisp tops; once the edges bubble and the tops are golden, the texture is right, and longer baking only dries the apples. Finally, drizzle the brown sugar butter while it is still warm. Let it sit, and it stiffens into a paste that sits on the surface instead of running through the layers.
Better results
Tips
Tip 1
Cut the biscuit pieces last and get the dish into the oven quickly. Cold dough rises with more lift than dough that has warmed on the counter, and lift is what gives the bake its fritter-like texture. If the kitchen is warm, keep the second can in the refrigerator while the first is being cut. When drizzling, sweep the pitcher side to side across the whole dish rather than pouring in one spot; the syrup should reach every corner, because the butter is what browns the edges and keeps the middle from drying out.
Tip 2
The dish rewards a watchful eye in the final ten minutes. Colors deepen fast once the sugar syrup reduces, so rotate the pan at the halfway mark and again if one side browns ahead of the other. If the tops look done while the center still seems pale, tent loosely with foil and give the center a few extra minutes — the foil protects the color while the middle finishes. Serve with the same spoon used for testing, warmed under hot water, and let people scoop straight from the dish; the crisp edges are worth keeping intact as long as possible.
Make it yours
Variations
Pear and ginger
Swap the apple pie filling for pear pie filling and whisk 1/2 tsp ground ginger into the brown sugar butter along with the cinnamon. The pears melt into the dough even more than apples do, and the ginger gives the syrup a gentle warmth.
Cinnamon sugar topping
Stir 2 tbsp granulated sugar with 1 tsp cinnamon and sprinkle it over the dish right after the butter drizzle. It bakes into a thin, crackly crust on the puffed tops, adding a doughnut-shop finish without any extra step.
Cherry version
Replace the apple filling with a 21-ounce can of cherry pie filling and keep the brown sugar butter as written. The tart cherries cut through the sweetness, and the deep red filling against the golden biscuit tops makes a striking dish.
Small-batch bake
Halve everything and use an 8x8-inch dish. The bake time drops to about 25 minutes, so start checking at 20. Same layering, same drizzle — just a cozier portion for a smaller table.
On the table
Serving suggestions
Serve the bake warm, straight from the dish, with a large spoon so each portion lifts out with biscuit pieces, apple slices, and syrup together. It fits naturally at a weekend breakfast or brunch table, where the dish can sit in the middle of the table and be emptied scoop by scoop. A cup of hot coffee alongside is the classic pairing, and the cinnamon-butter aroma makes the whole kitchen part of the meal.
If there is any left after the first pass, warm individual portions briefly and serve them as a simple dessert. The glossy syrup and tender apple layers stand on their own without any addition, and the crisp-edged corner pieces are worth claiming early. Set the dish on a trivet and let everyone help themselves — the bake is at its most inviting when the steam is still rising and the edges are still bubbling.
Leftovers
Storage & make-ahead
- Fridge
- Cover and refrigerate within 2 hours of baking; keeps up to 3 days.
- Freezer
- Freeze cooled portions in an airtight container up to 2 months; thaw overnight in the refrigerator.
- Reheat
- Warm portions in a 300°F (150°C) oven for 10 minutes, or microwave in 20-second bursts until heated through.
Cool the bake on a wire rack, then cover the dish or transfer leftovers to an airtight container once no more than 2 hours have passed — the sugary syrup holds heat longer than it seems, but it should still be refrigerated within that window. It keeps in the refrigerator for up to 3 days. The biscuit pieces soften as they sit and absorb the syrup, so day-two portions are softer and more pudding-like than the fresh bake, which many cooks consider a fair trade for how quickly it disappears.
Make ahead
Assemble the bake up to the point of the butter drizzle, cover the dish tightly, and refrigerate it for up to 8 hours. Make the brown sugar butter fresh just before baking, since it stiffens as it cools and is hard to drizzle once set. Cold-from-the-refrigerator dough actually bakes up with a bit more lift, so there is no penalty for the overnight rest. When baking from cold, add 5 to 8 minutes to the bake time and check the center with a knife before pulling the dish, since the chilled filling slows the middle down.
Questions
Frequently asked questions
Can this apple fritter biscuit bake be made ahead?
Yes, up to the drizzle. Layer the biscuit pieces and apple filling in the buttered dish, cover tightly, and refrigerate up to 8 hours. Make the brown sugar butter fresh just before baking so it drizzles properly, then add 5 to 8 minutes to the bake time since the chilled filling slows the center down.
Why is the middle of the bake still doughy?
The usual cause is biscuit pieces cut too large, which keeps the centers raw even after the tops brown. Cut each biscuit into four to six pieces. If the middle still seems underdone at the end of the bake time, tent the dish with foil and give it 5 more minutes so the tops do not darken further.
Can a different fruit pie filling be used?
Absolutely. Cherry, peach, and pear pie fillings all work with the same method and the same brown sugar butter. Stick with a 21-ounce can so the ratio of filling to dough stays right, and spread the slices evenly so the bake sets uniformly across the dish.
What size baking dish works best?
A 9x13-inch ceramic or glass dish is the target. Smaller and the pieces crowd together and steam instead of browning; larger and the layer thins out and dries. A dark metal pan browns faster, so if that is what is on hand, start checking the bake about 5 minutes early.
Can this be frozen after baking?
Yes. Cool the bake completely, then wrap portions tightly or use an airtight container and freeze up to 2 months. Thaw overnight in the refrigerator and reheat in a 300°F (150°C) oven for about 10 minutes to bring back some of the crisp edges before serving.
Everything in one place: the recipe card below gathers the ingredients, steps and estimated nutrition, ready to print.
Recipe card
Apple Fritter Biscuit Bake — One Pan, No Frying
Refrigerated biscuit dough bakes into cinnamon apple pie filling with a brown sugar butter drizzle, turning out golden, fritter-style squares in about forty minutes.
- Prep
- Cook
- Rest
- Total
- Servings
- one 9x13-inch baking dish
Ingredients
- 2 cans (16.3 oz each) refrigerated biscuit dough, cut into bite-size pieces
- 1 can (21 oz) apple pie filling, cinnamon-spiced
Brown sugar butter
- 1/2 cup unsalted butter, melted
- 1/2 cup packed brown sugar
- 1 tsp ground cinnamon
Instructions
Heat the oven and grease the dish. Heat the oven to 350°F (175°C). Butter a 9x13-inch ceramic or glass baking dish, getting into the corners where the syrup tends to catch. A light, even coating keeps every piece of biscuit from sticking and makes cleanup far easier once the sugar has baked on.
Cut the biscuits into bite-size pieces. Open the cans of refrigerated biscuit dough and separate the rounds. Cut each biscuit into four to six bite-size pieces with a sharp knife. Scatter the pieces in an even layer over the bottom of the prepared dish, filling it edge to edge but leaving a little breathing room between pieces.
Spoon the apple filling over the dough. Spoon the apple pie filling evenly over the biscuit pieces, nudging the apple slices around so they distribute across the whole dish rather than pooling in one spot. A few slices in every bite is the goal; the filling will settle and spread as it bakes.
Make the brown sugar butter. Melt the butter in a small saucepan over medium heat. Whisk in the brown sugar and ground cinnamon and stir for about a minute, just until the sugar dissolves into the butter and the mixture turns glossy and smooth. Pull it off the heat as soon as it comes together.
Drizzle and get the dish into the oven. Pour the warm brown sugar butter into a small pitcher and drizzle it evenly over the apples and biscuit pieces, sweeping side to side so every corner gets some. Transfer the dish straight to the center rack of the oven and close the door promptly.
Bake until puffed and golden. Bake for 30 to 35 minutes, rotating the dish once halfway through. The biscuit pieces puff and turn golden brown, the apple slices soften into the dough, and the syrup thickens and begins to bubble gently at the edges of the dish.
Rest the bake briefly. Set the dish on a wire rack and let it rest for 5 minutes. This short wait lets the bubbling syrup settle back through the layers and thicken slightly, so every spoonful lifts cleanly instead of sliding off the serving utensil.
Scoop and serve warm. Spoon the bake straight from the dish while it is still warm, making sure each serving gets biscuit pieces, apple slices, and a little of the syrup from the bottom. It is at its best in the first half hour, when the tops are still crisp at the edges.
Allergens: Gluten, Milk, Soy
Nutrition (estimated, per serving)
- Calories
- 340 kcal
- Protein
- 4 g
- Carbs
- 48 g
- Fat
- 15 g
- Fiber
- 2 g
- Sugar
- 22 g
- Sodium
- 420 mg
Estimates only: values vary with brands, substitutions and portion sizes.
Recipe by EasyCooks Kitchen · easycooksrecipes.com
Share this recipe
Send it to someone who’d love it, or save it for later.
Spotted a mistake in this recipe? Let us know.
Keep cooking


